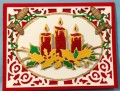
Cutting and assembling the candles were a challenge until I found this tip from Joan's Garden about using packing tape on the back of the red candle before cutting. See her tip at http://www.atjoansgardens.com/2013/09/this-weeks challenge_26.html
Cut Red Cardstock 8 ½" x 5 ½" for the card base. (1 piece of cardstock makes 2 cards). Score at 4 ¼ and fold.
Cut white cardstock into two 4 ¼" x 5 ½" pieces. Cut 2 of the "Filigree Frame" out of White Cardstock. Add gold glitter around the center using a Sakura Quickie Glue Pen. Adhere the filigree to the red cardstock base using Krylon Spray Adhesive.
The "Pinecone Corner" is cut using "Cricut "Joys of the Season" - Pine Cone Corner Spray. Use Sakura Silver jellyroll pen to mark the individual cones on the pinecone. Then use your dark Brown fine point pen draw the individual cones above the silver pinecones. Use Sponge Dauber to sponge the edge of Pine Cones in Dark Brown ink. Cut the stem out of green and glitter using Sakura Quickie Glue Pen with a Pinpoint Roller and glue to upper right and left corners.
Date: Friday, December 9, 2016 GMT Views: 403
Favorited:4
Paper: White, Red, Green, Shimmer Gold, and Light Brown
Paper Size: 5 1/2" x 8 1/4"
Ink: Dark Brown
Accessories: Glowing Candles by Memory box; Spellbinders A2 Filigree Delight S5-177; Krylon Spray Adhesive; Sakura Fine Tip Silver "Gelly Roll Pen; Packing Tape; Dark Brown Fine tip Marker; Cricut "Joys of the Season" - Pine Cone Corner Spray; Elizabeth Craft Green Gl