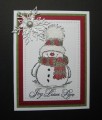
After I photographed this card I realized I hadn't quite finished it, It looks better outlined with a grey copic pen and 3D lacquer on the nose and coal buttons. I am famous for getting ahead of myself! I drew the texture on the scarf with a black micropen.....all those hours I spent trying to learn Zentangle finally paid off. I colored scarf and hat by scribbling distress markers on my craft mat and picking up the color with an aqua pen. I will probably make some other colors of "Snowy" just because I love him so. By the way, after getting him all flocked and colored I turned him over on a thick rubber mat, spritzed him "O so lightly" with water and used a ball stylus to push out his colored hat, scarf, nose, buttons and arms. Just a little touch that doesn't really show up in the picture but makes him look a little 3D in person.
Date: Tuesday, October 11, 2016 GMT Views: 829
Favorited:5
Accessories: 3D crystal lacquer, Fun Flock, ball stylus, Aqua brush and markers, snowflake die and punch, SB pierced rectangle die, black micropen silver glitter dot
Techniques: Stamping, painting with markers and aqua brush, using Fun Flock
Splitcoast Dirty Dozen Alumni Proud Fan Club Member Splitcoast Challenge Hostess Teapot Tuesday TEAm
Registered: April 18, 2011 Location: Melbourne, Aus Posts: 51844
Thu, Oct 13, 2016 @ 10:13 PM
Thanks for the stylus tip...brilliant. Beverley Sue every thing about Snowy is perfect. I love that you jazzed up his hat and scarf - I thought it was all in the stamp. This is absolutely fabulous my friend. TFS
------------------------------ Susie
Please don't take your organs to heaven - heaven knows we need them here.
How do you get the square around Snowy to be raised? The the paper piercing, but it looks like there is a square around him and the whole thing is raised up.