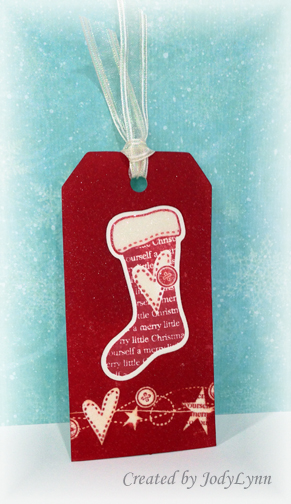
This is a tag I made for the 2014 Holiday Card Workshop at Online Card Classes. The emphasis of this session was tags.
I used two tags here - one for the die cut layer and one behind with the stamped image. I began with the top tag, stamping and embossing the border and die cutting the stocking. I aligned a second tag behind, securing with temporary adhesive and stamping the stocking through the die cut.
I first tried sponging the top tag but finally went direct to paper to get the depth of color I wanted. Unfortunately, the inkpad was pretty wet, and some of the color seeped behind the embossed border. This is the only one of four that I made that looks even halfway decent :( I misted it liberally with Shimmer Spritz to add some sparkle.
I added Glossy Accents to the cuff, heart and button of the stocking and sprinkled glitter over the top. When it was dry I attached the two tags with foam tape.
I like the design of this tag and will probably make more using colored cs and white ep for the front layer.
As always, thanks for looking!
Date: Monday, November 10, 2014 GMT Views: 599
Favorited:3
Registered: March 31, 2008 Location: Eastlake, OH Posts: 22598
Mon, Nov 10, 2014 @ 8:42 PM
What a process you used in designing this and I love it and love the stamps you used on it. Frankly, I would not have noticed the seeping ink if you hadn't mentioned it. It looks so fun to do too, except the direct to paper part. Even at a Michelle Zindorf class I bombed out of that one!