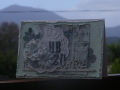
For the Inspiration Challenge I liked this pillow for the white on blue and the deer. Thanks for the challenge Stephanie!
My descriptions are always rather long and my reason for that is because my friend often cases my cards and itÂ’s much easier to write it out once than to try and remember which card she is asking about and what I used on it. And this description will also need a view at the blog post (link at the bottom) for photos which go with the wordsÂ…so Jan, just go there for these instructions.
I used a Dreamweaver metal tree stencil and 1 ½” EK Success circle punched from a sticky note for the moon. I secure my cardstock to the metal stencil with painters tape to avoid movement. The pink is sponged on first then the blue lightly over the pink and heavier as you go up. A tip for sponging: I place my ink pad on a piece of rubbery shelf liner (to avoid movement) close to my project. I use a back and forth rapid movement from ink pad to paper until I reached the desired color and I can have this panel inked up in a couple minutes or less.
After removing the moon mask, lightly sponge over the white circle.
The tiny stars are cut with the Cuttlebug die and glued to the card.
I got new tools:
I used the Perfect Tears from Perfect Paper Crafting to guide my tearing. These rulers arenÂ’t new to the crafting world but I never thought IÂ’d find a use for these tools but now that I have them I found I was wasting cardstock because I often tore more than once before I was satisfied with the shape but with the Perfect Tears I got it right on the first try. There are three rulers with two designs to each ruler and I used the two edges you see pictured below to make my tears and was able to flip the excess of the middle layer over to create the top two piece layer.
I also used the water pen which comes with the tools so my thick cardstock would tear easier. This also works when using vellum and will help the mulberry papers tear easier.
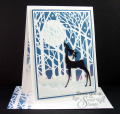
I lightly sponged snow with blue then each layer was heat embossed with Fantasy White embossing powder from SweetStamps and I avoided embossing the torn edge and the area the layer on top needed to attach to so the AleeneÂ’s tacky glue would stick. Love the shimmer of the glittered embossing powder!
I used the The Perfect Layers tools from Perfect Paper Crafting was used to cut the 1/16”borders. Note: the blue border is blue ink sponged on white cardstock.
For the Classy Deer from SweetStamps, I die cut three of them, the top layer is left as is and when it’s attached to the card panel it will slightly tuck under the first layer of snow, the second deer layer has the legs cut just beyond the middle snow layer and the bottom deer layer is cut just beyond the bottom snow layer. I then glued ¼” and 1/18” punched circles to the back of the body to compensate for the embossing powder thickness and as you can see it lies even on the card panel.
For the insert and envelope I only sponged blue and the stars are masked off with sticky note stars cut with the Cuttlebug die. I did the same procedure as the card front panel for the moon.
Registered: May 31, 2008 Location: Seattle Posts: 14509
Sat, Jun 22, 2013 @ 10:15 AM
Fabulous scene, Roxie! That may be the most precious deer die cut I've seen yet.
------------------------------ SCS Fan Club Member
Thrilled to have been Featured Stamper #132
Thrilled to be a Puchkateer! Musezi
Thrilled to have been Queen for the Day #166
Thanks SCSers for all your encouragement!
Registered: August 7, 2007 Location: North Carolina Posts: 28113
Sat, Jun 22, 2013 @ 4:01 PM
Oh this is a perfect take on the IC Roxie! Love the tree background!
------------------------------ MY GALLERY My BLOG
No card is complete without at least one cat hair
DT: Our Daily Bread designs
Happily a Fan Club Member Romans 6:23
Registered: December 15, 2011 Location: Abilene TX Posts: 11275
Sat, Jun 22, 2013 @ 8:57 PM
Fabulous card! So many details - I love the snowy foreground!
I write long descriptions, too, because I remember how much I appreciated having the details when I first started making cards. AND it gives me a record of what/ how in case I want to do it again, because the memory isn't what it used to be, lol! So, thank you!
------------------------------ JodyLynn - "Love me - love my cats!" DTGD12, DTGD14, HYCCT12, HYCCT13, HYCCT14, HYCCT15, Love Fest 2013, Love Fest 2014 CAS and CC guest designer QFTD 258