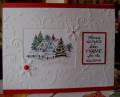
The frame layer is 4" x 7" overall. Cut the frame from the center with the rectangle die. Emboss the tree image on a separate piece of paper and attach to the back of the frame piece leaving room on the right side of the embossed layer. Glitter as shown and attach various snowflakes and pearls. Attach the ribbon and glue to a card base that is 5" x 7" folded with a 1" piece cut off of the top layer on the right side, so that the frame piece only fits that 4" x 7" part. The scored lines are done on the inside back of the cardstock, within that 1" space that shows when the card is closed.
Sizzix:
* 656939 Texture Fades Branch Tree & Tall Pine
Registered: March 11, 2007 Location: In my Garden in West Jefferson, Ohio Posts: 4278
Tue, Nov 09, 2010 @ 8:10 AM
Susie...........you never cease to amaze me with your talent.
Wish I could bring Western Michigan closer to Central Ohio so I could just set and watch you create !!
Into my favs.
------------------------------
GardenDiva AKA Tina DeLong
FS363 QFTD182
Fan Club Member & Tuesday Teapotter Hostess MMTPT222
Thyme began in a Garden. Jeremiah 29:11
Fabulous as always. I love all your cards, so simple but so elegant. And I really like that you post exactly what products you use. I have purchased several embossing folders that you used. Thanks for the inspiration.
Registered: July 11, 2004 Location: Troy, Michigan Posts: 10374
Tue, Nov 09, 2010 @ 8:59 AM
Uh oh, more enabling by you! I will now have to actually buy that Tall Pines embossing folder I've been contemplating. Gorgeous, Sue. I will make sure to find you next year at Novi, which I attend every year. TFS. Linda
------------------------------ Linda Art is the only way to run away without leaving home. -Twyla Tharp
Thanks for providing the information to order the embossing folder, I just ordered it! I love your cards, I get on your website almost everyday for inspirition. Keep up the great work!