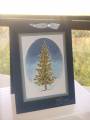
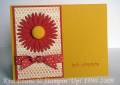
I saw a picture of a card in a Card Making Magazine that used this set and this technique. I replicated that card and then reinvented the idea with this card.
Basically, you create a frame with a shape - I've chosen an oval here. Then you stamp your image onto some Glossy white Cardstock. The Oval Frame is one part of your mask. You then stamp the image onto a post-it note and cut it out keeping both the image and the reverse of the image, that is, the piece that the image has been cut from. Place the Frame around your stamped image, then place your reverse image over the top so you can colour your image. Remove the reverse image and place the image mask over the image so you can colour the sky/surrounds - viola!!!!
I did this at my techniques class last week - and although the cutting out can take a while, the ladies LOVED the result.
Would love to know what you all think.
TFL
Cav
Date: Friday, August 14, 2009 GMT Views: 1414
Favorited:98
Registered: April 21, 2004 Location: Clark Fork, ID Posts: 12797
Sat, Aug 15, 2009 @ 2:01 PM
Your card is stunning. I love everything about it: the masking and reverse masking, the oval shape, the sky, the tree. I even like the little words that kind of get lost on your card.
Thanks for sharing your artwork and the technique.
------------------------------ Susie
Stampin' Up! demonstrator
Growing through challenges
Registered: March 5, 2007 Location: LaMoure, North Dakota Posts: 7723
Sat, Aug 15, 2009 @ 4:05 PM
Great make and take. I may have to CASE this for a class. Your coloring is amazing.
------------------------------ KAREN Now we see but a poor reflection as in a mirror; then we shall see face to face. Now I know in part; then I shall know fully, even as I am fully known. And now these three remain: faith, hope and love. But the greatest of these is love. 1 Corinthians 13:12-13