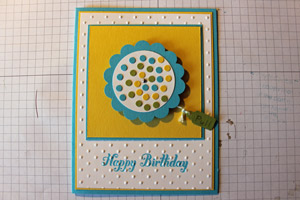
Zoetrope Card
by Michele Reynolds
Create the illusion of motion with a spinning piece.
Supplies
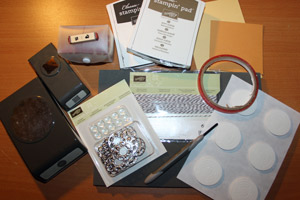
- Punches, or dies (2 3/8" Scallop Circle Punch, 1 1/4" circle punch and Petite Curly Label Punch used here)
- Cardstock, So Saffron and More Mustard used here
- Small stamp images, Stampin’ Up!’s Itty Bitties used here
- Inks, Soft Suede and Early Espresso used here
- Paper piercing tool
- Piercing mat
- Baker’s twine or other thin string (Early Espresso used here)
- Sticky strip, or other strong adhesive
- Shaker frames, or other dimensional adhesive
- Window sheets or transparencies
- Brads,Designer Builder Brads used here
- Big Shot die cutting machine, or other die cutting machine (optional)/li>
- Embossing folders optional
Step-by-Step
-
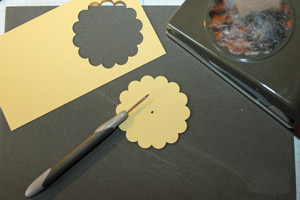
Step 1
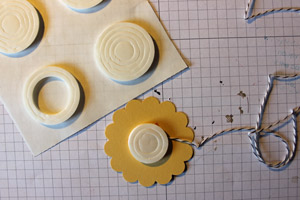
Punch a 2 3/8" Scallop Circle from card stock. Pierce a hole in the center of the circle for a brad . Do NOT insert a brad yet though.
-
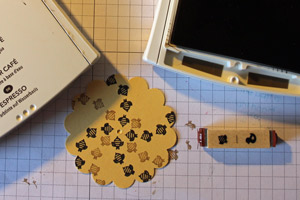
Step 2
Stamp small images in a spiral pattern radiating out from the center of the circle.
-
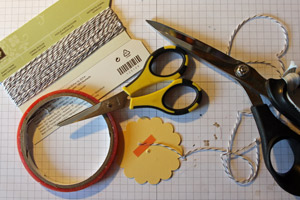
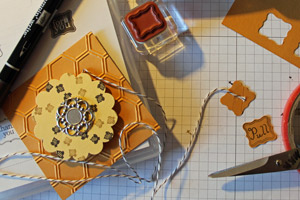
Step 3
Cut about 2 feet of Baker’s Twine. Adhere one end to the back of the stamped scallop circle near the center.
-
Step 4
Carefully remove the center circle and two smallest rings from one of the Shaker Frames. Do NOT separate the circles from each other. Adhere the circles to the back of the stamped scallop circle in the center by pressing the sticky side to the card stock.
-
Step 5
Cut a circle from a piece of Window Sheet about 1 1/4" in diameter.
Tip:
Punch a scrap of card stock with the 1 1/4" Circle Punch. Trace the circle onto the Window Sheet using a Sharpie Marker. Cut out the circle using Paper Snips.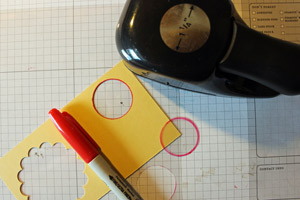
-
Step 6
Remove the protective backing from the Shaker Frame circles. Adhere the Window Sheet circle to the Shaker Frame circles.

-
Step 7
Cut a piece of card stock to 3 1/4" square.
Optional:
Dry emboss the square with an embossing folder of your choice.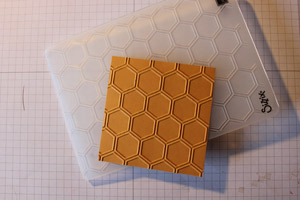
-
Step 8
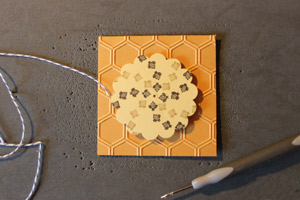
Cut a 1" square from a piece of Window Sheet. Adhere the Window Sheet square to the center of the card stock square.

-
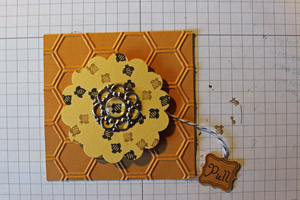
Step 9
Place the scallop circle with the Shaker Frames attached in the center of the card stock square with the right side up. Pierce a hole through all the layers using the original poked hole as a guide.
-
Step 10
Insert a brad through all the layers and secure it in place by folding the prongs flat.
Tip:
Brads with long prongs work best!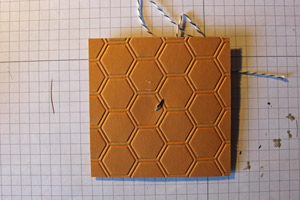
-
Step 11
Punch two identical, small shapes from card stock. Write or stamp the word “Pull” on each of them. Adhere the two shapes together around the loose end of the Baker’s Twine.
-
Step 12
Carefully wind the Baker’s Twine around the Shaker Frame pieces behind the scallop circle image. Leave the tag hanging free so it can easily be grabbed and pulled. Pull the tag to see the zoetrope effect. The faster you pull, the cooler it looks!
-
Step 13
Rewind the Baker’s Twine around the Shaker Frame pieces and finish the project.

Video!
Variations
-
Use small punched pieces instead of small stamped images to create the spiral pattern.
Your Turn
You've seen the tutorial, now you try it! We've got a section of the gallery set aside for Zoetrope Card. Try this technique, then upload your artwork to the gallery. Show us your creations!
***Please note - Internet Explorer/Edge is not a supported browser, and will not allow you to see the videos. Please use Chrome, Firefox or Safari to view our tutorial videos.

Questions and Comments
We'd love to get your feedback or questions. Leave your comment below.
Page 2 of 2 pages < 1 2