Mounting Unmounted Rubber Stamps

by Beate Johns

Get unmounted rubber stamps ready to use.

Supplies

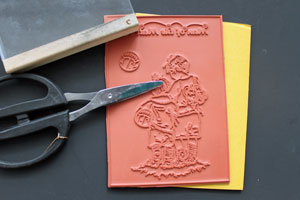
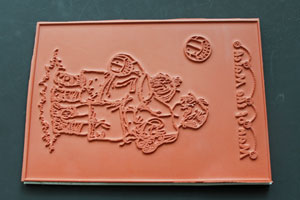
  • Unmounted Rubber Stamp Images, Flower Soft™ Moments in Time, Man of the Match used here

  • Repositionable Cushioning Sheet, Kling-On used here

  • Rubber Scissors

  • Acrylic Block

Step-by-Step

  1. Step 1

    Take a piece of repositionable cushioning sheet the size of your rubber stamp sheet and turn it foam size down.

    Start peeling off backing paper.

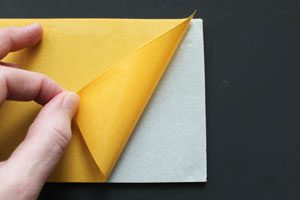
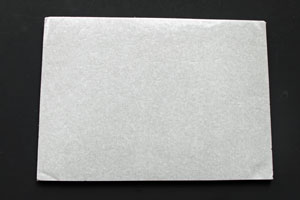
  2. Peel off paper completely.

  3. Step 2

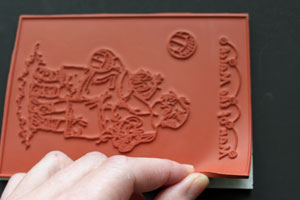
    Place your rubber stamp sheet over the cling foam.

  4. Press both layers together to make sure they stick together.
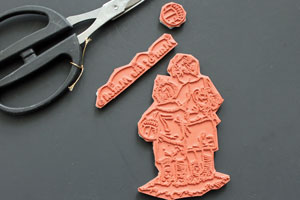
  5. Step 3

    Start trimming the rubber stamps closely with rubber scissors.

    Important:
    Only make straight cuts or you will undercut the rubber, taking away the support of the cushion.

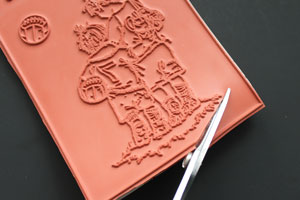
  6. Continue to trim your stamps until they are all cut out.

Video!

Variations

    Alternatives to Cling Foam:
    Instead of mounting your rubber stamps to cling foam, you can also trim them and attach them to an acrylic handle with
    -Double Sided Tape
    -Tacky Glue

    Storing Unmounted Stamps
    There are several storage solutions for unmounted stamps. You can keep them in empty CD cases, ring binders or in special storage containers. Some of them are:
    -ScrapOnizer
    -Storage boxes sold by Gina K. and Taylored Expressions

Questions and Comments

We'd love to get your feedback or questions. Leave your comment below.

Once you have peeled off the back of the ez mount and put it on the block, how do you store the stamp and keep the backing sticky so you can use it again. Do you put it on wax paper or the like?
janet  |  Wed Sep 22, 2010 at 9:45 AM
The wood blocks are discarded. The sticky side of the ezmount goes directly on the rubber stamp, this is permanent. The other side is called the cling side, it will just stay on the acrylic. I store these flat little stamps in cd cases that I bought at Office Max. Once you see how this works you will see that you can stamp the image first (let the ink dry!) before you attach it to the rubber. Then you can see exactly what you have. Hope this helps.
MaryJo Kuhn  |  Wed Sep 22, 2010 at 9:56 AM
If you use Tack n Peel, there would be no tackiness on the rubber itself, right? How do you get the rubber stamp to stick on your storage item of choice (ex. storage panels or cd cases)? Do you just have them thrown in together? If so, how do you know what you have?
Barbara  |  Wed Sep 22, 2010 at 9:04 PM
Hi
I thought there was a difference between Aileen's tacky glue and the tack it over and over? Can you use the normal brown Aileen's tacky glue the same way as the over and over one? Will it work on bigger stamps also? THANKS
Lizette  |  Tue Sep 28, 2010 at 8:29 AM
I just finished taking all of my stampscapes collection of stamps off the wood blocks. I bought the dollar store plastic chopping mats and cut them to fit in the plastic shoe box containers. put tack it over and over on the sheets and then put the stamps on it. I scanned the stamp image and put on the flip side of the mat. also scanned the images to put a folder together of what is in the box. I went from two big containers of stamps to one little one, much better for going away for the winter. As for the wood blocks, my grandson thinks they are great for building so maybe they can be donated to a child care or shelter of some sort if you don't have a little builder close by.
Jean  |  Wed Oct 13, 2010 at 6:43 AM
I just did all my wood mounted stamps with the Ammiki cling mount product and love it. I find it much easier to flip through the binders than all the boxes. With many SU sets, I got four or five on one storage sheet. Lots easier. . .now that the work is done!
suzi  |  Wed Oct 13, 2010 at 7:16 PM
You can use the wood blocks as an applicator for distrss ink. Just put a piece of Ranger foam on them. You can have one for every color!
Tamera  |  Wed Oct 13, 2010 at 7:42 PM
I am removing the wood mounts from my thousands of stamps and am finding that some work very well - but the ones with black mounting under the red rubber do not want to come off the back of the red rubber. Just spent l/2 hr on one stamp and still not clean. Also, I tried heating too much I guess and fried one of the rubber stamps trying to loosen the black gooey mess on the back. It all buckled and warped!! Thanks for any tips!
Joanne  |  Fri Dec 10, 2010 at 3:32 PM
Have been unmounting my wood blocks for over a year now (I have a ton of stamps and limited time) Nearly done, and I've found no one process works for all. The black mounting or red rubber are difficult to remove. Just heating in microwave and working with the pad of the finger to get all the goo off the stamp. The commercial goo removers are a go to for the extreme ones then washing with soap and water once...then condition with stamp conditioner. Some I use the ez mount on, I've tried a thinner version (personally like the cushioning) store in CD cases and even quit mounting the unmounted wood sets I picked up either new or used, just tapping the sticky side of the unmounted stamp onto my arm. The hair oils seem to temper the stickiness to make them great to use direct on the acrylic blocks...saw this on a utube video. I'm amazed at how much I've condensed my storage, now just to get them totally organized so I can find the ones I want when I want them...using CD baskets in a pantry shelf, but may check out the photo boxes for travel!! Thanks Beate for all of your pointers, been a long time follower.
Linda  |  Wed Jan 11, 2012 at 7:31 AM
Recycling wood blocks, I was reading some of the comments about ideas for the using them, I had a thought of making an artistic collection out of them, You could paint them, stamp an image of anything you have, then stack them. Then when you want to change that. You repaint and start over. I was thinking it maybe good for seasons or holidays. They can be in your craft area, or in your home, or even gifts. Maybe even baby names,or ABC's. Hope that gives you some ideas to re-use what you already have. Happy stamping!!
Kathy  |  Wed Jan 11, 2012 at 3:23 PM
I will take your wood blocks off your hands smile email me at shiba (dot) mom (at) gmail (dot) com
audrey  |  Mon Oct 29, 2012 at 3:00 PM
I am so confused!! I have purchased SU cling stamps and have found it very difficult to stamp with them. They don't stay on the acrylic blocks! Help please!
Ellen  |  Wed Feb 19, 2014 at 10:37 AM
Ellen - a few tips. If you don't put the sticker on them, they cling perfectly. If you like the sticker, try putting your stamp down on your work surface and pressing the acrylic block onto the stamp instead of the other way around.
lydia  |  Wed Feb 19, 2014 at 10:51 AM
Lydia, I do like the stickers and have tried pressing the stamps on with no luck. Thank you for your response.
Ellen  |  Wed Feb 19, 2014 at 9:53 PM
I Free cycled my wood blocks... they were picked up for craft projects.
LINDA  |  Sun Feb 23, 2014 at 11:07 AM
Lots of the wood-blocks are the same size as the Holtz Blending Tools, both the regular & mini. You can staple velcro on them& have a tool for each color or color family.
Sam Mann  |  Sat Oct 17, 2015 at 12:12 AM
Great ideas! Thank you all - even though this was all posted 8 years ago- I have been searching for just these ideas.

Happy to be back stamping after life changes made me retire for a while.
Wendy Poling  |  Thu Nov 22, 2018 at 1:12 PM

Page 2 of 2 pages  <  1 2

You need to be logged in to comment

GET OUR NEWSLETTER


Splitcoaststampers's privacy policy