T-Slide Card
by Kim Score
Create a slider card with a surprise message.
Supplies
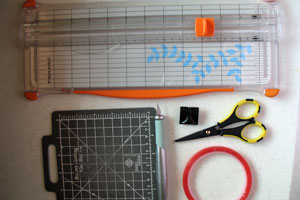
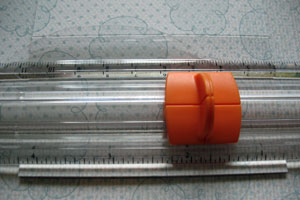
- Paper cutter with scoring blade
- Craft knife with cutting mat
- Sticky Strip™ or other strong adhesive
- 5 1/4" square of cardstock, or heavy patterned paper (card base)
- 5" square of cardstock, or heavy patterned paper (card front)
- 3 1/2" x 1 1/4" piece of cardstock, or heavy patterned paper (Inside sliding piece)
- 4" x 1" strip of cardstock, or heavy patterned paper (T-Slide mechanism)
- 4 1/4" x 1" strip of cardstock, or heavy patterned paper (T-Slide mechanism)
- Round tab punch or circle punch
- Additional cardstock, stamps, Ink and Embellishments to finish your card
Step-by-Step
-
Step 1
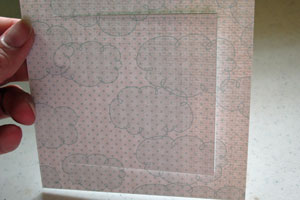
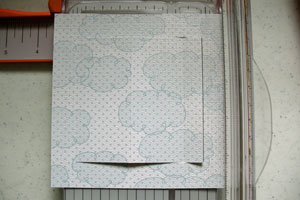
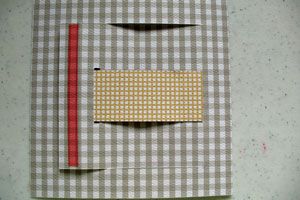
To begin, you will be cutting a "U" into the inside of the cardstock square at 3/4" from three sides of the square. To do this, line up the 5" piece of cardstock at the 3/4" mark of the paper cutter. Cut from 3/4" to the 4 1/4" mark.

-
Turn the cardstock clockwise to another side and follow the same steps. Turn the cardstock clockwise again, and follow the same steps. At this point, you will have 3 cut sides.
-
Step 2
Switch the blade on the paper cutter from the cutting to the scoring blade. Score the fourth side to complete the frame.
-
Step 3
Line up scored side of frame on the right side of cutting track (while the extended measurement arm of the cutter points to your left.)
Line up the left edge of the cardstock at the 2 3/4" mark and score between horizontal cut lines (3/4" to 4 1/4").
-
Move left edge of cardstock to 1 1/4" and score again from 3/4" to 4 1/4".
You should now have three scored sections on the inside of the frame. One 1/2" wide section adjacent to the cut side and two 1 1/2 wide sections.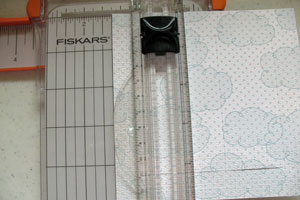
-
Step 4
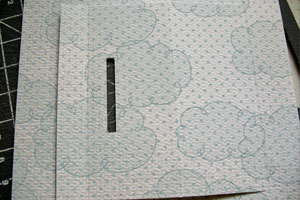
Put the cutting blade back in your paper cutter. Place the scored side of the frame to the LEFT of the cutting track. Line up the left edge of the cardstock at 3 3/8". Cut from 1 3/4" to the 3 1/8" mark.
-
Slide the left edge of the cardstock to 3 1/4". Cut the same slit as before.
-
Step 5
Use a craft knife to cut away the section created by the 2 parallel slits.

-
-
Step 6
Score the 3 1/2" x 1 1/4" piece of cardstock at 1/2". Add strong adhesive to the 1/2" scored end (right side up).
Stamp your greeting on the strip (if you don’t want your greeting to peek out when the card is closed, you will need to keep the greeting closer to the end with the score).
-
Step 7
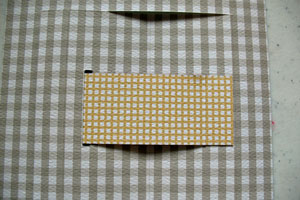
With the right side facing up, slide the greeting strip into the front slit as shown.

-
Turn the cardstock over and attach the end of the strip at the score line of the frame.
-
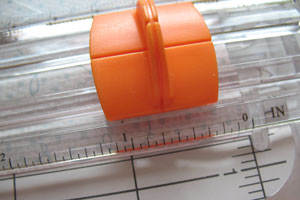
Step 8
Create a T-shaped slider by placing the 4" x 1" strip at the top and glue the 4 1/4" x 1" strip at the center. Attach a pull-tab at the end of the T-slide (sample uses the round tab punch, you can change that to a circle or scallop circle).

-
Step 9
Turn your 5” square piece of cardstock over and add adhesive along the 1/2” score line as shown.
-
Step 10
Attach the T-slide by lining up the left edge of the slide at the score line (make sure the side you want to show is facing down, try stamping another greeting on the slider as well).
Put strong adhesive around the outer edges. Make sure to leave a small gap on each side of the pull tab for clearance.
Note:
To prevent the pull tab from catching the edge of the cardstock when sliding back into place, add a thin dimensional or pop dot on each side of the pull tab before putting the backing piece in place. This will raise the cardstock slightly so the tab can freely slide in and out.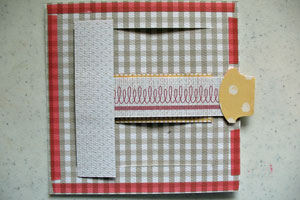
-
Step 11
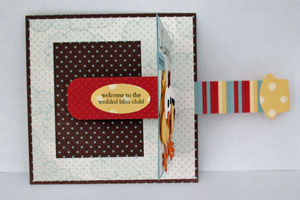
Attach slider card front to the 5 1/4” x 5 1/4" piece of cardstock. Attach card front elements over the slider front on either the left or right section. Don’t attach to both sections, or the card won’t open properly.

-
Step 12
Your card is now finished.

-
Video!
Variations
-
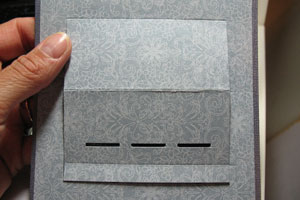
Triple T-Slide Card:
Follow the directions for making the basic T-Slider card. When you get to step 4, score 3 slots. Cut from at 1 1/8" to the 1 7/8", from 2 1/8" to 2 7/8" and from 3 1/8" to 3 7/8". Slide the whole piece 1/8" to the right on the cutter and repeat. Cut away the 3 slots.
Cut 3 pieces 3 1/2" x 5/8” and score one end at 1/2" on each piece.
-
Alternate card size:
For an A2 card, you will need the following size pieces:
5 1/2" x 4 1/4" backing piece
5 1/4" x 4" card front
2 3/4" x 1" slider mechanism
4 1/2" x 1" sider mechanism
1" x 3 1/2" message piece for the inside (you can vary the width as long as you have enough of a margin on each side)
Score a 3/4" margin all the way around for the frame.
Score at 2 1/2" (from the edge of the scored side) and 4 1/4". There will only be a 1/4" scored section left vs. the 1/2" section in the written instructions. If you want a 1/2" section, you could adjust the score marks by 1/8". I recommend doing that, as my sample doesn't seem to slide as nicely with only that 1/4" little piece on the end.
Cutting and Scoring Template for A2 card
Your Turn
You've seen the tutorial, now you try it! We've got a section of the gallery set aside for T-Slide Card. Try this technique, then upload your artwork to the gallery. Show us your creations!
***Please note - Internet Explorer/Edge is not a supported browser, and will not allow you to see the videos. Please use Chrome, Firefox or Safari to view our tutorial videos.

Questions and Comments
We'd love to get your feedback or questions. Leave your comment below.
Thanks so much for adding the video, Beate! That's so helpful!
http://www.paperpunchaddiction.com/2010/07/today-is-big-day.html
Super card
Love the card....
Elin K.
If you can't find my card, email me and I will send you my blog to visit.
Thank you for this tutorial it is terrific!!!!
Page 2 of 2 pages < 1 2