Tile Coasters
by Gina Krupsky
Create a set of coasters or trivets for gift giving.
Supplies
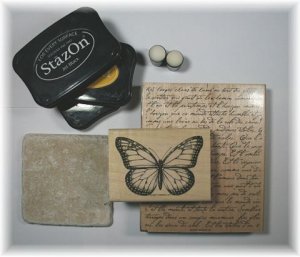
- Stazon Ink© in black and colors of your choice
- Background stamps
- Main image stamps
- Sponge daubers
- Porous tiles from your home improvement store
- Felt pads
Step-by-Step
-
Step 1
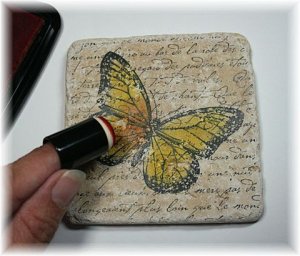
Begin by inking up your large background stamp with black Stazon™ ink and stamp your tile. Use a generous amount of pressure.
Don’t worry if your result is somewhat blotchy. This will give your tile an antique worn look!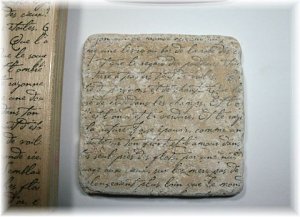
-
Step 2
Stamp your main image using black Stazon™ Ink. Again, make sure you use a considerable amount of pressure.
Allow the image to dry for about 10 minutes.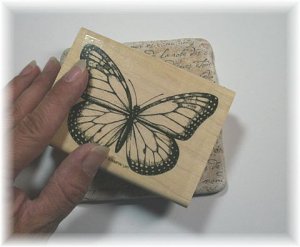
-
Step 3
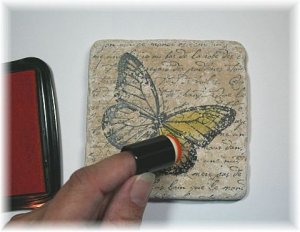
Using colored Stazon™ ink and a sponge dauber, begin to dab color onto your image. Do not rub, just dab.
-
Step 4
Use a second color to add depth. Allow the coaster to dry for about 10 minutes.
-
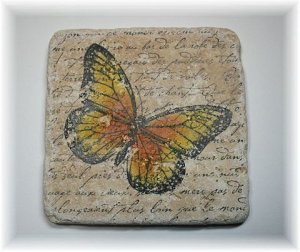
Finished Front of coaster.
-
Step 5
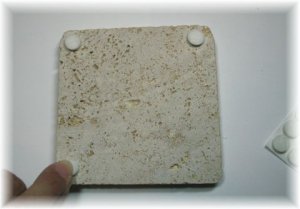
Add four small or medium felt pads to the corners of the underside of each coaster to protect furniture during use. These felt pads are available at your home improvement store as well.
-
Step 6
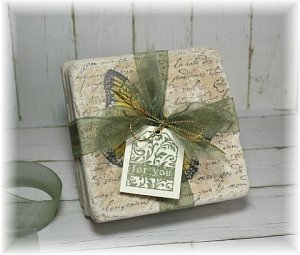
Make these in sets of four and group them together to give as gifts.
Your Turn
You've seen the tutorial, now you try it! We've got a section of the gallery set aside for Tile Coasters. Try this technique, then upload your artwork to the gallery. Show us your creations!
***Please note - Internet Explorer/Edge is not a supported browser, and will not allow you to see the videos. Please use Chrome, Firefox or Safari to view our tutorial videos.

Questions and Comments
We'd love to get your feedback or questions. Leave your comment below.
Thanks for any help or advice you may have.
Stacie
I stamped mine with StazOn, "painted" some with colored Stazon and some with SU! craft ink (pigment ink, not dye ink). I only baked mine and did not seal with anything, and they came out great. Using a few years, no fading, no color changes, etc.
When I baked, I believe I used about 250 degrees or so. Put the dry coasters in cold oven, turn on oven leave 20 to 30 minutes after getting to temp, turn oven off and let them cool in there. None cracked or broke, no color change.
Let me know if that works for anyone.
Just wanted to point out that the type of tile used makes all the difference regarding whether or not the ink stays set. Seems like a lot of the questions asked were related to ink smearing and that will happen with any tiles with a glaze or coating on them. Make sure you are using UNGLAZED floor tiles....otherwise the ink (regardless of what kind is used) can't penetrate the glaze and become permanent. I prefer the Botticino style of tumbled marble tiles. They are definitely unglazed and will hold the ink well....the other critical item is the type of ink used. Must be a permanent ink (StazOn is good, probably DecorIt as well...the old SU craft inks/pigment inks are good but must be heat set to remain permanent) or the color will bleed right into the tile and feather out/get blurry instead of staying crisp. As for the tiles if you use glazed tiles the colors will wipe off if you stamp directly on them. In that case, stamp on white tissue paper and color then mod podge the tissue paper onto the tile. Not as fast and easy but I have read craft instruction books which recommend this.
Personally, I prefer the tumbled marble to anything else. As for the backing to protect the tile, Gina showed the little stick on "feet" (cork or felt) on the corners and those work so well...easy to apply and inexpensive! I have read cautions about attaching a layer of cork to the entire back of the tile....with the porous "thirsty stone" type unglazed tiles the moisture can seep thru and if there is a porous backing like a square of cork or felt it can grow mold so using the little round tabs just on the corners is the best idea as it will protect furniture from scratching and prevent issues with mold/mildew.
Thanks for sharing this....I have always loved that butterfly image and the French Script combo!
Question, why do the tiles have to be baked? Or sealed if using Staz On ink? and if sealded, sealed with what? and if baked at what temp and how long? What does baking them do?
Page 4 of 4 pages « First < 2 3 4