Striped Wipe
by Beate Johns
Create patterned background with reinkers and baby wipes.
Supplies
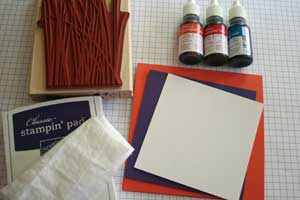
- Baby Wipe
- Two or more Dye Ink Reinkers
- Glossy Cardstock
- Stamps
- Ink
Step-by-Step
-
Step 1
Fold a baby wipe and add drops of reinker to the edge of the fold line.
Here, the baby wipe was folding in half twice.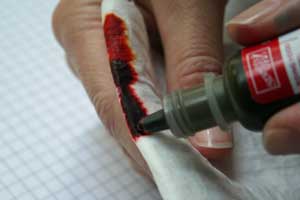
-
If you want a multicolored background, continue to add more colors.
Hint:
For smaller stripes, add a small dot of reinker.
For wider stripes, add longer stripes of reinker.
-
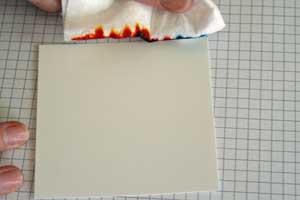
Step 2
Line the inked fold up with the edge of the glossy cardstock.
-
Step 3
Wipe the inked baby wipe over the glossy cardstock to create striped background.
-
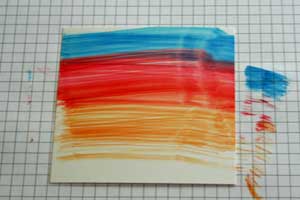
Step 4
Add more color, linking up the inked wipe with the existing stripes to intensify and even out the colors.
Continue to add color as needed.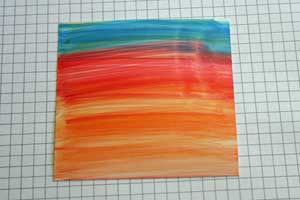
-
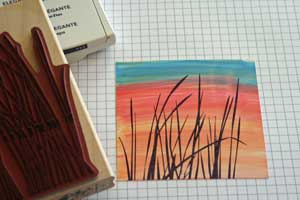
Step 5
Apply ink to stamp and stamp directly over the background.
-
Step 6
Finish your card.

Video!
Variations
-
Try the Tie Dyed Look
Fold your baby wipe up into a triangle and add ink. Twist the baby wipe. Untwist, lay baby wipe over glossy cardstock and press down.
Funky Retro
Add several colors of reinker on your folded baby wipe. Swipe the wipe in a circle to create a spiral look (like in the Bouncing Brayer tutorial).
Get creative
Try different patterns like crosshatch, waves, plaids.
Your Turn
You've seen the tutorial, now you try it! We've got a section of the gallery set aside for Striped Wipe. Try this technique, then upload your artwork to the gallery. Show us your creations!
***Please note - Internet Explorer/Edge is not a supported browser, and will not allow you to see the videos. Please use Chrome, Firefox or Safari to view our tutorial videos.
Questions and Comments
We'd love to get your feedback or questions. Leave your comment below.
One question though - when twisting the baby wipe how do you not get the ink on you?
You make it look so easy and your directions are cery clear..thanks a bunch
cheerios
Jennifer
Fold the baby wipe the same way but lay it over the flat end of a stamp pad, then add the reinker or use a marker to scribble the ink on in the same fashion as a spectrum pad is laid out. Then use it to swipe across the card. If it's hard to picture, there is a visual here: http://www.stampingvideos.com/2008/10/make-your-own-spectrum-pad.html.
My ink dried pretty much right away. Did you use dye ink refill or maybe pigment ink?
THANKS!
GOOOO WIIILLLDDDD!
Page 1 of 2 pages 1 2 >