Stamping on Metal
by Starla Nelson
Learn how to stamp on metal.
Supplies

- Thin mat, or piece of suede
- Acrylic mat
- Metal Sheet (Ten Second Studio used here)
- Refiner (metal or plastic) or stylus
- Paper stumps
- Stamps
- Stazon™ Ink (Metallic Gold used here)
- Lightweight spackling or embossing metal backing paste
- Strong double sided adhesive
Step-by-Step
-
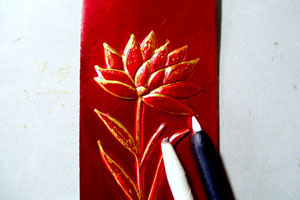
Step 1
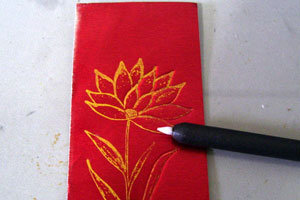
Stamp image onto the front of the metal using Stazon™ Ink. Let dry.
Optional:
Heat set with heat gun to speed up drying. WARNING: METAL WILL GET GET VERY HOT!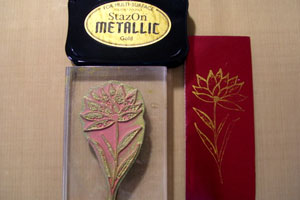
-
Step 2
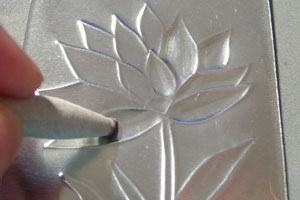
Place metal, image side up, on acrylic mat. Using the refiner or stylus, trace around the stamped image
-
Step 3
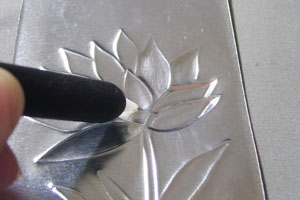
Turn the metal over to the back side and place on the thin mat or piece of suede. Use the paper stump to "puff" out the metal between the outlines of your image.
-
Step 4
Still working on the backside of the metal on the thin mat, use the refiner or stylus to detail the outline of the image even more.
-
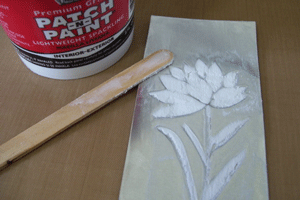
Step 5
Remove the the thin mat and replace with the acrylic mat. Working on the front side of the metal, use the paper stump to flatten the metal around the embossed image. You can use the refiner or stylus along the edges of the image to refine the detail even more.
-
Step 6
To prevent the puffed image from being flattened, fill the backside of the image with the spackling paste or embossing metal backing paste. If using the spackling, make sure you remove the excess spackling by sanding off the extra spackle around the outside of the image after the paste has dried.
-
Step 7
Apply the strong double sided adhesive to the back side of the metal.

-
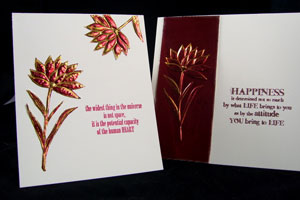
Adhere to your project.
Video!
Your Turn
You've seen the tutorial, now you try it! We've got a section of the gallery set aside for Stamping on Metal. Try this technique, then upload your artwork to the gallery. Show us your creations!
***Please note - Internet Explorer/Edge is not a supported browser, and will not allow you to see the videos. Please use Chrome, Firefox or Safari to view our tutorial videos.

Questions and Comments
We'd love to get your feedback or questions. Leave your comment below.
This is a must try technique, thanks so much!
Scissors work fine on the metal. I used paper snips for these flowers. Tim Holtz's Tonic scissors cut metal like butter, but don't fit into right areas as well. I have also used my regular paper cutter to cut strips of metal. The blade doesn't always slice smoothly ( of course, it could be I'm using an old blade!), but I just incorporate the edge in my design, if it works!
Thanks for sharing. I really like the effect, & it's good to know scissors will work well.
I do have a few questions, though. You mentioned the use of paper stumps & styluses. I have no idea what a paper stump is, & don't where I could get one, nor where I could get the right sort of stylus for this use.
You also mentioned filling in the back with either spackling paste or embossing metal backing paste. I have a few jars of embossing paste. Do you think these would fit the bill?
Cheryl mentioned in her comment that people could check out videos on her site for answers to FAQs, but didn't mention the site.
Finally, you mentioned Ten Second Studios for the metal & the double-sided adhesive. Once again, I'm not sure where to get products from Ten Second Studios.
Some clarification would be greatly appreciated.
Thanks again for sharing.
Great questions. I'll do my best to answer them all!
Paper stumps can be found in most craft stores, such as Michaels, in the drawing section. They are usually used to blend chalks or pencils.
If you ever did dry embossing with a light box, you may already have a stylus that would work to trace your image. Again, craft supply stores or your LSS should also have them.
I believe your embossing paste should work to fill the back of the image. I have never used it, but, I've seen it used, and don't see why it won't work!
Lastly, eclecticPaperie sells the TenSecond Studio products.
http://eclecticpaperie.com/tenseconds.html
You can also get the products directly from TenSecond Studios
http://www.tensecondsstudio.com/index.html
Both sell the metal, mat sets, paper stumps and beginning tool sets. The TSS site also has TONS of videos that show different ideas and techniques with their metal.
I hope I answered all your questions!
Haven't tried metal yet, but this has me excited about giving it a try. Thanks again for this nice tutorial!!!
Thanks,
Patty
HTH!
I think black stazon ink would look striking against the copper!
I've found that copper stands out well with turquoise or aqua. You could also try it with an olive or sage green. Basically, since copper is a warm color, you want to use cool colors (blues, greens, etc.) for contrast.
Page 1 of 2 pages 1 2 >