Stamping on Candles
by Jenni Mouer
Stamp tissue paper and melt it into your candle. Decorated candles make unique gifts.
Supplies
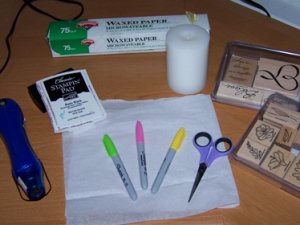
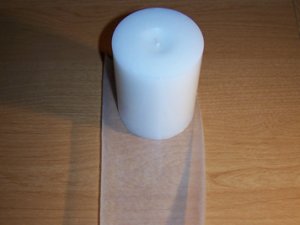
- Candle - preferably white or cream
- White Tissue Paper
- Stamps
- Ink Pads
- Markers or some other type of coloring medium
- Scissors
- Wax Paper
- Embossing Gun
Step-by-Step
-
Step 1
Stamp on tissue paper. Use images that can be colored-in or solid images, in the ink color of your choice.
Tip: Stamp extra images on the tissue in case of a mistake.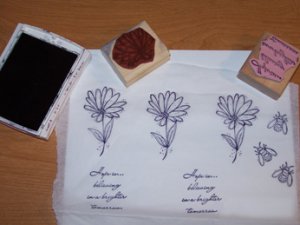
-
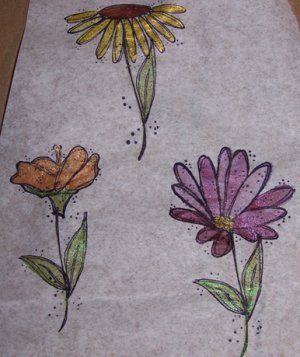
Step 2
Color in stamped images using some form of coloring medium, but be careful and test the medium used. With Twinkling H2O™s™ (as in this example), you will want to make sure your Aquabrush™ is not very wet but has a fair amount of watercolor on it. If you would prefer not to color just use a solid stamp with your choice of ink.
-
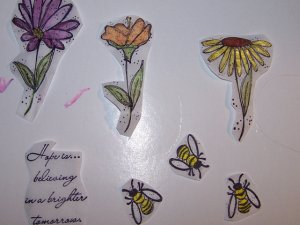
Step 3
Cut out your stamped images fairly close to the edges.
-
Step 4
Take a piece of wax paper and cut it so that it is not any taller than the candle being used and long enough so that it wraps completely around the candle and then some.
-
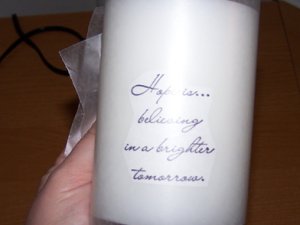
Step 5
Take your first stamped image and place it on the candle. Then place the wax paper on top and wrap the wax paper around the candle. Wing out the extra wax paper and pinch close with your fingers making sure the wax paper is tight against the candle.
-
Step 6
Heat up your embossing gun for 30-40 seconds until it is nice and hot. Moving quickly, wave it over the area where the stamped image is; be sure to keep the wax paper nice and tight. Every candle will have a different wax melting point, but you should see a change begin to take place within a few seconds. As the candle heats up, the pressure from the wax paper should push the image into the melting wax of the candle, embedding the image and leaving your image intact.
Slowly peel the wax paper off the candle. Remember: every brand is different so if you are switching between brands you may need to adjust your heating times a bit.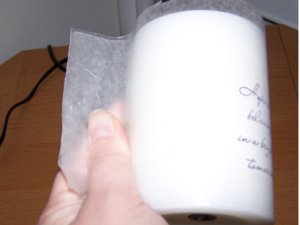
-
Step 7
Finish your candle.
You can do numerous images on one candle; just place another image and move the wax paper. It is best to try and not use the same spot on the wax paper for each image, but you can use 1 piece of wax paper numerous times.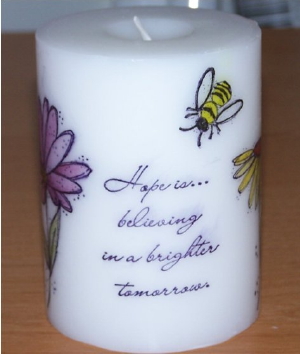
Video!
Your Turn
You've seen the tutorial, now you try it! We've got a section of the gallery set aside for Stamping on Candles. Try this technique, then upload your artwork to the gallery. Show us your creations!
***Please note - Internet Explorer/Edge is not a supported browser, and will not allow you to see the videos. Please use Chrome, Firefox or Safari to view our tutorial videos.

Questions and Comments
We'd love to get your feedback or questions. Leave your comment below.
Dear Sir/Madam,
We got your company information from the internet that you are one of the leading importers of Paraffin Wax in your country. We are glad to let you know that we can supply you with Paraffin Wax direct from the plants, in big quantities, at very competitive prices.
Al Nasheet is a well established chemical trading company in the Largest Trade Hub - United Arab Emirates with a slogan of "Chemical Distribution in the Four Corners of the world". Our company is servicing clients in diverse areas of industrial chemicals, synthetic and natural rubbers, rubber process aids, plastic polymers, lubricants and industrial solvents.
Kindly indicate the firm requirements of your esteemed organization so that we could forward you the technical data along with our best quotation for your kind consideration.
We would like to establish a long term relationship with your company.
Awaiting your kind replies.
With Best Regards,
______________
M.Talha Ismail
AL NASHEET TR L.L.C
SAJA INDUSTRIAL AREA,
BEHIND ZAID ROAD,
PLOT NO.2658, P.O.BOX 73303,
SHARJAH UNITED ARAB EMIRATES
Tel: +971-6-5262770
Fax: +971-6-5262780/+971-6-5614194
E-mail: [email protected]
You could try the same technique with a picture from a magazine. Cut close around it, place on candle, add wax paper over it and heat. The magazine image should melt/sink into the candle. But because it is an image you will see where the image ends, ykwim?
Page 3 of 3 pages < 1 2 3