Spring Card

by Sandy Hulsart

Proudly display a beautiful scene or meaningful sentiment on this fancy-fold card.

Supplies

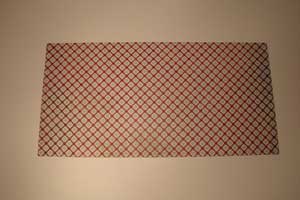
  • One piece of cardstock 5 ¼" x 10 ½"

  • Scoring tool

  • Pencil

  • Ruler

  • Scissors

Step-by-Step

  1. Step 1

    Fold paper in half, patterned sides together to make a 5 ¼" square.

  2. Step 2

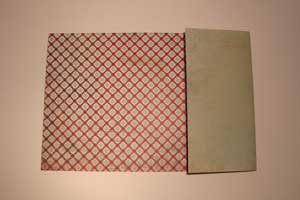
    Open the paper and with the patterned side up, fold the right side back to the center, creating a quarter fold on the right end.

  3. Step 3

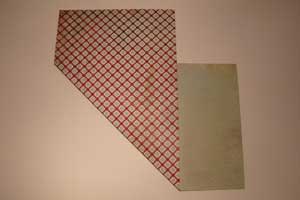
    Open the paper again, but with the patterned side down.

    Grab the lower left hand corner, pull it up and over until the lower edge is even with the score created in Step 2. Crease.

  4. Step 4

    Open the paper again, still patterned side down.

    Grab the top left hand corner, pull it down and over until the upper edge is even with the score created in Step 2. Crease.

  5. Step 5

    Open the paper, patterned side down to see the score lines.

    Mark the center of the left hand edge and draw a line from that point to the score marks a quareter of the way to the right, top and bottom.

    These are the cutting lines.

  6. Step 6

    Cut along the pencil lines to create a point at the top of the card.

    If everything was creased in the correct direction, it should fold up perfectly. This is what it looks like from the back. A little bit of adhesive was added under the front point on the bottom to get it to stay upright.

  7. And a side view.

  8. Step 7

    Finished card folds flat and is 5 1/4 " square. When taken out of the envelope, it will "spring" up, thus the name. For mailing, use a 5 1/2 square envelope.

Video!

Your Turn

You've seen the tutorial, now you try it! We've got a section of the gallery set aside for Spring Card. Try this technique, then upload your artwork to the gallery. Show us your creations!

***Please note - Internet Explorer/Edge is not a supported browser, and will not allow you to see the videos. Please use Chrome, Firefox or Safari to view our tutorial videos.

Questions and Comments

We'd love to get your feedback or questions. Leave your comment below.

Oh, that is really cool! I just did 24 acetate cards last week and now I must try this technique ... but not 24 of them!
Joan  |  Wed Jul 2, 2008 at 1:09 PM
How exciting! Thanks so much for this great tutorial!
Tanja Fussell  |  Wed Jul 2, 2008 at 2:23 PM
What an awesome fold!!! Now all I need to do is decide on which patterned cardstock & how to embellish it!!! Thanks for the fabulous tutorial!!!
Marge  |  Wed Jul 2, 2008 at 6:17 PM
OH, this looks like so much fun. I do Origami with my 4th graders so I should be able to do this, I hope! LOL!
sandyh50  |  Wed Jul 2, 2008 at 6:38 PM
That's so clever. I've never seen anything like it before. Thank you so much. Well written tutorial makes it so easy.
Elaine  |  Wed Jul 2, 2008 at 7:13 PM
i am fairly new to this(since last year) and still learning new things....i love this and i think i could even make you proud if i tried this one!!! thanks so much for your creative "flow"......tfs!!!!
mommarocks  |  Wed Jul 2, 2008 at 7:21 PM
This card is just adorable. Love the way it "springs" up. I will have to try one. It would make a neat card to display. Thanks for the clear instructions.
LynneZ  |  Wed Jul 2, 2008 at 8:23 PM
Wow. I'll have to try that. Pretty darn cool.
MelodyGal  |  Thu Jul 3, 2008 at 2:44 AM
This is really neat and I like the look. You done a good job. Will have to make one of my own. TFS and taking time out to do it.
Tam  |  Thu Jul 3, 2008 at 3:27 AM
Your card is so adorable and I can see many uses for this one. Thank you so much for sharing.
Niki  |  Thu Jul 3, 2008 at 6:58 AM
Wow! I can hardly wait to make this one. I am very impressed.
Donna Henderson  |  Thu Jul 3, 2008 at 7:53 AM
I can't believe this! I spent the better part of a week hunting for some information about your beautiful spring fold cards after seeing a few in the gallery. To no avail, couldn't find a tutorial, couldn't find any help at all! And lo and behold, the Lord does answer prayers! When I received this weeks inkling there was the tutorial I had been seeking! Thank You so very much. Your senic cards are beautiful!
Marsha  |  Thu Jul 3, 2008 at 8:35 AM
Hi.. Could you tell me how you attach the picture to the front of the card?? I am not seeing how you got from step 6 to step 7. I must have missed something. Lovely idea for a card.
Thanks,
Priscilla
Priscilla  |  Thu Jul 3, 2008 at 11:41 AM
The front panel is about 3 5/8 inch square turned on the diagonal. Just cut a piece of cardstock smaller and decorate it with anything and adhere it. You can check out the gallery, the link is above, you will find a wide assortment of embellishments. Hope this helps.
Sandy Hulsart  |  Thu Jul 3, 2008 at 12:16 PM
Sandy ..this casrd was so much fun to make..Ilove it..I embosed mine! Thanks..Ines
ines(4 cats lady)  |  Thu Jul 3, 2008 at 12:22 PM
Sandy, I've looked at your tutorial & your work--how beautiful! Thanks for sharing your passion & talent with us! Looking forward to seeing more. Blessings.....Pat
Pat  |  Thu Jul 3, 2008 at 4:54 PM
this tutorial rocks!!!! it took me twice(cause i folded it wrong the first time) to get it right, but snap! did it turn out awesome.....thanks for creative-ness(is that a word??)......
mommarocks  |  Thu Jul 3, 2008 at 5:10 PM
Thank you so much Sandy, for this great and easy to follow tutorial! This is such a unique card template! I love it and will be making lots of them!
Ina aka Yellowrose46  |  Fri Jul 4, 2008 at 6:04 AM
LOVE this tutorial and Im printing it out to give it a go as we speak!
Heather  |  Fri Jul 4, 2008 at 2:32 PM
I saw this template at a local stamp store, and now I am glad i didn't buy it. This looks easy enough even for me to make. Thanks for posting this out here.
cheryl Morrison  |  Fri Jul 4, 2008 at 3:21 PM

Page 2 of 5 pages  <  1 2 3 4 >  Last »

You need to be logged in to comment

GET OUR NEWSLETTER


Splitcoaststampers's privacy policy