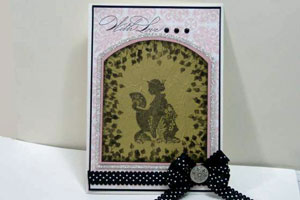
Shoji Screen Stamping
by Sharon Field
Invoke the look of Asian screens by stamping on waffle paper.
Supplies
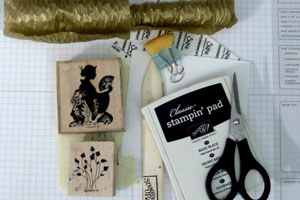
- Grid Paper or clean scrap paper to protect your work surface
- Basic Black Classic ink pad (Well Inked) or other black dye ink
- Gold waffle paper
- Sticky sheet or Sizzix Adhesive Sheet
- White cardstock
- Rubber stamps (Stampin' Up!'s Dream Gardens used here) NOTE: solid image stamps work best!
- Bone folder
- Paper trimmer or scissors
- Sponge
- Heat tool (optional)
Step-by-Step
-
Step 1
Protect your work surface with several layers of paper. Unroll the waffle paper, and smooth/flatten enough that you can cut it evenly.

-
Step 2
Use your paper trimmer or scissors to cut a piece of Gold Waffle Paper slightly larger than the whisper white cardstock, and smooth with fingers to remove most (but not all) of the wrinkles.
Examine both sides of the waffle paper to determine shiny/dull side.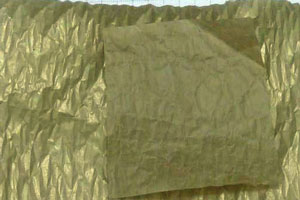
-
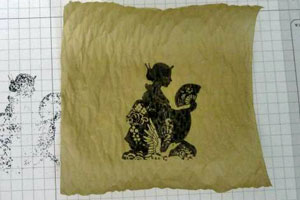
Step 3
Place the waffle paper dull side UP on your protected work surface. Choose the image you would like to appear in the background, ink with Basic Black Classic Ink. Check to ensure the entire image is covered with ink, and then stamp onto the dull side of the gold waffle paper.
-
Step 4
Turn waffle paper over with the shiny surface facing you. Your stamped image should be visible through the waffle paper.
-
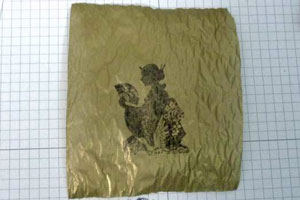
Step 5
Apply Basic Black Classic Ink to your secondary image. Check to ensure even coverage of ink on the image surface. Keeping mind that you will be trimming some of the excess or overage from the gold waffle paper, stamp the perimeter of the gold waffle paper, and/or slightly off the prior stamped image. Set aside to dry.
NOTE:
If you are doing perimeter stamping, you may want to turn the image back over to the other side and use the same stamp to ink along the perimeter to provide more depth.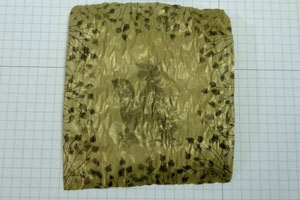
-
Step 6
Cut a piece of Sticky Sheet or Sizzix Adhesive Sheet to the same size as your white card stock base.
Use the bone folder to burnish the surface of the sheet. Burnishing will ensure the adhesive stays with the card stock and not with the protective sheet. Carefully remove one protective layer.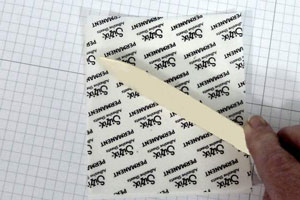
-
Step 7
Align sticky sheet with the white card stock base, attaching one to the other. Use a bone folder to burnish the remaining protective layer, and then remove the protective layer.
With the stamped waffle paper shiny side DOWN, attach to the sticky side of the coated card stock to the dull side of the waffle paper.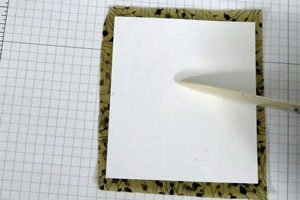
-
Step 8
DOUBLE CHECK THAT YOUR INK IS TOTALLY DRY, then use the bone folder and long strokes to smooth out any wrinkles on top of the waffle paper. If your ink is not dry, the stamped images will smear. This step removes any bubbles and gives your stamped image a silk-screen effect.
Trim away excess gold waffle paper using a paper trimmer, or scissors.
Ink sponge with Basic Black Classic Ink, and lightly thump along all edges of the stamped cardstock/waffle paper piece.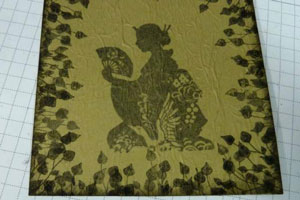
-
Step 9
Finish your card.
-
Side view.

Video!
Your Turn
You've seen the tutorial, now you try it! We've got a section of the gallery set aside for Shoji Screen Stamping. Try this technique, then upload your artwork to the gallery. Show us your creations!
***Please note - Internet Explorer/Edge is not a supported browser, and will not allow you to see the videos. Please use Chrome, Firefox or Safari to view our tutorial videos.

Questions and Comments
We'd love to get your feedback or questions. Leave your comment below.
I think SU products are probably excellent quality, but I don't care to have to go through a rep to purchase something, so I usually try to find a similar product that I can purchase in my local craft stores.
LOL, I've seen gold shoji screens in antique shops in china town.. so the gold doesn't bother me at all...
AND it was what I had available at the time...
I've also embossed on it...
made a Winter Scene, adding 'snow' atop the waffle paper Jolly Old St. Nick AND a dry embossed silver waffle paper card Silk Embossed Waffle paper If you are interested
This s a great Tutorial!
xo
and Hi Mer!! It's good to see you here!
Would you mind answering a couple of questions for me? First of all, what did you use to cut the layers for the focal point. Is a a Nestibilities? Secondly, did you use SU!'s glitter paper for the last layer? Thanks in advance for the informations!
Natalie
I have scoured through my new Stamping Up Catalogue & can find nothing that resembles
Waffle paper, is this product featured in the S/U book.?
Cheers
Ivy
BUT if you want a more precise method of cutting an arch without a die cut, simply use a plate turned upside down. Measure up from the bottom to a point at both sides of the stamped image and make a pencil mark... place your plate at the pencil mark, aligning so that it produces the arch/angle you would like... and draw a line.
To create subsequent layers, measure up 1/4" higher than sides of previous arch layer, place plate and repeat.
The second layer is SU Silver Glimmer Paper... really fun stuff!! I've separated the glimmer from the paper to make flowers, roses, 3-d items too.. another fun technique (it's on my blog.. all my tutorials are free).
Hope that answers all your questions!
Sharon
R/
cheers
Ivy
I love this tutorial! Thanks for sharing. What is the stamp set you used? I'm a SU demonstrator but have never seen this technique. Can't wait to try it. Thanks!
Page 2 of 3 pages < 1 2 3 >