Ruffled Ribbon Border

by Cindy Lawrence

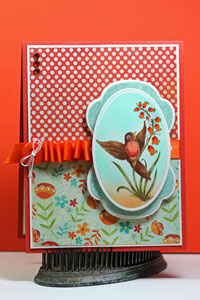
Create a pretty ruffled ribbon border around a die-cut shape.

Supplies

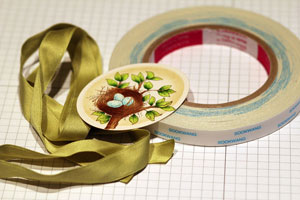
  • Die-cut stamped cardstock, any shape will work
  • Scor-Tape™, or other strong adhesive
  • Ribbon

Step-by-Step

  1. Step 1

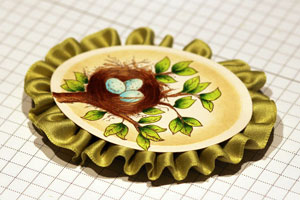
    Begin with a die-cut shape already stamped, colored, and ready to go.

    Flourishes Spring has Sprung set was used here.

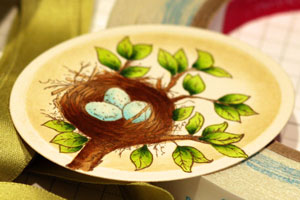
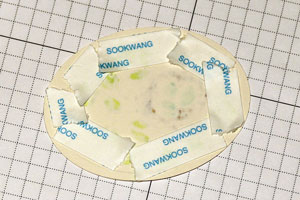
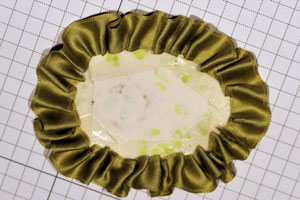
  2. Flip die-cut piece over, and adhere strong adhesive all around the edges.

  3. Step 2

    Begin attaching ribbon to adhesive by creating small folds with your fingernail as you go.

    You can create lots of tight ruffles by making your folds very close together, or you can create a looser ruffle by making your folds further apart.

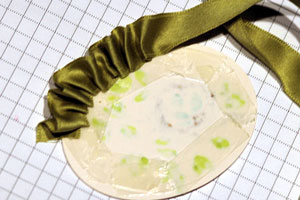
  4. Continue folding until you meet the end where you started. Tuck the two ends out of sight in the back.
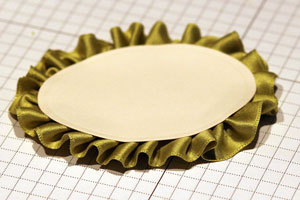
  5. Step 3 (Optional)

    Adhere an identical die-cut shape to the back of the piece to give it some stability.

  6. Step 4

    Flip it over and adhere to your card or other project.
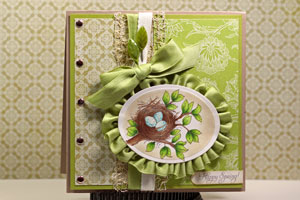
  7. Step 5

    Finish your card.

Video!

Variations

  1. You can also created a simple ruffled border without using a die-cut shape. Simply adhere Scor-Tape™ in a straight line and ruffle using the same method as you would around a shape.

Questions and Comments

We'd love to get your feedback or questions. Leave your comment below.

I've seen this before, but didn't know how it was done...but loved the look! Thank you for teaching us!! SCS Rocks!!
StampinCatMom  |  Wed Mar 23, 2011 at 2:09 PM
WOW! I LOVE THIS TUTORIAL! I've always wondered how the ruffled ribbon look was done, so THANK YOU for doing this tutorial!! I will definitely be trying this out soon!
Nicki S  |  Wed Mar 23, 2011 at 2:43 PM
I'm a newbie to cardmaking and this is a lovely look that I will try. I thank you sooo much for the video as that works better for me than directions and photos.
Elly  |  Wed Mar 23, 2011 at 2:54 PM
This looks easier than another method ( for doing the ribbon ) I have seen. I have seen instructions for pulling a fiber from the frayed ribbon to do this. Thanks so much for the great tutorial !
Jacqueline Dorer-Russell  |  Wed Mar 23, 2011 at 3:02 PM
i have seen this but i have been too nervous to give it a go. This is a great tutorial thanks.
lisa  |  Wed Mar 23, 2011 at 5:40 PM
Oh Cindy, these are both stunning! I love the ruffles, and I love this stamp set! Gorgeous!
Danielle  |  Wed Mar 23, 2011 at 6:21 PM
This is fantastic! LOVE how it looks! Thanks for showing us grin
Jocelyn aka JoBear2  |  Wed Mar 23, 2011 at 8:18 PM
I love this tutorial, thanks for the challenge, I did struggle with my ribbon border, practice, practice.... Thanks
Jan Keen  |  Wed Mar 23, 2011 at 10:19 PM
Great idea, simply explained, I can do that now, will give it a try soon. Love your coloured images too, so beautifully done. Hugs lin
Linda Wescott  |  Thu Mar 24, 2011 at 2:57 AM
Thank you for your wonderful tutorial. I can't wait to try it. And your images are gorgeous!
Kristine  |  Thu Mar 24, 2011 at 3:38 AM
what stamp is used in the bird\flower example with the gathered ribbon? i'd love to get it.
paula s  |  Thu Mar 24, 2011 at 1:48 PM
This is absolutely lovely! Thank you for the wonderful idea!
JoanieG  |  Thu Mar 24, 2011 at 1:51 PM
Yes, i would love to know the stamp company too! I responded up above, just wonderful!
Cheryl Hellem  |  Thu Mar 24, 2011 at 2:10 PM
The image is from Flourishes. The set is called Spring as Sprung. It was just released last week.
beate  |  Thu Mar 24, 2011 at 2:27 PM
Yes, that's right, stamps are from Flourishes...gorgeous new set! Thanks for all your sweet comments, friends! smile-
Cindy Lawrence  |  Thu Mar 24, 2011 at 2:56 PM
For a single ruffeled ribbon you can just catch a few threads and pull to make the ribbon ruffel.
cathy  |  Thu Mar 24, 2011 at 3:11 PM
This is so pretty. Now I know what I can do with all the ribbon I bought from a floral shop that went out of business. Couldn't pass up the deal. Thank you so much for the tutorial.
Debbie (grammatroll)  |  Thu Mar 24, 2011 at 4:55 PM
Fabulous job girlie!!! It was wonderful hearing your voice again too!!!! grin
Julie Koerber  |  Thu Mar 24, 2011 at 5:39 PM
Love your tutorial. The finished look on the back makes it even better. The straight line ribbon looks great as well. Thanks for sharing. Linda
Linda Clark  |  Thu Mar 24, 2011 at 7:59 PM
Loved the ruffled look. Will try this soon!
Diane  |  Fri Mar 25, 2011 at 8:48 PM

Page 3 of 4 pages  <  1 2 3 4 >

You need to be logged in to comment

GET OUR NEWSLETTER


Splitcoaststampers's privacy policy