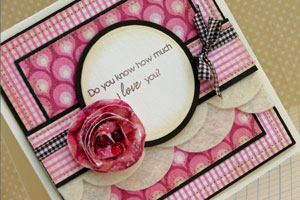
Rolled Flowers

by Joanne Basile

Create custom rolled flower embellishments using scraps of paper, a pencil, pair of scissors and some adhesive.

Supplies

  • Cardstock or Patterned Paper
  • Scissors
  • Glue Dots
  • Pencil

Step-by-Step

  1. Step 1

    Round the corners of the cardstock with a pair of scissors.
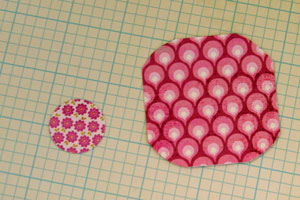
  2. Step 2

    Using a pencil, draw a spiral, starting from the outside and working in to the center.
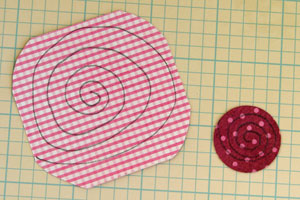
  3. Step 3

    Cut all the way along the spiral.
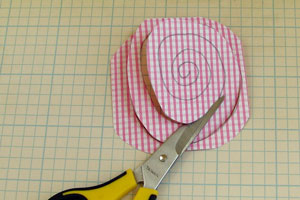
  4. Step 4

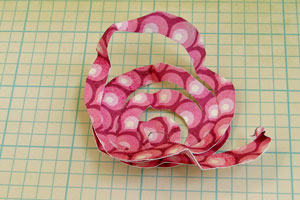
    Lightly crumple the paper, to loosen the fibers of the paper, which will make the next step easier.
  5. Step 5

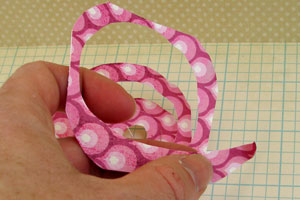
    Begin on the outside of the spiral, and roll your flower up from the outside all the way back towards the center.

    Tip:
    Gently crumple the paper slightly as you are rolling it into the flower to make it more pliable.
  6. Step 6

    Continue rolling all the way till you’ve rolled up the entire length of the spiral. This will be uneven and messy looking, but just keep rolling.

  7. Step 7

    When you have the bloom fully rolled up to the center, bend back the outside edges to open up the bloom into a rosette. This shows off the pretty patterned paper you’ve selected.
    Release the bloom and let it uncurl slightly to bloom.

    Tip:
    Once you have it in a shape that you like, flip it over and anchor it together with a glue dot.

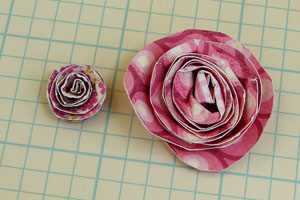
  8. Finished bloom – in both sizes

    Tip:
    Optionally, you can adorn your bloom with distress inks, glitter sprays or glitter. I chose to give mine a coating of Crystal Effects with a paintbrush, and then added some glitter.
  9. Step 8

    Sample created with big bloom.

  10. Sample created with small flowers.

Video!

Your Turn

You've seen the tutorial, now you try it! We've got a section of the gallery set aside for Rolled Flowers. Try this technique, then upload your artwork to the gallery. Show us your creations!

***Please note - Internet Explorer/Edge is not a supported browser, and will not allow you to see the videos. Please use Chrome, Firefox or Safari to view our tutorial videos.

Questions and Comments

We'd love to get your feedback or questions. Leave your comment below.

thank you, thank you Joanne! so glad to have this tutorial & a VIDEO to boot! WooHoo!!
gabbe  |  Wed May 12, 2010 at 2:02 PM
So pretty, Joanne!! Thanks for your wonderful tutorial!!
Rose Ann  |  Wed May 12, 2010 at 3:35 PM
Thanks for this awesome tutorial! I already made some little cuties @ 2 inches. So adorable. I also went the extra mile as you did and added glue and glitter! Gorgeous. Now... I can't decide if they belong on a card or as a broach! Oh the possibilities! Thanks again!!!
steph zerbe  |  Wed May 12, 2010 at 4:25 PM
AWESOME tutorial, Joanne. Thanks for doing it. Your finished samples are beautiful and I can't wait to give it a try. smile
Jody Morrow  |  Wed May 12, 2010 at 7:01 PM
awesome tutorial, joanne! i loves me these flowers!
Susan Liles (susiestampalot)  |  Wed May 12, 2010 at 7:07 PM
Thanks for the great tutorial!! YOu make it looks sooooo easy!!! Can't wait to try it!!! smile
Jenni King
Jenni King  |  Wed May 12, 2010 at 8:46 PM
Gorgeous girl! TFS!
Dawn Easton  |  Wed May 12, 2010 at 10:03 PM
Grea,t just finished one and it looks great , BUT what do you do with the little circle? Is it for a litle flower?
We are going to be making your little flowers in card this coming week. Thanks for you bright idea!
Bonnie  |  Wed May 12, 2010 at 10:13 PM
Lovely! Thank you!
Sandra K  |  Thu May 13, 2010 at 5:37 AM
You did not give the size of the paper for the flower.
Janet  |  Thu May 13, 2010 at 7:02 AM
Hi Janet -

She lists them in the video - the larger is 3" x 3" - the small one is with a circle punch - you can use any size. HTH! smile
Lydia  |  Thu May 13, 2010 at 8:37 AM
Fabulous and sooooo pretty, TFS!!
Juanita in Ohio  |  Thu May 13, 2010 at 9:41 AM
I love it, simple but beautiful! Thank you!! I have to go and try this.
Mary Harris  |  Thu May 13, 2010 at 1:04 PM
Wow Joan, that is the fastest cutting I've ever seen. :o) Awesome tutorial. Thanks for taking the time to create this. I can't wait to try it out.
Melissa Shultz  |  Thu May 13, 2010 at 7:59 PM
It looked great when you did it but I don't know how you secured it so it doesn't fall apart...my glue dot didn't hold it, can you elaborate?
kaycstamper  |  Sun May 16, 2010 at 12:02 AM
Great tutorial - have a go with fancy edge scissors and you will add a whole new dimention to your flowers.
Kath Honor  |  Mon May 17, 2010 at 2:52 AM
Great tutorial will try this one.
Earline  |  Mon May 17, 2010 at 5:33 PM
Thanks for such a detailed hands-on tutorial.
Your creations are always the best. Love the paper combinations.
neenie40  |  Wed May 19, 2010 at 8:02 AM
Great Tutorial on this. I have wanted to learn to do these for a good while. Thank you so much for the tutorial!
Debbie J  |  Fri May 21, 2010 at 6:59 AM
Thank you for your tutorial - Loraine sent me the site. She makes lovely flowers with it.

I am going to try the roses this week end.
Monica  |  Fri May 28, 2010 at 8:33 AM

Page 2 of 3 pages  <  1 2 3 >

You need to be logged in to comment

GET OUR NEWSLETTER


Splitcoaststampers's privacy policy