Rolled Flowers

by Joanne Basile

Create custom rolled flower embellishments using scraps of paper, a pencil, pair of scissors and some adhesive.

Supplies

  • Cardstock or Patterned Paper
  • Scissors
  • Glue Dots
  • Pencil

Step-by-Step

  1. Step 1

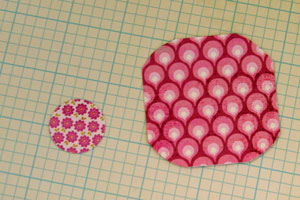
    Round the corners of the cardstock with a pair of scissors.

  2. Step 2

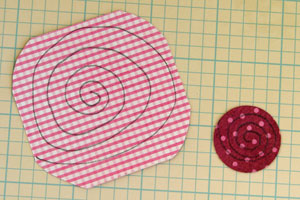
    Using a pencil, draw a spiral, starting from the outside and working in to the center.

  3. Step 3

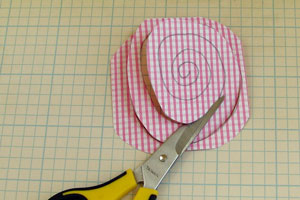
    Cut all the way along the spiral.

  4. Step 4

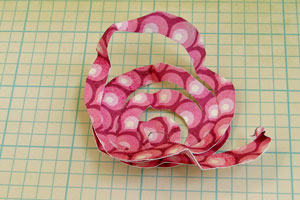
    Lightly crumple the paper, to loosen the fibers of the paper, which will make the next step easier.

  5. Step 5

    Begin on the outside of the spiral, and roll your flower up from the outside all the way back towards the center.

    Tip:
    Gently crumple the paper slightly as you are rolling it into the flower to make it more pliable.
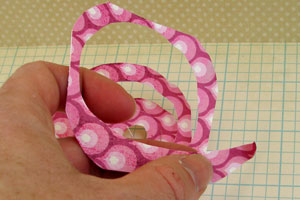
  6. Step 6

    Continue rolling all the way till you’ve rolled up the entire length of the spiral. This will be uneven and messy looking, but just keep rolling.

  7. Step 7

    When you have the bloom fully rolled up to the center, bend back the outside edges to open up the bloom into a rosette. This shows off the pretty patterned paper you’ve selected.
    Release the bloom and let it uncurl slightly to bloom.

    Tip:
    Once you have it in a shape that you like, flip it over and anchor it together with a glue dot.

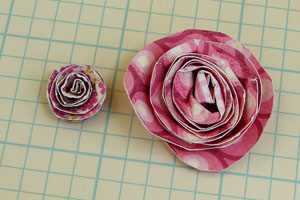
  8. Finished bloom – in both sizes

    Tip:
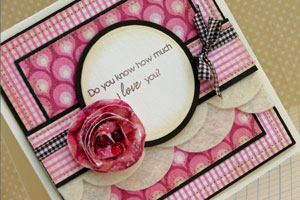
    Optionally, you can adorn your bloom with distress inks, glitter sprays or glitter. I chose to give mine a coating of Crystal Effects with a paintbrush, and then added some glitter.

  9. Step 8

    Sample created with big bloom.

  10. Sample created with small flowers.

Video!

Your Turn

You've seen the tutorial, now you try it! We've got a section of the gallery set aside for Rolled Flowers. Try this technique, then upload your artwork to the gallery. Show us your creations!

***Please note - Internet Explorer/Edge is not a supported browser, and will not allow you to see the videos. Please use Chrome, Firefox or Safari to view our tutorial videos.

Questions and Comments

We'd love to get your feedback or questions. Leave your comment below.

Precioso tutorial, creativo, sencillo y fant�stico.
Gracias.Bss
Monika  |  Wed May 12, 2010 at 5:16 AM
Great tutorial, Joanne! Makes me want to make one now - so great! Thanks for all your inspiration!
CherylQuilts  |  Wed May 12, 2010 at 5:19 AM
I love the plethora of tutorials and techniques that have come out lately for lovely little flowers and other embellishments to make. Thank you for this to add to my repetoire.
Melissa Layman  |  Wed May 12, 2010 at 5:26 AM
LOVELY!! <3
So easy and yet so gorgeous!
AMA  |  Wed May 12, 2010 at 5:36 AM
LOVE your tutorial Jo!! And those flowers are too cute for words!
Kim  |  Wed May 12, 2010 at 5:45 AM
Love your tutorial Jo!! Just fabulous and so are the finished cards!
Kerry J.  |  Wed May 12, 2010 at 6:51 AM
OHHHHHHH so pretty. I can't wait to try it.
Tyger  |  Wed May 12, 2010 at 7:10 AM
Great tutorial Joanne!! Been wondering how to do these. And isn't your voice adorable??
Libby Hickson  |  Wed May 12, 2010 at 7:11 AM
Fabulous tutorial! Love the video.
Beth M  |  Wed May 12, 2010 at 7:42 AM
Love this...great tutorial and video. Thanks for sharing.
Lorri Reeder  |  Wed May 12, 2010 at 8:44 AM
Super great tutorial! I've always looked forward to Wednesday's for the tutorials for a new thing to learn ~ but with the video's now they are SO much easier to understand.
Thank you!! Now I'm off to try it!
Hugs,
Joani
Joani  |  Wed May 12, 2010 at 8:47 AM
This is a spectacular tutorial Joanne! I need to make one of these today! Thanks for the great video!
Lydia  |  Wed May 12, 2010 at 8:55 AM
This is an awesome tutorial! Thanks so much for sharing it with all of us!
Shari  |  Wed May 12, 2010 at 9:13 AM
This is just sooooooo cool!!! I love that it doesn't take a boat load of paper to make-helps us to "go green" by using our scraps. Thank you so much for this GREAT idea.
Laurie
Laurie  |  Wed May 12, 2010 at 9:58 AM
This is the best paper flower tutorial I have seen. So simple and fabulous results. Thanks so much for the great tutorial.
Glenda Giguere  |  Wed May 12, 2010 at 10:02 AM
So pretty! Can't wait to try this! Thanks for sharing!!!
Bonnie  |  Wed May 12, 2010 at 10:50 AM
FANTASTIC tutorial!!
BevMom/Bev Rousch  |  Wed May 12, 2010 at 10:55 AM
Really awesome job, I am headed for my paper and sissors right after this post! Thanks for your great tutorial.
Kristin Griesbaum  |  Wed May 12, 2010 at 10:57 AM
I love it! Thank you for the video seeing is the best!
rose  |  Wed May 12, 2010 at 11:52 AM
Yippeee!!! Now I can try my hand with these. Thanks Joanne.
raduse  |  Wed May 12, 2010 at 1:00 PM

Page 1 of 3 pages  1 2 3 >

You need to be logged in to comment

GET OUR NEWSLETTER


Splitcoaststampers's privacy policy