Pop-Up Twirl Card

by Maren Benedict

Create a card with a twirling pop up surprise inside.

Supplies

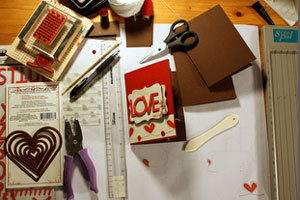
  • Two 8 1/2" x 5 1/2" card bases (heavy/thick cardstock works best)

  • Two 1 1/4" x 2 1/4" strips of cardstock

  • Two 2 1/2" x 2" strips of cardstock

  • Scoring tool (optional)

  • Scissors

  • String

  • Small Hole Punch

  • Skewer or skinny straight straw

  • Adhesive (glue dots)

Step-by-Step

  1. Step 1

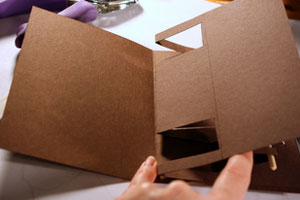
    Score one card base at 4 1/4" and fold in half.

    Mark the cardstock 3/8” from both ends.
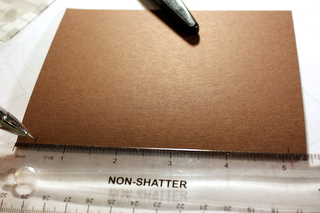
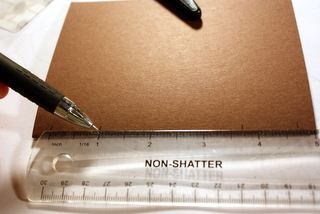
  2. Step 2

    Now make a mark 1” in from each of the 3/8” marks.

  3. Step 3

    Draw a line across the base 1 3/4" from the edge.

    This will be covered up and is only a guide to cut to.
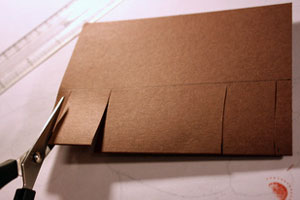
  4. Step 4

    Cut from each mark up to the guideline.

  5. Step 5

    Fold the strips/tabs in as shown.

    Shut the card to create creases.
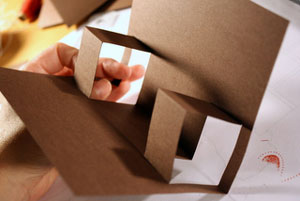
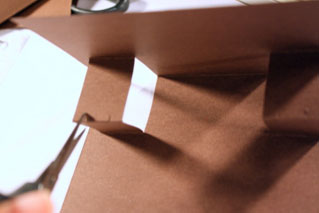
  6. Step 6

    Cut two small slits on the edges of each tab.

  7. Step 7

    Fold the strips in to allow the skewer to slide through.

    Trim the edges of the skewer to be slightly shorter than the card.
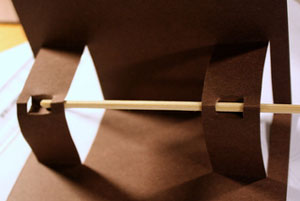
  8. Step 8

    Punch a small hole approximately 3/4" in from both sides of the back of the card.

    The holes should be slightly above the bottom tab.
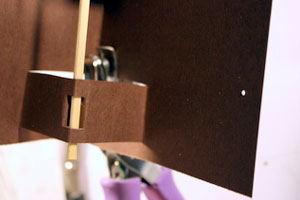
  9. Step 9

    Feed your string through one hole and adhere.

  10. Step 10

    Wrap string around skewer at least a few times and feed it through the other hole.

    Close card and adhere the second end of the string.
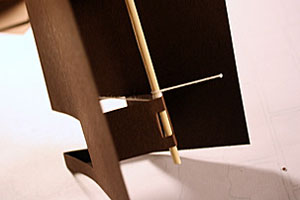
  11. Step 11

    Practice opening and closing the card to see if you need to adjust the tension of the string.

    The skewer should rotate when opening and closing the card.
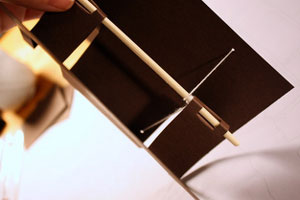
  12. Step 12 (Optional)

    Score both 2 1/2" x 2" cardstock strips in half (at the 1" mark).

    This will help keep the skewer in place.
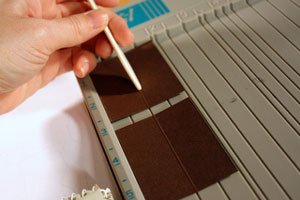
  13. Step 13 (Optional)

    Embellish/stamp both 1 1/4" x 2 1/4" strips and attach to the front of the tabs.
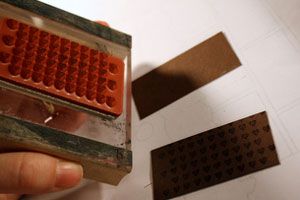
  14. Step 14

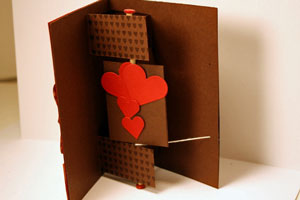
    Embellish and stamp one side of both 2 1/2" x 2" cardstock strips. These should be identical on both sides as they will be the spinning element.

    Place one embellished strip underneath the skewer, decorated side down. Add adhesive to the outside edges of the strip, then adhere the second embellished strip to the first.

  15. Step 15

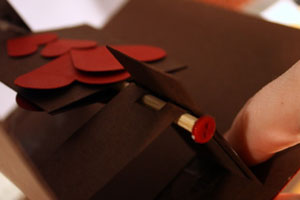
    Adhere small buttons to the top and bottom of the skewer to prevent it from sliding.

  16. Step 16

    Adhere to the inside of the second card base.

  17. Step 17

    Decorate card front.

  18. Your card is done.

Video!

Your Turn

You've seen the tutorial, now you try it! We've got a section of the gallery set aside for Pop-Up Twirl Card. Try this technique, then upload your artwork to the gallery. Show us your creations!

***Please note - Internet Explorer/Edge is not a supported browser, and will not allow you to see the videos. Please use Chrome, Firefox or Safari to view our tutorial videos.

Questions and Comments

We'd love to get your feedback or questions. Leave your comment below.

OH I just love this ... I always wondered how to make this ,I am going to try this for sure.
Angie Blom  |  Wed Jan 20, 2010 at 5:59 PM
Hi,
Love this card and idea. My skewer spins fine, but my spinner doesn't spin. The skewer spins inside it and it just stays. I did score as instructed. Any tips?
Loretta  |  Wed Jan 20, 2010 at 6:00 PM
Hi Loretta! I wonder if your spinner needs to be more snug against the skewer so it spins WITH it instead of allowing it to to spin inside it. Try adhering the 2 tabs further closer in and see if that works. Let me know. smile
maren  |  Wed Jan 20, 2010 at 6:16 PM
Hi Leah- Heyentah is right...any round stir stick would work too! smile
Maren  |  Wed Jan 20, 2010 at 6:28 PM
Love the idea. It would have been easier to see if you had used a lighter colored card. I got lost with the small strips and how to add them.
Lura Wadman  |  Wed Jan 20, 2010 at 8:15 PM
Loved the card. I need to try this technique. Your tutorial was very nice. Thanks for sharing it.
Creative Busy Hands  |  Wed Jan 20, 2010 at 9:17 PM
One more quick idea: When you are threading your string through you small hole, use a Dental Floss Threader as a needle and your string will slip through so easily, you won't go back to threading without them!
Heyentah  |  Wed Jan 20, 2010 at 10:04 PM
You rock Maren! This is a fabulous tutorial. Can not wait to try this out!!
Karen M  |  Wed Jan 20, 2010 at 10:15 PM
Wow, this is an amazing card but your tutorial makes it seem achieveable! I am thinking that if I do most of the prep work ahead of time we might be able to crank out half a dozen of these for our church card ministry to do for the college kids Valentine cards. Last year we did a freestanding pop up for Valentine's so I am always ISO of cool new idea and by George, I think I"ve got it now!
Jan  |  Wed Jan 20, 2010 at 11:28 PM
Great card and very clear video tutorial. I'm going to try this.
Eveline.
Eveline van Heijst  |  Thu Jan 21, 2010 at 1:12 AM
Wow, this looks so easy the way you've done it Maren! Would you believe that I just threw out lots of those sticks! But, I'm going to try it this afternoon! Thanks for detailed instructions and making it simple for us! Great video too!
Jen in AZ  |  Thu Jan 21, 2010 at 9:40 AM
Love this card. Thanks for showing us in a video! I love to see new projects I've never seen before. A great show and tell item!
Michelle  |  Thu Jan 21, 2010 at 10:01 AM
WOW WOW WOW ! ! ! ! !

You just made my valentine cards. Two of my granchildren are getting out of the "kiddie" cards i love so much to make and this is perfect for the "old kids"
joann  |  Thu Jan 21, 2010 at 10:17 AM
What a awesome tutorial and so easy to follow. Thanks, it is one of the most inspiring cards I've seen. I will 'run with it', and create, create.
Ruth  |  Thu Jan 21, 2010 at 10:37 AM
Another great tutorial and idea to add to my journal of things to do! Thanks for sharing.
Jessica  |  Thu Jan 21, 2010 at 11:29 AM
Maren, I really like this card, I'm going to make one tonight, your tutorial is great and easy to follow. Thanks
Marge  |  Thu Jan 21, 2010 at 12:01 PM
I can't wait to make one of these. So cute and very inspirational. One question though on the spinner part. The two outsides edges are glued together on the 2 1/2 x 2 pieces, but is the center that is scored glued to the skewer in any way?
Sandy  |  Thu Jan 21, 2010 at 12:18 PM
Hi Sandy!
I didn't adhere the pieces directly to the skewer and the spinner worked fine for me but I don't think it would matter if you did......as long as the skewer is able to rotate. smile
Maren  |  Thu Jan 21, 2010 at 12:59 PM
Yes, another great demo and def want to give it a try! Regarding the comment about the camera being shaky...I guess your hubby was keeping in the theme of a "movement card" haha
Terry  |  Thu Jan 21, 2010 at 1:10 PM
awesome.. can't wait to try it!
Denise Trahan  |  Thu Jan 21, 2010 at 7:09 PM

Page 2 of 4 pages  <  1 2 3 4 >

You need to be logged in to comment

GET OUR NEWSLETTER


Splitcoaststampers's privacy policy