Photo Editing
by Joanne Basile
After investing much time and energy on your cards and scrapbook pages, make sure all of your thoughtfulness and attention to detail shine through with these photography tips courtesy of the MFT Design Team.
Supplies
- Camera
- 12" x 12" cardstock, white or kraft
- Photo editing program
Step-by-Step
-
Step 1
Lighting
Wherever possible, use natural light for your photos. Using your flash can create an undesirable yellow cast in your photos. Disable your flash by looking for a button or icon similar to the one shown in the picture.
-
Step 2
Setup
Various areas of your home will offer the best possible lighting at different periods during the day, so explore your own home to find what works best for you.
A neutral background is recommended for your project photography. After all, you don’t want to detract from your beautiful card, project, or page. Start by having both white and kraft 12x12 cardstock on hand for this purpose.
In general you will use the white cardstock. It helps to reflect light and can also be used for color correction assistance in Photoshop Elements. We will discuss photo-editing in more detail later.
Use the kraft cardstock for projects that are mostly white or off-white. Very light cards look best with a little contrast behind them.
Line your photo box with 12x12 papers as illustrated.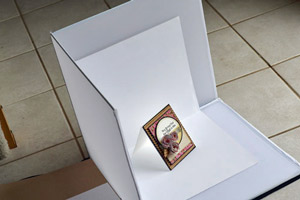
-
If you don’t have a photo box, you can easily make one with a cardboard box or by adding a cardboard backer to one of your 12x12 papers so it will stand up vertically. If necessary, you can place a coffee mug behind the cardboard sheet to hold it in place.
-
Step 3
Taking the Photo
You can use just about any camera to photograph your projects. Here are a few tips for actually taking the photo:
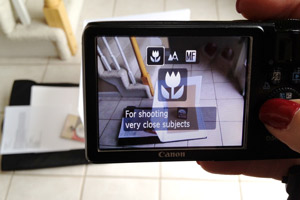
• Enable the macro setting on your camera. If you can't easily identify it, look for an icon shaped like a flower. This will help capture the finer details of your project as is it designed for close-up photography.
• Take lots of photos including detail shots of important features like embellishments or additional layers. You’ve spent a ton of time building your masterpiece and you want to allow all the details to shine through.
• Rotate your card to see where the light looks best. Take pictures from different vantage points and choose the one you like best during the editing process.
-
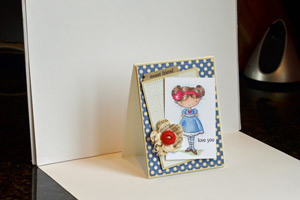
• Change your angle. Sometimes one element blocks another in the photograph. For example the card in this photo needed to be photographed from the right hand side, or the dimensional flowers blocked the sentiment

-
Step 4
Photo-Editing
It is during the editing process you'll be able to fine-tune your photo to reflect all of the detail in your card.
This tutorial features Photoshop Elements as the photo-editing software. It offers many adjustments that can be made with relative ease.
Here is a photo of the card before editing.
Take the following steps to adjust your photo:
• Crop
• Brighten
• Adjust white balance
• Resize
• Optimize for web use
On occasion you'll need to go back to the drawing board if you notice something that seems "off" during editing. For example, you could find a dimensional backing stuck on the card front, a layer of cardstock or stamped area that is crooked, or possibly a frayed ribbon that needs to be re-trimmed. It’s worth taking a moment to fix the mistake you’ve discovered, and then take another set of pictures.
Here is how you'll make adjustments so that your photo accurately represents your finished card: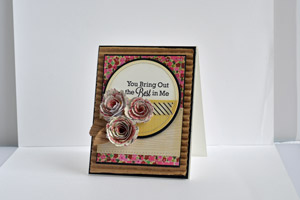
-
Step 5
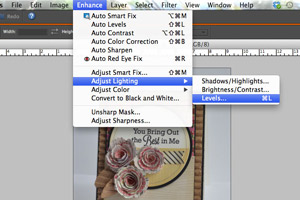
Select Enhance>Adjust Lighting>Levels from the menu.
-
Step 6
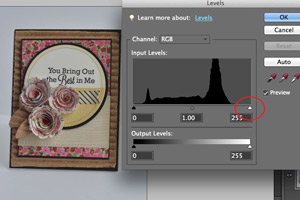
A dialog box will pop up that contains the Input and Output Levels. Use your mouse to click and drag the small white arrow under Input Levels on the right-hand side of the dialog box toward the left. Drag until the small white arrow on the right meets the area where the black "mountain" begins to point upward. This will brighten the background of your card.
-
Step 7
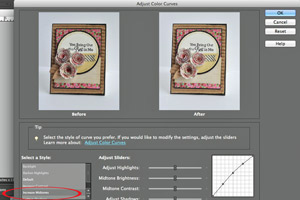
Make another quick adjustment by selecting Enhance>Adjust Color Curves. This opens a dialog box that includes a before and after image. Select Increase Midtones and then click OK to approve the change.
-
Step 8
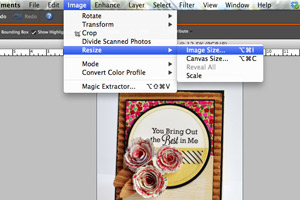
You’ll want to resize your photo to keep them manageable for online galleries and speedy blog uploads. Here’s how:
Select Image>Resize>Image Size and a small dialog box will appear.
-
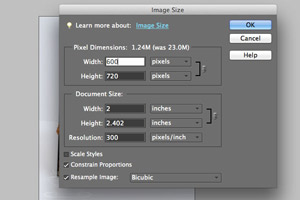
Step 9
In the image size dialog box, type in 600 for the width measured in pixels. If the Constrain Proportions box is checked, your program will keep your project in proportion by automatically configuring the height. Click OK to save the changes
-
Step 10
The last step is to optimize your file for the web.
Select File>Save for Web. This will keep your project crisp on computer screens. A dialog box will appear with a before and after photo.
On the right-hand side, select Custom and a small box will appear. Select JPEG High and you will notice an immediate improvement in photo clarity. Select OK to approve the change and you’ll be asked where to save your finished file.
-
Step 11
Here is the fully-edited file, ready for use in the Splitcoaststampers Gallery.


Questions and Comments
We'd love to get your feedback or questions. Leave your comment below.
Now I can do so much more.
Page 2 of 3 pages < 1 2 3 >