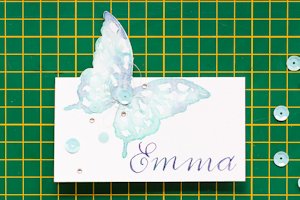
Partial Die Cutting

by Debby Hughes

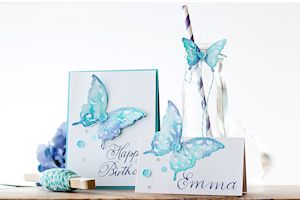
Extend a portion of a die cut shape past the fold for a unique card or place marker.

Supplies
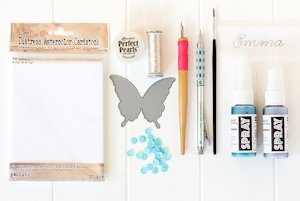
Step-by-Step

  1. Step 1

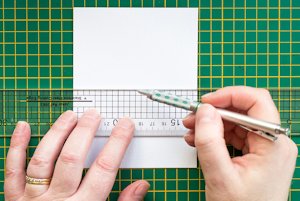
    For a place card, cut card base to 5 1/2" x 4 1/4". Mark a pencil line across the card at 2 3/4".

    For a standard-sized card, cut base to 8 1/2" x 4 1/4". Mark a pencil line across the card at 4 1/4" and at 5 1/2".
  2. Step 2

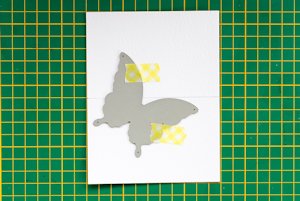
    Place a shaped die so that one part of the die is above the center pencil line and the rest is below.

    For the standard sized card, position the die so that it does not go above the line at 5 1/2".
  3. Step 3

    Line up die cutting plates along the pencil line so that only the protruding portion is cut when run through the die cutting machine.
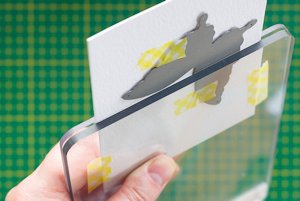
  4. Step 4

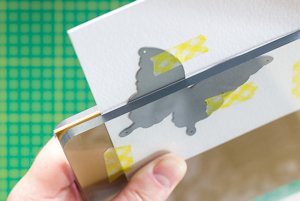
    Line up die cutting plates along the pencil line so that the rest of the die is encased between the plates. Run through the die cutter with an embossing mat to impress the die into the card.
  5. Step 5

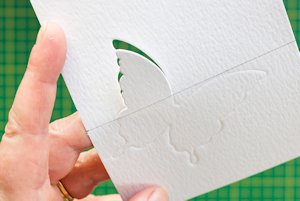
    The card now has a die cut element, with the rest of the die impressed into the card.
  6. Step 6

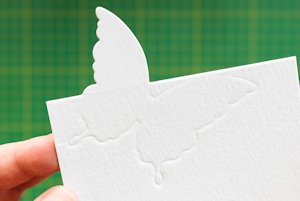
    Score along the pencil line, outside the die cut area. Erase pencil markings.
  7. Step 7

    Decorate the card as desired.

Video!

Variations

  1. Use similar techniques on a card, or create a fun party ensemble.
Your Turn

You've seen the tutorial, now you try it! We've got a section of the gallery set aside for Partial Die Cutting. Try this technique, then upload your artwork to the gallery. Show us your creations!

***Please note - Internet Explorer/Edge is not a supported browser, and will not allow you to see the videos. Please use Chrome, Firefox or Safari to view our tutorial videos.

Questions and Comments

We'd love to get your feedback or questions. Leave your comment below.

Thanks for responding Debby. I'm sure there's a video out there somewhere and I'll find it!
Germayne Turner Nash  |  Thu Jun 12, 2014 at 8:25 AM
Thank you so much for sharing this wonderful place setting and the techniques with us. You make things looks so easy!
Christine Sudmann  |  Thu Jun 12, 2014 at 10:25 AM
Such a great technique and tutorial. Another very cool partial die cut technique is with individual letters to spell a word. I have some in my gallery - http://www.splitcoaststampers.com/gallery/photo/2516124?&cat=500&ppuser=316610

with a link to a tutorial by damasklove. - Karen
Karen  |  Thu Jun 12, 2014 at 12:44 PM
Thanks Debby, this is a terrific tutorial with lots of tips and techniques.
Helen Cooke  |  Thu Jun 12, 2014 at 11:44 PM
Thank you. This is incredibly beautiful and I certainly will be trying it.
Janice Martin  |  Fri Jun 13, 2014 at 12:29 AM
Wow!!! What a great idea! I really enjoyed the video tutorial, so easy to understand. I recently bought some butterfly dies! Fortunate timing smile
Thanks so much!
Diane McG  |  Fri Jun 13, 2014 at 1:35 PM
This was one of the best videos I have ever seen. Thank you for clear and beautiful instructions.
Sallie Hayes  |  Fri Jun 13, 2014 at 3:44 PM
Beautiful!!!!
Nancy Williams  |  Sat Jun 14, 2014 at 6:45 PM
This is such a beautiful card and the tutorial is so well done. Now I'd like to see a tutorial on doing the graphite calligraphy.
Melanie Richards  |  Sat Jun 14, 2014 at 8:32 PM
Saved this to come back and watch & I'm SOOO glad I did -- what a beautiful result and fabulous tutorial on not only partial die cutting, but water coloring too!!! Have a card in mind now and hope to have time to create it after your informative video!!! TFS!!!
Marge R (mer)  |  Tue Jun 17, 2014 at 11:06 AM
That was a great tutorial/video! I can't wait to try this. TYFS!
Sue Simmons  |  Sat Jun 28, 2014 at 6:45 PM
Absolutely inspirational, I can't wait to try your watercolor technique. Thank you so much, a great teacher~
Donna Cipriano  |  Wed Jul 23, 2014 at 7:53 AM
Thanks so much for taking the time to make this great video! I love your accent and your clear and concise directions. I am so inspired to try partial die-cutting, water colouring and calligraphy !!
Signe  |  Thu Jul 24, 2014 at 3:24 PM
Stunning....thx for sharing!
Nancy Monahan  |  Mon Feb 2, 2015 at 2:10 PM
Absolutely beautiful!! and so well done. Thank you so much for sharing your love of watercolors and card making.....love the colors you chose..
Linda Carter  |  Tue May 19, 2015 at 10:45 PM
Oh, Debby, what a wonderful tutorial! I loved it! And I love that you included watercoloring and the handwriting tip too! Hugs!
CherylQuilts  |  Mon Dec 28, 2015 at 2:51 PM

Page 3 of 3 pages  <  1 2 3

You need to be logged in to comment

GET OUR NEWSLETTER


Splitcoaststampers's privacy policy