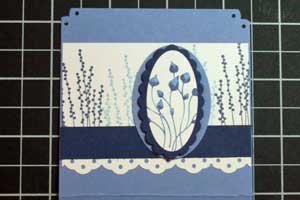
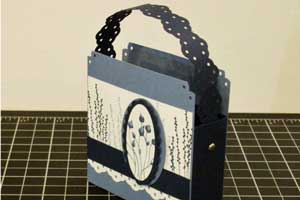
3” x 3” Note Card Tote
by Regina Andari
Create an adorable tote to give away 3" x 3" note cards.
Supplies

- One 3 1/4" x 7 1/2" piece of Cardstock for tote base (Brocade Blue used here)
- One 2 1/4" x 8 1/2" piece of Cardstock for tote sides (Night of Navy used here)
- One piece of cardstock for tote handle (Night of Navy used here)
- Stamps (Stampin' Up!'s Pocket Silhouette used here)
- Ink
- Paper Punches (Eyelet Border Punch and Oval punches used here)
- Paper piercing tools, or 1/16" circle punch
- Strong Adhesive (Sticky Strip™ used here)
- Brads
- Additional Cardstock to decorate your tote
Step-by-Step
-
Step 1
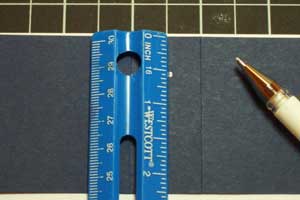
Score 3 1/4" x 7 1/2" piece of cardstock
3 1/4” from each end.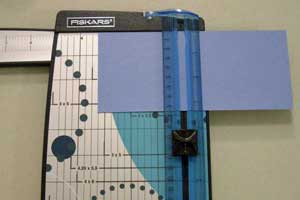
-
Step 2
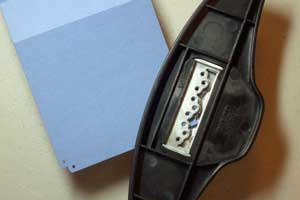
Make decorative cuts on the four corners by placing each corner in the Eyelet Border punch as shown.
-
Step 3
Use the Eyelet Border punch along both edges of a 1 1/4" x 8" piece of cardstock to create a handle.
Note:
If you'd rather not have a fancy handle or don't have a decorative border punch, cut a 3/4" x 8” strip instead.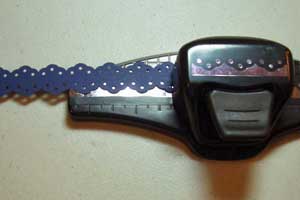
-
Step 4
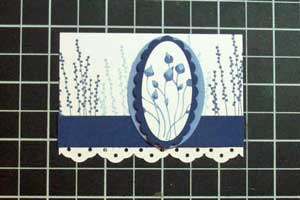
Stamp and embellish additional cardstock to create your card tote front.
-
Adhere the stamped and embellished layer to the front of the note card holder.
-
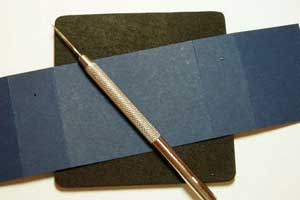
Step 5
Score the 2 1/4" x 8 1/2" piece of card stock at 1 5/8", 2 5/8", 5 7/8", and 6 7/8". This insert creates sides for the holder.

-
Step 6
There are 1” sections on the scored cardstock. Find the center of each, and mark 1/2" down with a white gel pen.
-
Step 7
Use a piercing tool or 1/16” circle punch to make a hole where the handle will be attached.
-
Step 8
Apply adhesive to the cardstock strip as shown.
-
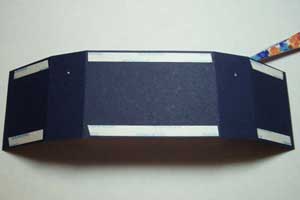
Step 9
To adhere the scored strip to the holder, line up one of the short panels with the bottom and the edge of the holder.
Then secure the long panel to the back of the holder.
Finish by folding in the remaining short panel. Adhering the panels in this order helps keep the edges lined up.
-
Step 10
Attach the handle with brads.
-
Make a set of 3x3 note cards to put in the holder.

Video!
Variations
- For 5" x 5" cards, the base is 5 1/4" wide and 11 1/2" long, scored at 5 1/4" from each end.
- For 4 1/4" x 5 1/2" cards, the base is 4 1/2" wide and 12 1/2" long, scored at 5 3/4" from each end.
- For 5" x 5" cards, this piece is 12 1/2" long and 4 1/4" wide, scored at 2 7/8", 3 7/8", 9 1/8", and 10 1/8".
- For 4 1/4" x 5 1/2" cards, this piece is 10 1/2" long and 4 3/4" wide, scored at 2 1/4", 3 1/4", 7 3/4", and 8 3/4".
Make the tote for any size card!
For the base piece in Step 1 of the tutorial, add 1/4" to the width of your cards for the width. The length of this piece will be 2 times the height of your card plus 1 1/2".
Score at card height plus 1/4" from each end.
The length of the piece in Step 5 will be the same as the perimeter of the bottom of the tote, 2 times the width plus 2". Subtract 1" from the score measurement for the width of this piece.
Make the first score line at 1/2 the width of the tote, the next line 1" over, the next line the full width of the box, then again 1" over.
Your Turn
You've seen the tutorial, now you try it! We've got a section of the gallery set aside for 3” x 3” Note Card Tote. Try this technique, then upload your artwork to the gallery. Show us your creations!
***Please note - Internet Explorer/Edge is not a supported browser, and will not allow you to see the videos. Please use Chrome, Firefox or Safari to view our tutorial videos.

Questions and Comments
We'd love to get your feedback or questions. Leave your comment below.
I have been wanting to make a holder for some 3x3 cards.
Hope mine is as lovelyl as yours!
Thank you!
Page 1 of 3 pages 1 2 3 >