Iris Twist
by Jennifer Thomas
Iris Twist is a paper folding technique taken from the old fashioned Iris Folding technique from Europe. My intentions were to make this complicated and fabulous form of art something that stampers could use in their card making. So the steps are simplified to make this project demonstrable and repeatable. If you can fold paper and count, you can do this, really!
Supplies
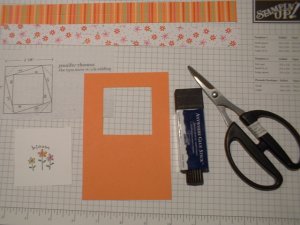
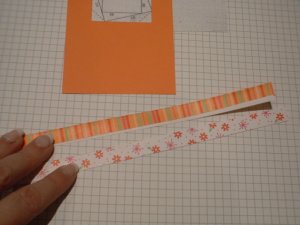
- Two 1" x 12" pieces of designer paper
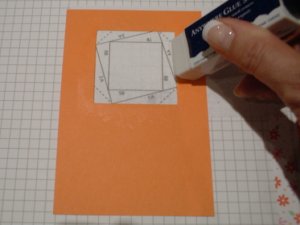
- Cardstock of choice with a 2 1/8" square cut out of it. Marvy sells a jumbo punch that punches a 2 1/8" square, otherwise trace a 2 1/8" square onto your cardstock then use a hobby blade & ruler to insure a straight cut.
- Glue Stick
- Repositionable Adhesive
- Scissors
- Stamped Artwork on Cardstock
- Iris Twist Pattern
Download (jpg, 8k)
Step-by-Step
-
Step 1
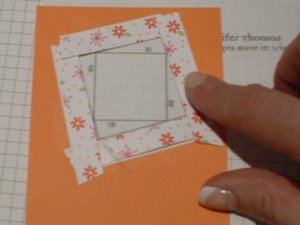
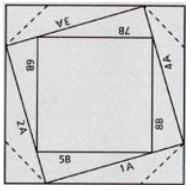
Take the Iris Pattern and apply some Repositionable Adhesive to the outside of the top of the box. Position the orange cardstock over the pattern so the pattern of the square shows through the cutout of the square in the cardstock. Press down so the repositionable adhesive holds the cardstock to the pattern.
Important note: We are working on the BACK of the finished design, so things may look messy from the back but they will look nice when we turn it over in the end. Trust me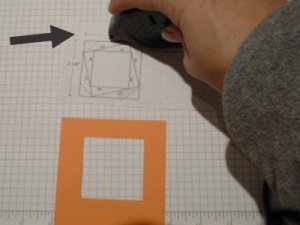
-
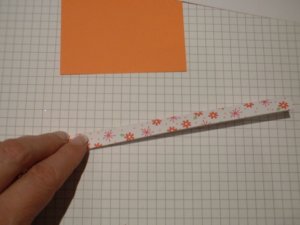
Step 2
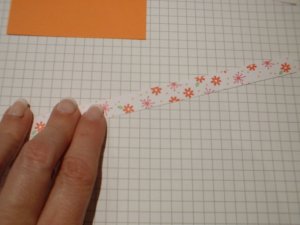
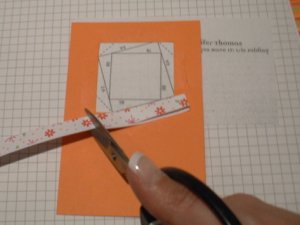
Fold the strip of designer paper in half the long way.
-
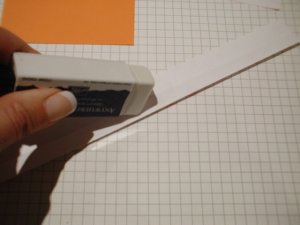
Step 3
Open the fold and apply Glue Stick adhesive to the inside of this folded paper.
-
Step 4
Press the fold down so the strip glues itself together...rub a little to get the glue stick to take hold.
-
Step 5
Repeat this on the second strip of designer paper so you have two strips.
Note: Don't worry a lot about how well the raw edges of the fold line up, that part will not be seen. The folded edge is the part that will be seen.
-
Step 6
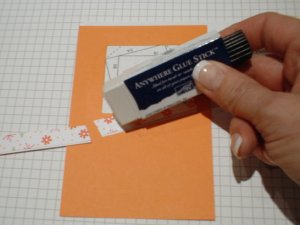
Apply gluestick adhesive on the orange cardstock around the frame of the opening...keeping the glue on the cardstock only and not on the pattern piece!
-
Step 7
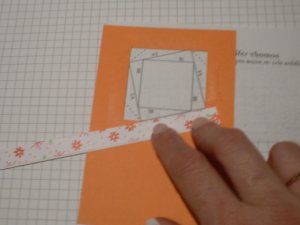
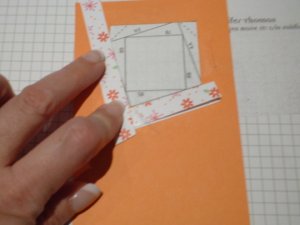
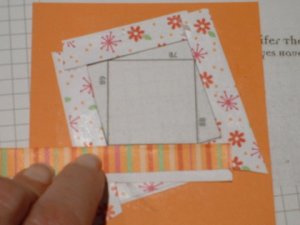
Take your first designer paper strip holding the folded edge facing in towards the center. This will be our '"A" piece. Line the folded edge of this strip up with the slanted line marked by the pattern as "1A". So you are using the lines of the pattern to show you where to place each strip, but the strips only get glued to the cardstock, not to the pattern! For now ignore the dotted lines in each corner of the pattern. See the optional instructions at the end of these directions for working with more than 2 strips of colori>
-
Step 8
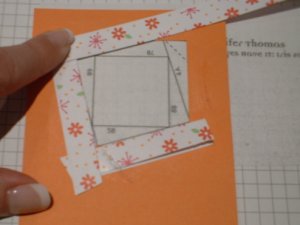
Trim the strip off so that we can continue to use that same piece.
-
Step 9
You will need to add a little bit of gluestick to the end of that first strip so that...
-
Step 10
...when you line the designer paper strip up for "2A" it will stick where it overlaps on that first piece. Each time you layer on a new strip you will need a little bit of glue on the previous piece.
-
Step 11
Continue the same process around the square for "3A"...
-
Step 12
...and for "4A". You should have enough of this strip to make all four of these pieces.
-
Step 13
Apply adhesive to the square created by the first ("A") strip so that the next strip can have something to stick to, once again only apply adhesive to the layers of designer papers and not on the pattern!

-
Step 14
Take the other strip of designer paper, this will be the "B" strip. You will complete the same process by gluing onto "5B"...
-
Step 15
...then "6B"...
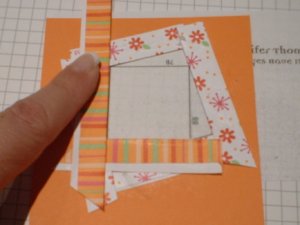
-
Step 16
....then "7B".
Now the fun part! Carefully pull the cardstock up off the pattern. The repositionable adhesive allows the pattern to be removed cleanly from the cardstock.
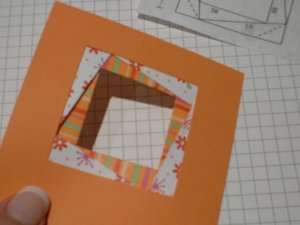
Viola! Your Iris Twist Paper Folding design is done! Remove any remaining adhesive from the front of the cardstock.
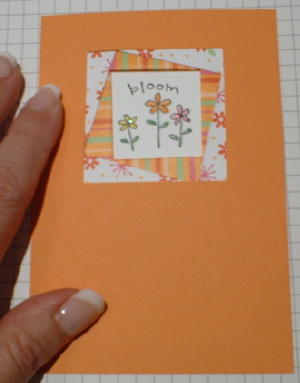
Adhere your stamped artwork of choice into the open square to make a nice cardfront design. Take this piece, layer it onto a card and embellish to your hearts content!
-
Finished card.
Variations
Another twist
This pattern can incorporate 3 different designer patterns. Start with 3 strips of coordinating designer papers. When you start layering on the strips do not start with "1A" but instead use the dotted lines in each corner first.
Once you have one small piece attached to each of those dotted lines take your second strip of color and complete "1A - 4A" and your third strip to complete "5B - 8B". Enjoy this "Twist" of the Iris Folding technique!
Use your scraps!
If you fold carefully you can also use vellum papers for a very elegant look - a great way to use up those scraps of designer papers!
Your Turn
You've seen the tutorial, now you try it! We've got a section of the gallery set aside for Iris Twist. Try this technique, then upload your artwork to the gallery. Show us your creations!
***Please note - Internet Explorer/Edge is not a supported browser, and will not allow you to see the videos. Please use Chrome, Firefox or Safari to view our tutorial videos.

Questions and Comments
We'd love to get your feedback or questions. Leave your comment below.
Thank you so much.
You just saved me the $25.00 fee the LSS charges for the class and to make one card. :}
Now will you help me understand how to incorporate this iris folding into a lady bug?
Should I just draw what I want on the outside of the card??
I LOVE Iris Folding and your card is an inspiration to me - Here's my question...I want to make a free standing (no card background) of a Iris folded Vase - how do I glue? Should I glue it directly to the pattern back? Any suggestions will be greatly appreciated...The back will be hidden inside a shadow box frame. Thanks!
You can Google "Iris Folding" and it is the first choice in your search.
Jan
Jan
than tearing off all those strips of tape.
I figure out where I want to cut on the card and use my expression and in an instant I have the shape and am ready to start folding.
I use the templates at:
http://www.irisfolding.circleofcrafters.com/makepatterns.html
I bought a book for iris folding Christmas cards, but the book says you have to use rubber stamps with the pattern on them. They only give three patterns in the back, and those patterns are not numbered. So, my question is, if I have a pattern, and it's not numbered or sectioned off to know which color/pattern paper to use where, how do I know what to do? Also, I've seen all different suggestions for the width of the paper strips. How do you know which one to use for a particular pattern if it's not listed?
Thank you very much for your time!
Michele
Jan Castle
Thank you so much for the great explanation! I have one more
question. If there are no numbers to follow along on the pattern, how
do you know where to place your first chosen paper to start, and how
do you know where to put the next piece, etc? I totally understand
the coding system you explained to keep track of your papers, but I
don't understand how to determine the order of those papers. In other
words, how do number the pattern? I hope this is making sense, LOL!
Thanks again!
Michele
Hope I can answer this...showing is soooo much easier - LOL! After temporarily affixing your pattern (which is cut 1/4" bigger than the actual pattern) on the right/front side of your aperature so you are looking at the aperature/hole from the back side and seeing only the lines of the pattern, I would begin considering my pattern at the bottom right as I look at it from the back side...this should help you begin to mark your colored dots if you have not already figured out and marked your pattern. Dot one color here = #1, move to the bottom left and dot different color here =#2, move to top left and dot different color = #3, move to top right and dot different color = #4...continue around to dot your same colors in the same locations (bottom right, bottom left, top left, and then top right...adding the next number - if you want numbers) until you are at the center of your pattern. Hope this make sense...my suggestion is to just jump in and give it a try - it's really easier than it sounds.
Jan
Thank you, thank you, thank you!!! Your directions are going to help me SO much!! I appreciate you taking the time to try and explain something that's much easier understood by seeing it done, but I think that you did a great job!! When I make a card, I'll post it for you to see!
Hugs,
Michele
:D
http://manuelasbastelblog.blogspot.com/
LG Manuela
Page 1 of 2 pages 1 2 >