Hot Glue Embossing
by Connie MacFarlane
Create miniature abstract art panels with watercolor paper, hot glue, embossing powder and re-inkers.
Supplies
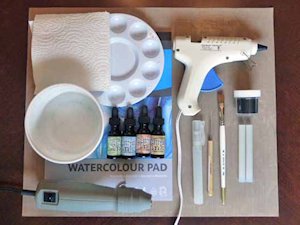
- Watercolor paper – any kind (Daler & Rowney 90 lb. wt. used here)
- Hot glue gun and glue sticks
- Piercing tool or large needle
- Heat tool
- Embossing powder
- Water mister
- Ice cube
- Dye reinkers (Ranger Distress Antique Linen, Wild Honey, Peeled Paint and Broken China inks used here)
- Palette or something to hold your inks
- Paint brush
- Container of water
- Craft mat - or other water proof surface
- Paper towel
- Other supplies as needed to complete card (4 1/4" x 5 1/2" card base used here)
Step-by-Step
-
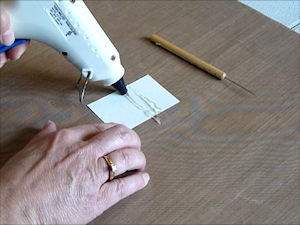
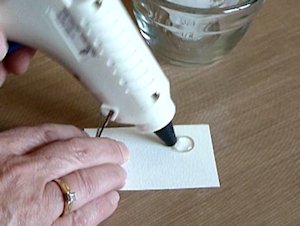
Step 1
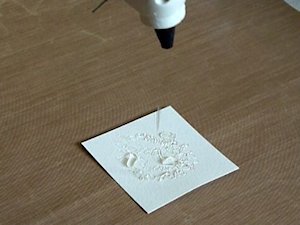
Cut a piece of watercolor paper to desired size (2" x 3" piece used here). Heat hot glue gun until the glue is running freely. Apply hot glue to the watercolor piece in an abstract design. Here, two lines of glue were run from right to left across the piece.
-
Working quickly, while the glue is still soft, run the tip of a piercing tool through the hot glue to pull it into a design. Repeat this step as desired. Set the piece aside to cool.
NOTE:
See Variations below for more ways to apply the hot glue.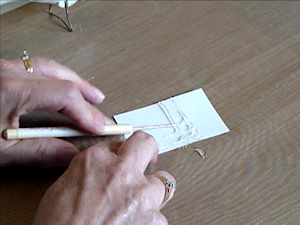
-
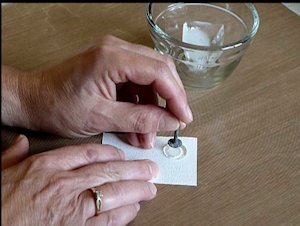
Step 2
To emboss the piece, reheat the glue very slightly – only 3 to 4 seconds – with a heat tool. Sprinkle with embossing powder and set with a heat tool.
NOTE:
While heat setting the embossing powder the glue will begin to soften and may change shape. Do not overheat the piece.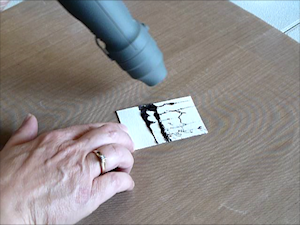
-
Step 3
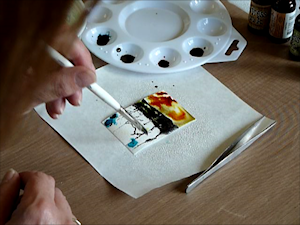
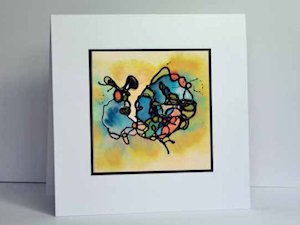
Put a few drops of each color of dye reinker you will be using onto your palette. Place your piece onto a waterproof surface and generously spritz with water until the entire surface is wet.

-
With a wet paint brush pick up some of the lightest ink and float it onto the piece. Continue adding ink colors, cleaning and wetting the paint brush between each color. (Ranger Antique Linen & Wild Honey used at top of piece, Peeled Paint & Broken China used on lower section here) Mist the piece with water again; the colors will move and blend.
-
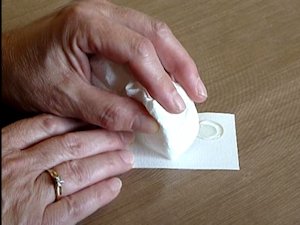
Step 4
As the piece starts to dry you can adjust the color as desired. Add more color where needed with your ink and a wet paint brush, or remove excess water or color by very gently daubing with a paper towel where necessary. Set the piece aside and allow to completely dry. When dry use a paper towel to wipe off any ink that may be sitting on the embossing – the embossing resists the ink so will wipe off easily.
NOTE:
Leave your piece on the waterproof surface until completely dry. Do not place a paper towel under it as the paper towel will absorb a lot of your color leaving a faded piece. Distress inks will retain a more vivid color; regular dye inks tend to separate out into their component colors often giving unexpected and interesting results.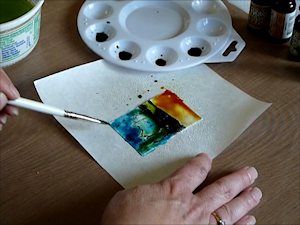
-
Step 5 (Optional)
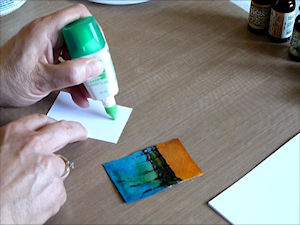
Cut a piece of heavy cardstock slightly smaller than your finished art piece and adhere to the back with adhesive to flatten the piece and give it stability.
-
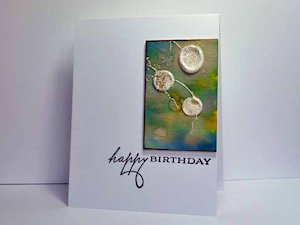
Step 6
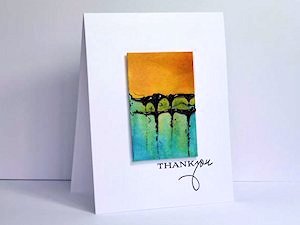
Use the panel to complete a project.
-
Step 7
To create a raised edge circle, place a large drop of hot glue on the watercolor paper.
-
Press into the center of it with an ice cold, round flat surface (the sample was made using the head of a roofing nail, which was cooled by placing it head down on an ice cube). As the shape cools and contracts, press into it a second time if needed. Heat emboss as desired.
-
Step 8
For a wide, flat circle of glue, press down on the hot glue with the flat surface of an ice cube.
-
Watercolor as above, and use the panel to complete a card.
-
Step 9
To create an abstract design hold the glue gun 4” – 6” above the watercolor piece and allow the glue to drizzle randomly. Heat emboss as desired and watercolor as above.
-
Feature the panel on a card.
Video!
Your Turn
You've seen the tutorial, now you try it! We've got a section of the gallery set aside for Hot Glue Embossing. Try this technique, then upload your artwork to the gallery. Show us your creations!
***Please note - Internet Explorer/Edge is not a supported browser, and will not allow you to see the videos. Please use Chrome, Firefox or Safari to view our tutorial videos.

Questions and Comments
We'd love to get your feedback or questions. Leave your comment below.
A couple of people that have posted to the gallery have mentioned that their glue dried too quickly - I just checked my glue sticks, the ones I used are High Temp, not sure if that makes a difference.
Can't wait to try this one. Thanks so much.
Page 2 of 3 pages < 1 2 3 >