Heated Copper Accents
by Loll Thompson
Die cut copper sheeting for a unique metal accent. Heat using a mini torch to achieve multi-colored patinas.
Supplies
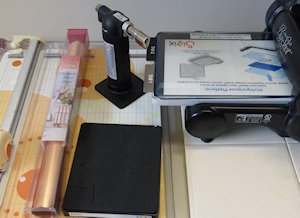
- Soft copper sheeting (.005 mm K&S Precision Metals brand used here; .003 mm sheeting can also be used. It can be cut with wafer dies, but is more flimsy.)
- Scissors or rotary cutter
- Heat-proof work surface
- Mini butane torch or high-temp heat gun
- Die cutting machine
- Steel rule dies (Sizzix “Leaves” used here)
- Stamps and other embellishments to complete the card (white card stock, wood grain embossing folder (Sizzix), copper cording, glue dots, Smoky Slate ink and Amy R “Sunny Sentiments” stamps used here)
Step-by-Step
-
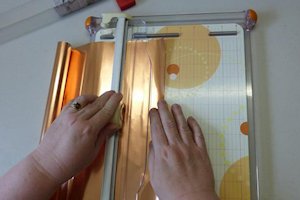
Step 1
Cut soft copper sheet into manageable pieces using scissors or rotary cutter.
-
Step 2
Place copper on heat-proof surface and use mini butane torch to heat copper. Keep torch four to six inches above the copper and moving at all times. As soon as the copper starts to change color, immediately pull heat source away. The color will continue to change for a few seconds. Continue heating the copper until the whole piece has been heated. Heated copper will change color in this order: copper, dark orange, pink, blue, silver.
If copper is over-heated it will turn silver. Small areas of silver will add interest to the copper piece, but try to avoid creating large areas of silver.
NOTE:
An embossing gun can be used with thinner sheeting, but it takes much longer to see an effect. The color variations will be less intense and more diffuse.
-
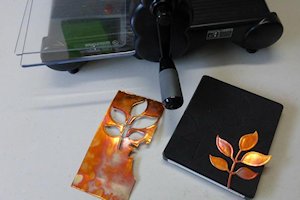
Step 3
Die cut heated copper using steel-rule dies (may need to run back and forth in Big Shot a few times or add cardstock shim to increase pressure).
NOTES:
Some wafer thin dies will cut through thicker copper, but not all. Experiment to see which ones work. Again, a card stock shim may be added to increase pressure when die-cutting.
-
Step 4
Place cut copper between cutting plates and run through machine with platform (no dies) to smooth out any sharp edges before adding to card.
NOTE:
Carefully remove any narrow copper threads from the edges of the die cut piece.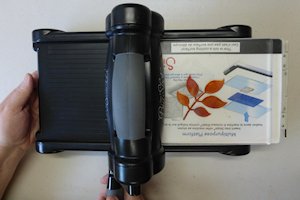
-
Step 5
Use the copper piece to embellish a completed project.

Video!
Variations
-
Heat the copper as above, then run it through your die cutting machine in an embossing folder for a stunning textured accent.

Your Turn
You've seen the tutorial, now you try it! We've got a section of the gallery set aside for Heated Copper Accents. Try this technique, then upload your artwork to the gallery. Show us your creations!
***Please note - Internet Explorer/Edge is not a supported browser, and will not allow you to see the videos. Please use Chrome, Firefox or Safari to view our tutorial videos.

Questions and Comments
We'd love to get your feedback or questions. Leave your comment below.
Page 2 of 2 pages < 1 2