Glitter Painting
by Jessie Hurley
Create a sparkly image with Glitter, stencils and double sided adhesive.
Supplies
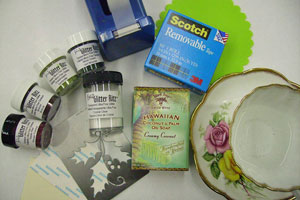
- Brass stencil, Dreamweaver Stencil used here
- Assorted glitter
- Double-sided adhesive sheet, cut down to the size of your stencil
- Neutral colored cardstock, cut down to the size of your stencil
- Removable tape for masking
- Pure coconut soap, other brand name soaps can get in the way of the glitter sticking to the adhesive sheet
- Water
- Glitter Gone Mat, or other product to clean up glitter
Step-by-Step
-
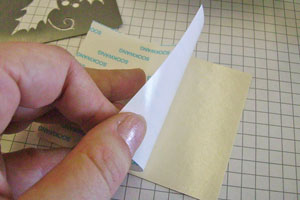
Step 1
Attach the double sided adhesive sheet to a piece of neutral colored cardstock for stability.
-
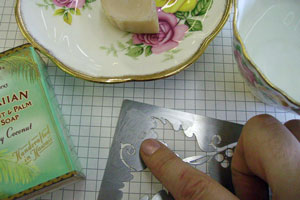
Step 2
Wet your finger with a bit of water and rub your finger into the soap creating the consistency of moisturizer. Rub your soaped finger onto the stencil.
Once your entire stencil is covered in soap, lay the soaped side down onto the adhesive sheet you prepared in Step 1.
Hint:
The soap shouldn't be too wet (lots of soapy bubbles) or too dry (hardly see the layer on the stencil) and getting to the right consistency requires some practice, but once you get it, you will always get it.
-
Step 3
Using the removable tape (or tape of your preference) mask off any areas where you do NOT want glitter to be.
As there will be 4 colors of glitter used in this example, only the branches were left unmasked in this step.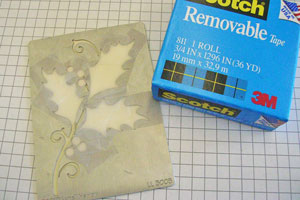
-
Step 4
Pour the first color of glitter (bronze) over your unmasked areas.
Press the glitter into your image to ensure it sticks, and tap off the excess back into the container.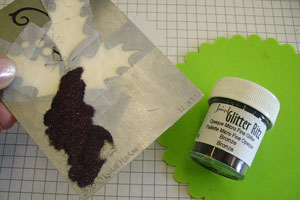
-
Step 5
Remove the tape from the areas where you would like the second color of glitter to be. In this example, the tape was removed from the berries which were then glittered with Apple Red.

-
Step 6
Remove the remaining pieces of tape.
Using your finger, dip into the third color of glitter (Moss Green in this example) and rub into the areas where you would like it to have a darker dimension.
Keep adding more glitter by rubbing it into your stencil until you have it how you like it. Keep the lines a little rougher on the inside edges, it makes it easier to blend in the color in the next step.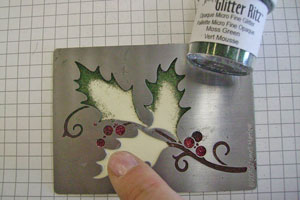
-
Step 7
Add the final color of glitter (Grasshopper)
Press the glitter into your image to ensure it sticks, and tap off the excess back into the container.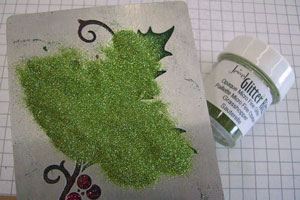
-
Step 8
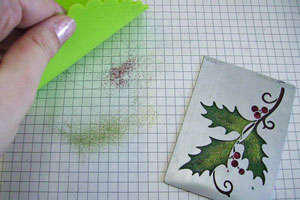
Clean off your surface area with the Glitter Gone Mat.
-
Step 9
Lay the stencil face down on your work table and carefully peel your glittered cardstock off your stencil. If you have the right amount of soap on your stencil from Step 2, the cardstock will remove easily, if there isn't enough soap, it may fight back a little, but be patient and remove it slowly.
Hint:
It is important to remove the paper from the stencil, and not the stencil from the paper to try and ensure that your stencil does not get bent during this step.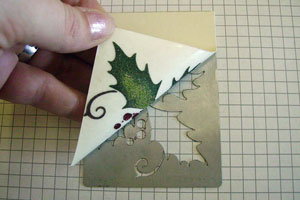
-
Step 10
Apply Clear Glitter all over the background to cover every sticky inch of the adhesive covered cardstock base.
You can use another color of glitter in this step, but because a cream cardstock was used in Step 1, the Clear Glitter allows for the color of the cardstock underneath to show through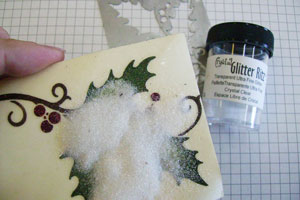
-
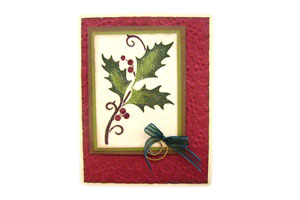
Step 11
Mat your image, and attach to a card.
Video!
Your Turn
You've seen the tutorial, now you try it! We've got a section of the gallery set aside for Glitter Painting. Try this technique, then upload your artwork to the gallery. Show us your creations!
***Please note - Internet Explorer/Edge is not a supported browser, and will not allow you to see the videos. Please use Chrome, Firefox or Safari to view our tutorial videos.

Questions and Comments
We'd love to get your feedback or questions. Leave your comment below.
I'm very excited to say that the Glitter Gone mat is my own invention and we sell it on my website here...
http://www.cherishthethought.ca/store/index.php?cPath=341_356&osCsid=7b2jtbfqdfkdk7uac286l36ha0
we do have distributors throughout Canada so there may be a store close to you that carries it, and are working on getting it into the USA.
It is re-useable and picks up glitter from any surface and then rinses clean!
Thanks so much for leaving your comment!
There is a video in progress, and it shows that this technique only takes 4 minutes total, but, sigh, I'm technologically challenged, and am having trouble getting it off the camera, please bear with me, and we'll get it loaded up asap.
Thanks for your patience!
we can certainly send you a Glitter Gone mat, as we have mailed stuff out to the U.S. before, just place the order online, and be sure to put in your mailing address, and we will get one to you asap.
Thank you for taking the time to leave a comment!
thanks for leaving a comment and appreciating the instructions, I joked with Beate that she edited the "fun" out of them, but after i saw it posted, i was quite happy with how well it read too, sigh, Beate really knows how to make sure the Tutorials are straightforward and easy!
Wish you had one
Sue
Thank you so much for your lovely support of my work! I learned on Jak paper too, and it was far easier than the Sookwang, I'm jealous that you have some Jak stashed away though!
I'm SO glad to know that the goats milk soap worked too! Thank you for posting that here for everyone to see!
You don't know how happy it makes me when people say they are going to play with something in their stash that is "collecting dust". Thank you for taking the time to reply, and I do hope you're playing with your glitter this weekend! Spread the Sparkle!
Page 2 of 3 pages < 1 2 3 >