Flip Down Stack Card
by Sabrina Friel
Create a card with a flip down stack on the front.
Supplies
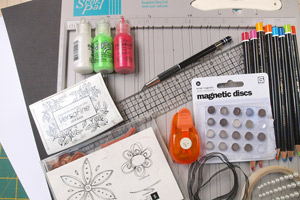
- Scor-Pal™
- One of 8" x 9 1/4" piece of Cardstock for card base, scored along the 4" and folded in half, to fit a #10 business envelope
- One 4" squares of white cardstock pieces for panels
- One 4 1/2" x 6 3/4" piece of black cardstock, for panels and stack contruction
- Paper trimmer or ruler and blade
- Ribbon, approximately 12" long
- Double-sided tape
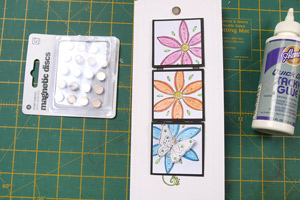
- Magnetic snaps or a photo-turn and brad for closure
- Stamps, inks, coloring media and preferred adhesive,stamps used here are Stampin' Up! Doodle This and Penny Black Perched on Lace
Step-by-Step
-
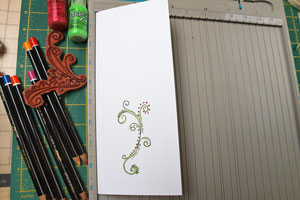
Step 1
Prepare your card base. This example is simply scored and stamped; you can also use patterned paper on the card base.
-
Step 2
Prepare cardstock for image panels and stack:
Cut the white cardstock into 4 squares each measuring 2" square.
Cut the black cardstock into 5 squares, each measuring 2 1/4" square.
From the remaining black card, cut two pieces half an inch wide and about an inch long, and round one end of each strip if you wish. This is to create the tab for holding the stack closed.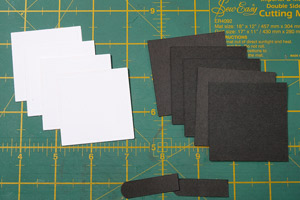
-
Step 3
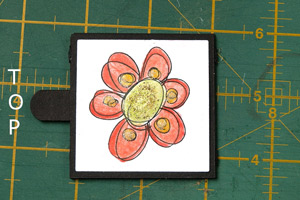
Stamp and color your image panels as required.

-
Step 4
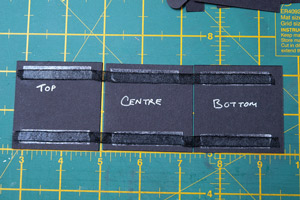
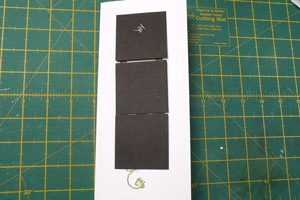
Take 3 of the 2 1/4" squares, and lay them face down on your surface. Leave a slight gap between the bottom panel and the center one, and a slightly larger gap between the center panel and the top one.
Add two strips of double-sided tape to each panel.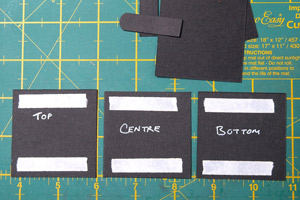
-
Step 5
Remove the backing from the tape and add a strip of ribbon from one end to the other, making sure to keep a slightly larger gap between the center square and the top one, and trimming the ribbon so that the ends don’t stick out beyond the card.
-
Step 6
Take another of the 2 1/4" squares, and stick it to the bottom square, over the ribbon.
The tab should be two layers of card for extra strength; take the two 1/2" wide strips and stick them together.
Then stick the tab to the center square – it will stick out over the bottom square. Make sure it sticks out enough to cover the magnetic snap if you’re using it, so it needs to be about half an inch.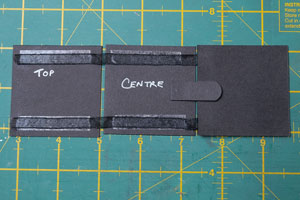
-
Step 7
If you are using a magnetic snap, the next stage is to attach it to the tab.
Turn the strip of 3 squares over so that the ribbon side faces down, and fold the bottom square up over the centre square. Now the back of the tab is visible – stick the magnetic snap here.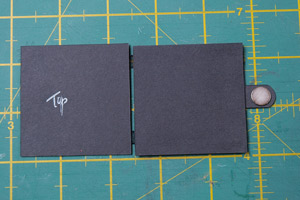
-
Step 8
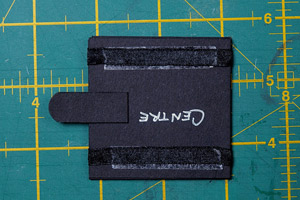
Fold the stack upwards once more; the back of the center square will now be showing, with the tab towards the top.
-
Attach the last 2 1/4" black square over the center square, and then attach the image panel that you wish to show on the FRONT of the closed stack. You need to take care to attach it in the right orientation if that matters.
-
Step 9
Lay the open stack on the embellished card front to check the positioning, and then stick the BACK of the top square to the card front with your preferred adhesive. This is the only square that still has the ribbon showing on the back. Make sure that the tab does not stick out above the top of the card
-
Step 10
Attach the image panels to the squares, and then fold the stack up, attaching the second half of the magnetic snap directly behind the tab.
-
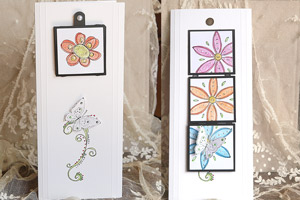
Step 11
Your card is finished.
Video!
Variations
Options:
-The size of the card can be varied so long as it is a tall skinny format.
-The size of the panels can be varied, and they can be rectangular rather than square.
-You can add extra layers for matting the image - just allow extra ribbon to accommodate the increased bulk.
-A photo turn and brad (fastened through the card front) can be used as an alternative closure to keep the stack closed. If you don’t like the back of the brad showing, you may prefer to make a card front with thin card and patterned paper and then attach it to a card base after adding the brad closure.
Your Turn
You've seen the tutorial, now you try it! We've got a section of the gallery set aside for Flip Down Stack Card. Try this technique, then upload your artwork to the gallery. Show us your creations!
***Please note - Internet Explorer/Edge is not a supported browser, and will not allow you to see the videos. Please use Chrome, Firefox or Safari to view our tutorial videos.

 *
*
Questions and Comments
We'd love to get your feedback or questions. Leave your comment below.
thanks
Have a wonderful 2013 Lee (NZ)
for your great tutorial and video !
Here is my card :
http://www.splitcoaststampers.com/gallery/photo/2308870?&cat=500&ppuser=205884
Greetings from Belgium,
niki
Page 2 of 3 pages < 1 2 3 >