Flat Backed Treat Box

by Patti Gilliam

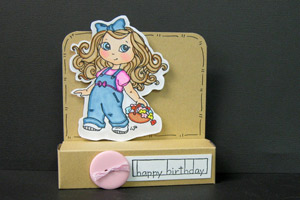
Try this fun twist on a treat box, and showcase your artwork!

Supplies
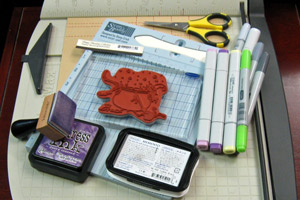
  • One 7" x 9" piece of cardstock

  • Scoring Tool

  • Strong Adhesive

  • Paper Trimmer

  • Scissors

  • Stamps

  • Ink

Step-by-Step

  1. Step 1

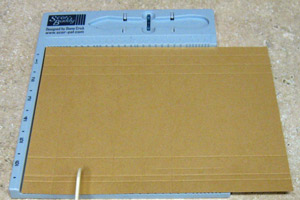
    Score the 7" x 9" cardstock on the 9" side at 1", 2", 3", 4" and 5".
    Score on the 7" side a 1/2", 3/4", 1 1/2", 5 1/2", 6 1/4" and 6 1/2".
  2. Step 2

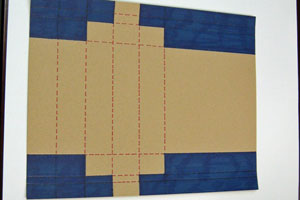
    Cut out all sections of cardstock that are shown below.
  3. Step 3

    Trim in only to the long fold lines, as shown in blue. This will create your tabs.
  4. Step 4

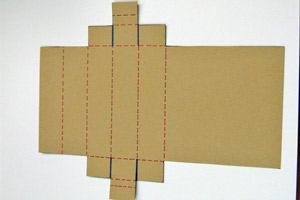
    You will want to slightly trim each tab, to ensure a nice, but snug, fit.
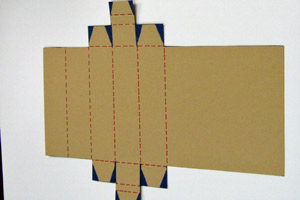
  5. Step 5

    Add strip of Scor-Tape™on the largest piece, about 3/4" from the last score line.
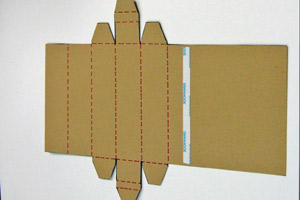
  6. Step 6

    Fold all score lines as shown below.

    If you are planning to stamp directly onto your box, you should do that now.
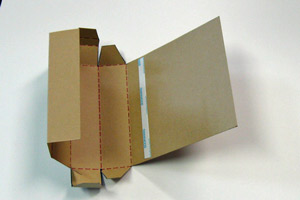
  7. Step 8

    Assemble box, by folding in each section, until they meet at the adhesive strip. Remove strip, and adhere the box body to the box ‘back’. Fold in the two short tabs on each side. Fold the long tab over the two short tabs, and score the small outside line – it should easily slip inside box for closure.
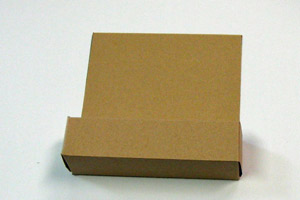
  8. Step 9

    Decorate as desired.

    This box ‘back’ is a perfect place to showcase your own artwork. It’s also perfectly sized for Hershey’s Kisses, or other small gift items.
Video!

Your Turn

You've seen the tutorial, now you try it! We've got a section of the gallery set aside for Flat Backed Treat Box. Try this technique, then upload your artwork to the gallery. Show us your creations!

***Please note - Internet Explorer/Edge is not a supported browser, and will not allow you to see the videos. Please use Chrome, Firefox or Safari to view our tutorial videos.

Questions and Comments

We'd love to get your feedback or questions. Leave your comment below.

What a super cute idea...am just LOVING this and so many ideas are floating around in my head! Am thinking this would be great for all holidays and even birthday treats!! Thanks so much for sharing with us!!
Joanne Hoffmann  |  Thu Sep 13, 2012 at 5:51 PM
Martha I just finished mine and found the same thing. Reading the finer instructions is not a specialty of mine so I figured I did something wrong. I love the end result though and can't wait to make more.
susie australia  |  Thu Sep 13, 2012 at 10:10 PM
@Martha and Susie,
I think those score lines make it easier to tug the lid inside the box. You can leave those off if you don't like them. They are not neccessary.
beate  |  Fri Sep 14, 2012 at 6:33 AM
Cute, cute, cute! Great for many occasions.
Rosa M. Vasquez  |  Fri Sep 14, 2012 at 12:53 PM
What an adorable and easy to make treat box. Absolutely have to try this one! TFS
-pat
Scraps of Luv  |  Fri Sep 14, 2012 at 1:31 PM
I just made two of these adorable little boxes. Love them! I'd like to make bigger versions of these, but math is not my forte.
Lady Fair  |  Sat Sep 15, 2012 at 12:00 PM
I found that the two "extra" score lines made the cardstock tabs bow outward and they wouldn't lie flat when tucked into the box. I ended up adhering an extra piece of cardstock inside the tabs to correct that. Fortunately, the card is for my granddaughter, and she will not notice the "repair" when she sees the candy!
ec  |  Mon Sep 17, 2012 at 9:28 AM
This is so stinkin' cute and easy to make. Wow my brain is going to explode with all the ideas using this box is conjuring up!! thanks smile I actually would like to make smaller versions also, any math help with that? thanks again
stamppig  |  Tue Sep 18, 2012 at 3:16 PM
I absolutely LOVE this! Boxes (of all types) are my thing smile. Thanks to you both for your awesome tutorial! HUGS!
Holly aka Toy  |  Thu Sep 20, 2012 at 7:26 AM
where is the adorable girl stamp from?
letta  |  Mon Sep 24, 2012 at 5:13 AM
who makes the adorable little girl stamp?
LinB  |  Mon Sep 24, 2012 at 5:14 AM
Letta and LinB,
The girl stamp is from Little Darlings Rubber Stamps.
beate  |  Mon Sep 24, 2012 at 6:16 AM
THANK YOU!!!
LinB  |  Mon Sep 24, 2012 at 6:26 PM
Hi there,

Thanks for this super tutorial.
I love it !
And guess what ?
I made this great box !
Have a look here :
http://created-by-spoot.blogspot.be/2012/10/halloween-magnet-box.html
Hugs,
Sylvie
Sylvie Mathieu  |  Tue Oct 9, 2012 at 2:04 AM
HI
I don't really get just exactly where you make the cut lines - is there an easier way of saying just exactly which score lines you cut and how far? Maybe what the measurements are? I can't seem to get it from the written directions or the video. This is so cute and I'd love to make it.
Donnasue Jacobi  |  Sat Aug 31, 2013 at 1:04 AM
There is so much wisdom from everyone, whether a beginner to a well aged (pun) crafter. Thanks
dickiebutts  |  Wed Sep 14, 2022 at 8:45 AM
What a great tutorial! No special dies, and a card/treat anyone would be thrilled to receive!
Pepita933  |  Tue Sep 20, 2022 at 11:25 PM

Page 2 of 2 pages  <  1 2

You need to be logged in to comment

GET OUR NEWSLETTER


Splitcoaststampers's privacy policy