Felted Cardstock

by Lydia Fiedler

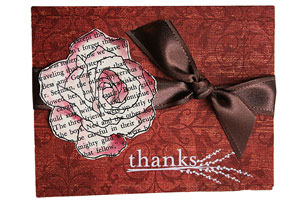
Use plastic wrap and a decorative napkin to create a cool background.

Supplies
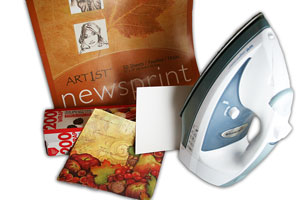
  • Decorative paper party napkins
  • Plastic Wrap
  • Large Pad of Newsprint
  • Iron
  • White cardstock
  • Stamps
  • Ink
  • Adhesive
  • Scissors
  • Embellishments

Step-by-Step

  1. Step 1

    Separate printed layer of napkin from white layer.

  2. Step 2

    Open pad of newsprint to middle.

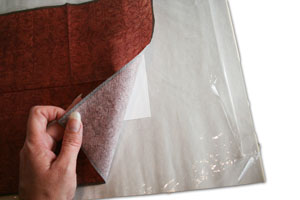
    Place white cardstock, plastic wrap and then napkin on newsprint with printed side of napkin facing up.

    Put two sheets of the newsprint on top of this sandwich.
  3. Step 3

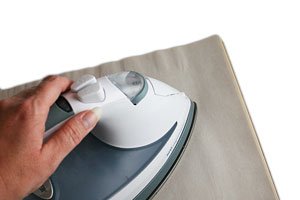
    With your iron on the highest non-steam setting, begin ironing the sandwich, going over it evenly for a few minutes, making sure you iron the entire area.

    Let cool.
  4. Step 4

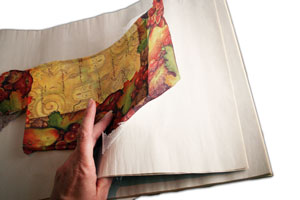
    While holding the napkin down with one hand, carefully remove the top two sheets of newsprint.

    Then slide your hand under the newsprint and pop the card up off the bottom newsprint.

    Check to be sure the napkin is fused to the cardstock everywhere - especially at the corners. If it's not, simply put the newsprint back down and continue ironing. You can do this as often as necessary.
  5. Step 5

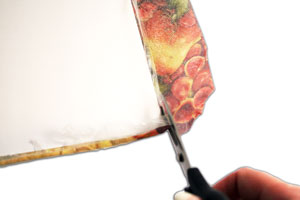
    When the cardstock is felted, simply flip it over and trim off the excess napkin, and use the cardstock as you normally would.
  6. Step 6

    Finish your card.

Video!

Your Turn

You've seen the tutorial, now you try it! We've got a section of the gallery set aside for Felted Cardstock. Try this technique, then upload your artwork to the gallery. Show us your creations!

***Please note - Internet Explorer/Edge is not a supported browser, and will not allow you to see the videos. Please use Chrome, Firefox or Safari to view our tutorial videos.

Questions and Comments

We'd love to get your feedback or questions. Leave your comment below.

I live in a small town and we dont have anyplace to buy newspaper print is there anything I can substitute? Love the video and technique.
Debbie  |  Wed May 18, 2011 at 5:05 AM
Hi Debbie - you can substitute any uncolored, lightweight paper like copy paper - you may have to experiment a little with how many sheets to use. smile
lydia  |  Wed May 18, 2011 at 5:40 AM
How can I separate the napkins? How can you tell a napkin can be separated? I did this with a friend a while ago but she already had the napkins separated. Love you ideas, tutorials and video. Please keep up the great work!! Kathy
Kathy Bolam  |  Wed May 18, 2011 at 2:14 PM
Hi Kathy! In the video I think I show you how to tear off a little corner of the napkin - that makes the layer show themselves to you smile When they are separated, that pretty layer should be VERY thin. If you do find a napkin that cannot be separated this way, then you wouldn't be able to use it but I haven't found any I couldn't pull apart. Some are easier than others smile
lydia  |  Wed May 18, 2011 at 2:17 PM
That is incredible, I am going tot try it for sure.
Martha  |  Wed May 18, 2011 at 3:49 PM
I did that as soon as the video ended....Wow I love it the only thing I would say is MAKE sure the plastic wrap is much larger than your card stock it really shrinks.
DEBBIE  |  Wed May 18, 2011 at 4:19 PM
Hi Lydia, this is a great technique! I have so many beautiful napkins. Can't wait to try it.

Teresa
Teresa  |  Wed May 18, 2011 at 5:26 PM
This technique is fantastic- thank you!! I have about 30 cards to make in the next couple of months, and I'll definitely be making some out of my new felted paper. Another thank you for the videos - they are just what we visual learners need.
Barb P.  |  Wed Jun 22, 2011 at 6:51 AM
bello,bello bello.
anila  |  Wed Jun 22, 2011 at 7:29 AM
Thank you for the wonderful technique.
Here in Brazil we have beautiful napkins.
I will make several cards
hugs
Neuza Maria  |  Wed Jun 22, 2011 at 8:43 AM
This is absolutely incredible!! I would have NEVER thought of this myself. Thank you so much!
Srjnm  |  Wed Jun 22, 2011 at 8:53 AM
Of course I missed this the first time and am so glad you opened again. I love all your tutorials and am going to try today on this one. Thanks again and again !
Diana  |  Wed Jun 22, 2011 at 10:07 AM
What a wonderful demo,for using Napkins. I cannot wait to try it. What a talented lady!
Teresa Unthank  |  Wed Jun 22, 2011 at 12:43 PM
I love this idea and am looking forward to trying it. Thanks.
Linda Fielder  |  Wed Jun 22, 2011 at 6:15 PM
What a fabuluos idea Lydia, thankyou ssoooo much,!! I'm off to the kitchen now to check out my serviettes
Joy D.  |  Thu Jun 23, 2011 at 3:49 AM
Hi everyone, Instead of using an iron, couldn't you run this sandwich through a laminating machine without the laminating plastic. Just take the sandwich you created and let the heat of the laminator press and melt things together. Try the lower setting for 3 ml plastic not the 6ml as I think this would not be as hot.
Joan Bravo  |  Thu Jun 23, 2011 at 5:46 AM
This also works using plastic coated butcher paper (sold along side the plastic wraps and tin foils). I think it's also called "freezer paper". It brings the project down to 2 layers to iron together. If I cut the freezer wrap smaller than the napkin I can just iron on the paper side without needing a press sheet over it. Since it's only a heavy paper, trim it a little smaller to adhere to a card front.
jocelyn  |  Sun Jul 3, 2011 at 8:03 PM
how easy that was i just cant wait to try it , what a lovely card it makes.
carol  |  Tue Jul 5, 2011 at 11:15 PM
I'm having trouble getting the saran wrap to melt. Am using a HOT iron but can't seem to get them to separate all the way no matter how many times I go over them with the iron. Any suggestions?

Thanks.
Lucky  |  Mon Jul 11, 2011 at 12:41 PM
Hi Lucky!

If your iron is too hot, it will melt the saran wrap into the napkin instead of adhering it to the cardstock, so play with a lower temperature.

Also, I'm not sure what you mean by separating, but you need to separate the napkin so you're using just the thinnest top layer with the design on it before you heat it, not after.

Hope that helps! smile
lydia  |  Mon Jul 11, 2011 at 12:50 PM

Page 8 of 9 pages « First  <  6 7 8 9 >

You need to be logged in to comment

GET OUR NEWSLETTER


Splitcoaststampers's privacy policy