Easel Card

by Beate Johns

Create a card with a built-in easel.

Supplies

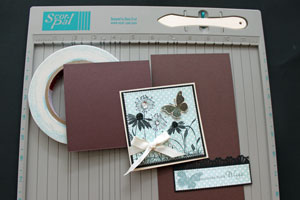
  • One 4 1/4" x 8 1/2" piece of cardstock (look for alternate measurements under variation)
  • One 4 1/4" square piece of cardstock
  • Scor-Pal™, or other scoring tool
  • Scor-Tape™, or other strong adhesive
  • Additional cardstock for card inside and card front
  • Stamps, Taylored Expressions Discover your Wings used here
  • Ink and Embellishments

Step-by-Step

  1. Step 1

    Score the 4 1/4" x 8 1/2" piece of cardstock at 4 1/4" and 6 3/8".

    Hint:
    On a Scor-Pal, the 6 3/8" measurement is marked with a dot on the upper guide.
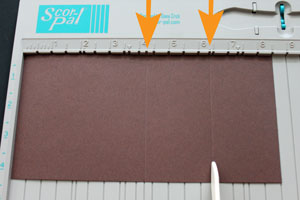
  2. Step 2

    Prefold all score lines.

    First fold the card in half, then fold the second score line (6 3/8") opposite from the 4 1/4" score line.
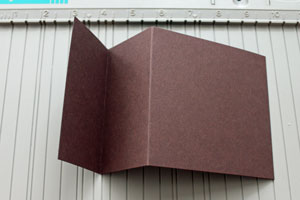
  3. Step 3

    Place cardstock on table with the 4 1/4" side down.

    Add Scor-Tape to the 2 1/8" x 4 1/4" section cardstock that is facing up.
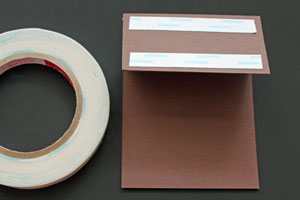
  4. Step 4

    Remove the Scor-Tape liner and adhere the 4 1/4" cardstock square to the card base.

    Line up the top of the square with the top of the 2 1/8" x 4 1/4" section.

    This creates the easel card base.
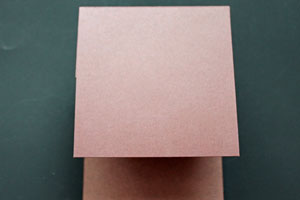
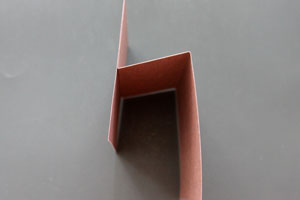
  5. Side view

  6. Step 5

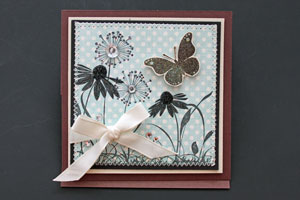
    Decorate the card front.

  7. Step 6

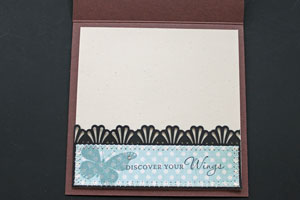
    Decorate the card inside.

  8. To make the easel card stand up by itself, add an embellishment or an extra layer (for this sample, it's the punched layer) the inside of your card. This that will keep the card front from closing.

    It is best to have that embellishment or layer at least 1/3" into the card from the bottom up.
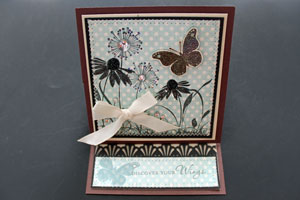
Video!

Variations

  1. Regular card size (4 1/4" x 5 1/2")
    Vertical card
    Start out with a 4 1/4" x 11" piece of cardstock and score at 5 1/2" and 8 1/4". Your card front piece will measure 4 1/4" x 5 1/2.
    Horizontal card
    Start out with a 5 1/2" x 8 1/2" piece of cardstock and score at 4 1/4" and 6 3/8". Your card front piece will measure 4 1/4" x 5 1/2".

    Other card sizes
    You can make any card size into an Easel card.
    Your Easel base will measure two times the height of the card front.
    Example:
    For a 3" x 6" card start out with a 6" square for the easel base. Score at 3" (height of finished card) and 1 1/2" ( 1/2 of height of card).
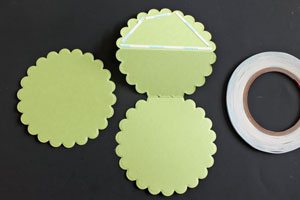
  2. Circular Easel Card
    - Cut a circular card base out with die templates. To do that, fold your cardstock in half, and line up the side with the fold so that part of that fold won't be cut.
    - Score one of the circle card sides in half and fold the other half up.
    - Add adhesive to the folded up 1/2 circle.
    - Adhere another circle shape, cut with the same die you used to cut the card base, to the 1/2 circle.
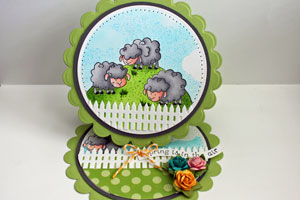
Your Turn

You've seen the tutorial, now you try it! We've got a section of the gallery set aside for Easel Card. Try this technique, then upload your artwork to the gallery. Show us your creations!

***Please note - Internet Explorer/Edge is not a supported browser, and will not allow you to see the videos. Please use Chrome, Firefox or Safari to view our tutorial videos.

Questions and Comments

We'd love to get your feedback or questions. Leave your comment below.

I love the easel card. I will be making some for Valentine's Day. Also love all your tutorials. Thanks for the great ideas.
Debbie  |  Sat Dec 31, 2011 at 8:03 PM
This is a beautiful. Great tutorial, and I am so glad you also did a short video to ensure that it is done correctly! Great job and thanks for sharing.
Rene  |  Wed Jan 11, 2012 at 8:11 PM
I'm having SUCH good fun trying all your ideas! Your demonstrations are so clear and easy to follow. Thank you, SO much.
Linda Moore  |  Mon Feb 6, 2012 at 3:02 PM
Try, try, try, and keep on trying is the rule that needs to be followed to become a specialist in anything.
Is there a subject of life - to have rich? All those fellows out there getting rich could possibly be dancing across the real subject of life.
Camilla Cessna  |  Sat Mar 10, 2012 at 7:35 PM
Hi! Thanks for this tutorial. My children and me made today a card for dad using it... it is our first scrapbooking creation... I translated the measures in centimeter in my blog, but left a link to your tutorial (comprehensible also for no-english speaking!. Hopping you appreciate, thanks again

http://www.mymeitai.com/2012/03/la-nostra-festa-del-papa/
Tiz  |  Mon Mar 19, 2012 at 6:09 PM
WOW! I love the easel card I just started out making card and i love love it seeing this card is great i do arts n craft at my school so this is a great idea for mother's day for some my students to make however I'd like to make it a a2 size but don't know the measurement HELP lol
maggie Warren  |  Tue Apr 10, 2012 at 9:27 AM
Thank u for tutorial...it's very clear...Gog bless you...
Diana  |  Sat Jun 9, 2012 at 10:03 AM
Thanks for the tips, really useful grin
AM  |  Tue Jun 19, 2012 at 12:29 PM
How can I copy your pictures and instructions to put in document so I can have it. I always hate going back to a spot and have the video or instructions removed. The words come across fine to put in a document but the pictures are not. Thank You so much.
Dorothy  |  Tue Jun 26, 2012 at 7:58 AM
Hi,
I have heard that Gina K. is giving lecture on the Silhouette Cameo. Is this true?
jogrybali  |  Thu Jul 26, 2012 at 2:50 AM
Have been going through lots of tutorials and find them so refreshing and full of ideas for me to develop. Thanks Beate for all your hard work filming these. We love them!
Dottie Davis  |  Sun Oct 7, 2012 at 4:41 PM
Thank you for sharing these lovely cards. Genny
Genny Hanning  |  Fri Nov 16, 2012 at 2:37 AM
I love it!!! thank you for sharing!!!
Orlis Alonso  |  Wed Jan 16, 2013 at 10:58 AM
I cannot find the instructions for easel cards in other sizes which Beate mentioned in the video. Would someone tell me where that is?
Thanks,
Heather
Heather  |  Wed Jun 19, 2013 at 5:49 AM
Oh my gosh! So glad I found this site. I've just started to learn to make really pretty cards and this is website will help me enormously. Wonderful tutorials and super lovely cards. You are all so talented. Thank you!
Joan Orr  |  Fri Sep 12, 2014 at 9:25 AM
What happened to the video? I love watching these for a refresher. Thanks!
Cheryl Scrivens  |  Mon Oct 16, 2017 at 9:07 AM
Try again, Cheryl - it just had some outdated code. smile Thanks for letting us know!
dina  |  Mon Oct 16, 2017 at 12:32 PM
Thank you! I just made my first card with this tutorial tonight, and it was so fun and easy. Thank you for giving such great instruction! smile
hoptownracer  |  Tue May 21, 2019 at 12:13 AM

Page 6 of 6 pages « First  <  4 5 6

You need to be logged in to comment

GET OUR NEWSLETTER


Splitcoaststampers's privacy policy