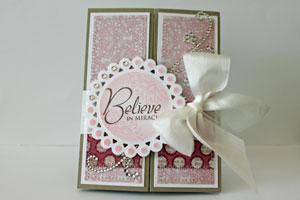
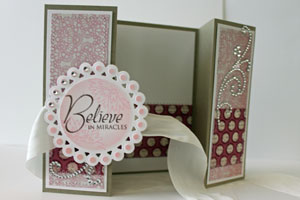
Double Z-Fold Card
by Beate Johns
Add a few score lines to a cardstock strip to create a unique card fold.
Supplies

- One 5 1/4" x 12" piece of cardstock for card base
- Two 1 3/4" x 5" piece of cardstock for side panel
- One 3 3/4" x 5" piece of cardstock for inside of card
- Patterned Paper to decorate panels (optional)
- Additional cardstock for center panel
- Scor-Pal™ or other scoring tool
- Scor-Tape™ or other strong adhesive
- Dimensional adhesive
- Ribbon
- Stamps (Verve Stamps Believe used here)
- Embellishments
Step-by-Step
-
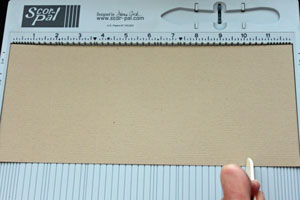
Step 1
Score cardstock at 2", 4", 8" and 10".
-
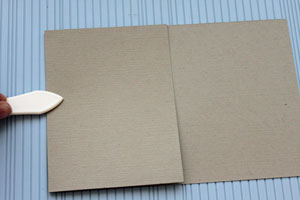
Step 2
Fold second score line in.
-
Fold the first score line back.
-
Step 3
Repeat step 2 on other side of cardstock. Your card base is done.

-
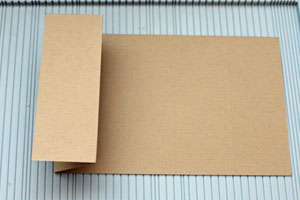
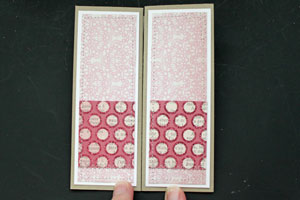
Step 4
Decorate the 1 3/4" x 5" pieces of cardstock. Adhere them to the side panels of the card base.
-
-
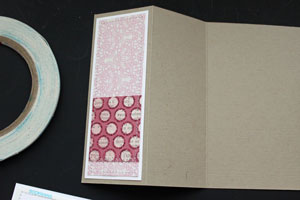
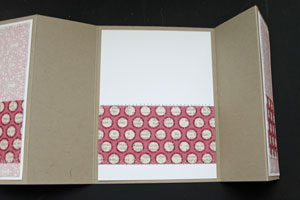
Step 5
Decorate the 3 3/4" x 5" piece of cardstock and adhere to center panel of card base.
-
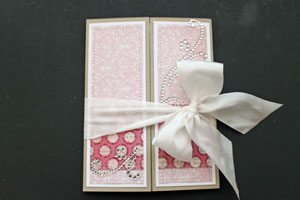
Step 6
Tie card shut with ribbon.
-
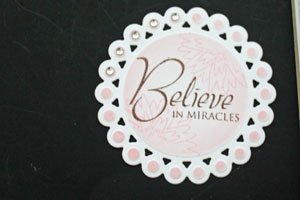
Step 7
Create focal point panel.
-
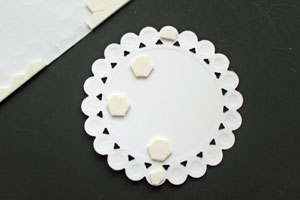
Step 8
Add dimensional adhesive on the back side of your focal point. Only add adhesive on half of the panel.
-
Step 9
Adhere main image over center of card panel.
-
Your card is done.
Video!
Variations
No Ribbon Closure
Add a smaller image slightly over your main image to keep the card shut (check the Joy Fold Card Tutorial for a sample of that closure).
Different Sizes
To change up the size, divide your card length by 6 and score at 1/6, 1/3, 2/3 and 5/6 of the cardstock length. It's easiest if you decide how big you want your panels to be. For example. Your panel width is 1 3/4". Your final paper length will have to be 1 3/4" x 6 = 10 1/2". You would have to score at 1 3/4", 3 1/2", 7" and 8 3/4".
Smaller Flaps
After scoring your panels, cut the outer panels a bit smaller to let the second panel peek through.
Your Turn
You've seen the tutorial, now you try it! We've got a section of the gallery set aside for Double Z-Fold Card. Try this technique, then upload your artwork to the gallery. Show us your creations!
***Please note - Internet Explorer/Edge is not a supported browser, and will not allow you to see the videos. Please use Chrome, Firefox or Safari to view our tutorial videos.
 *
*
Questions and Comments
We'd love to get your feedback or questions. Leave your comment below.
http://www.facebook.com/#!/photo.php?fbid=10150303678682461&set=a.445679092460.246097.590617460&type=1&theater;
Your sample is beautiful. What a fun fold. So elegant yet so easy too. This is something I can do. Thank-you for sharing this.
Thank you for making, yet again, another wonderful video. I seem to learn much easier by seeing and hearing the directions. Your cards are always amazing...and this is no difference. And, your papers are always so straight, and it seems you do it with just a glance of your eyes! Practice I guess!
He IS Able!
Traci S.
PEGGY
Thanks for the inspiration !
I looked for an other closing mechanism as you challenged us
Here is my card with a little twist :
- closed : http://www.splitcoaststampers.com/gallery/photo/2066002?&cat=500&ppuser=205884
- and open : http://www.splitcoaststampers.com/gallery/photo/2066003?&cat=500&ppuser=205884
greetings,
niki
However, I have a Scor Pal and also the new Stampin' Up Simply Score, and find on both that the Stampin' Up 12 x 12 inch paper isn't actually 12 x 12 inches and when I score at 2, 4, 8 , and 10 inches, the first panel is not the same wideth as the last panel. So, how do you compensate for this? I've tried putting the paper evenly between the edges, however, that still doesn't work, so what am I doing wrong?
Page 2 of 2 pages < 1 2