Distress Marker Painting

by Jen Shults

Learn how to use Distress Markers, heat embossing, and a waterbrush to create an easy and gorgeous watercolor look.

Supplies

  • Stamps, Teacup Bouquet from Taylored Expressions used here

  • Pigment or Watermark Ink

  • Black Embossing Powder

  • Heat Gun

  • Distress Markers

  • Waterbrush

  • paper towel

  • watercolor paper

Step-by-Step

  1. Step 1

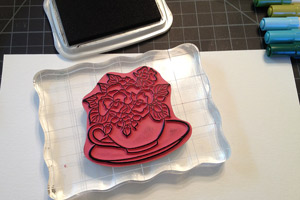
    Stamp the image on watercolor paper using pigment or watermark ink.

  2. Step 2

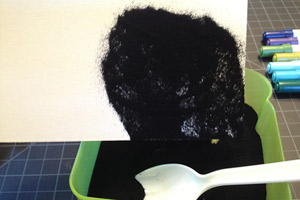
    Apply black embossing powder to image and gently tap off excess.

  3. Step 3

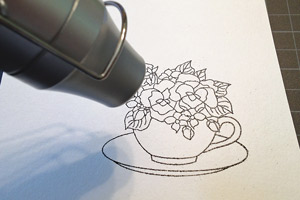
    Heat set embossing powder.

  4. Step 4

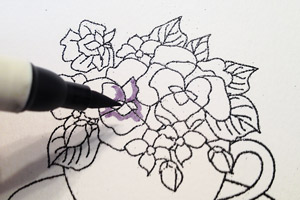
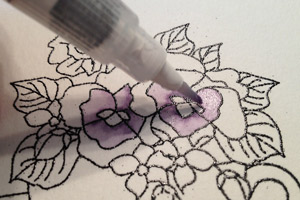
    Apply Distress Marker directly to the image. Begin with the lightest layer in the darkest part of the image. Apply ink sparingly.

  5. Step 5

    Use water brush to pull and spread the marker ink throughout the individual spaces of the image.
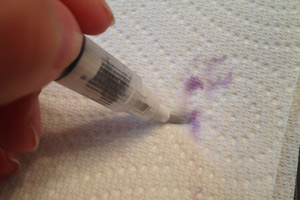
  6. Step 6

    Blot the brush on a paper towel frequently to create a gradient.
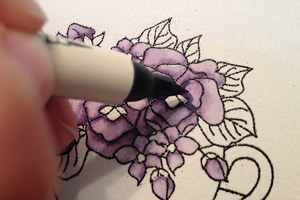
  7. Step 7

    Layer darker colors over previously painted areas to create new colors and depth.

  8. Step 8

    Repeat steps 4 thru 7 until the entire image is completed.
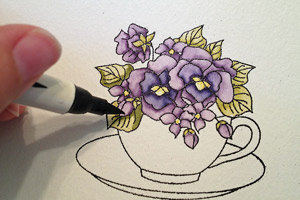
  9. Step 9

    Create a cast shadow and atmosphere around the image using grays and light yellows.

  10. Step 10

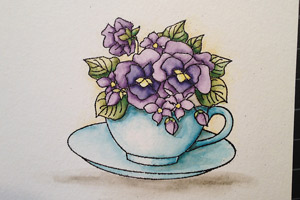
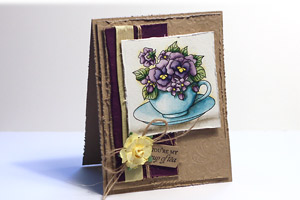
    Apply the finished painting to a card or other project.

Video!

Your Turn

You've seen the tutorial, now you try it! We've got a section of the gallery set aside for Distress Marker Painting. Try this technique, then upload your artwork to the gallery. Show us your creations!

***Please note - Internet Explorer/Edge is not a supported browser, and will not allow you to see the videos. Please use Chrome, Firefox or Safari to view our tutorial videos.

Questions and Comments

We'd love to get your feedback or questions. Leave your comment below.

Love your artistic look! Could you tell us more about the watercolor paper you use. Artist watercolor pads have thick watercolor paper. What was your source of thinner paper? Thanks!
Bronya Gumper  |  Mon Jun 17, 2013 at 9:56 PM
@Fran - Hi Fran! Thanks so much for your comment. I haven't used SU markers so I can't say for certain how well they work with this technique but if they are a waterbased marker I'd bet they would work pretty well. The best thing to do would be to give it a shot. If they work well then the Distress Markers might be a good way to fill in some of the color gaps if there are any. Thanks! ~Jen
Jennifer Shults  |  Wed Jun 19, 2013 at 2:15 PM
Hi Lee! Thanks so much for your comment. You can find more tutorials on my blog. It's linked up there at the top of the page. Thanks!! ~Jen
Jennifer Shults  |  Wed Jun 19, 2013 at 2:16 PM
Hi Bronya, thanks for your comment! I actually used a thicker watercolor paper from Canson. It's the kind in the blue Aquarelle pad. Canson does carry a brand of 90# watercolor paper that is thinner that I have had a lot of success with. It comes in a red and black paper pad. I have found them on sale at the chain craft stores for a nice price 4-5 times a year. Thanks!! ~Jen
Jennifer Shults  |  Wed Jun 19, 2013 at 2:18 PM
What a wonderful tutorial! I had the very same stamp as you did, and tonight I finally tried watercolouring that image . It turned out fair nicer then I expected! Thanks so much for the encouragement to use my Tim Hotlz Distress Markers! smile
Deborah  |  Wed Sep 11, 2013 at 3:59 AM
By the way, the video tutorial was so much help! Thanks again!
Deborah  |  Wed Sep 11, 2013 at 4:01 AM
Great tutorial--I emboss everything--I was just curious why you stamped in black and then embossed in black? I always stamp in black (Versafine permanent) and then emboss with clear embossing powder--same effect? Or is using the black on black even more crisp looking? smile
Susanne Gleason  |  Wed May 21, 2014 at 7:52 AM
Hi Susanne! I'm guessing the black was used for more even coverage of the outline.
Dina K  |  Wed May 21, 2014 at 8:07 AM
Great Tutorial. I love the finished look. TFS!
Carol-Happy Expressions  |  Wed May 21, 2014 at 2:16 PM

Page 2 of 2 pages  <  1 2

You need to be logged in to comment

GET OUR NEWSLETTER


Splitcoaststampers's privacy policy