Diagonal Double Pocket Card

by Claudia Rosa

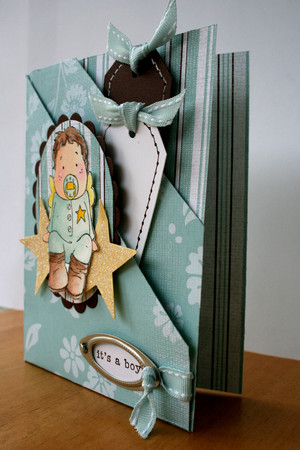
Create a double pocket card out of one sheet of patterned paper.

Supplies
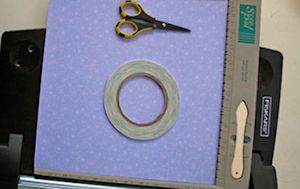
  • Patterned paper (8 1/2" x 11")
  • Scoring tool
  • Scissors
  • Adhesive
  • Ruler
  • Other supplies as needed to complete the card (embellishments, tags or gift cards for inserts, etc)

Step-by-Step

  1. Step 1

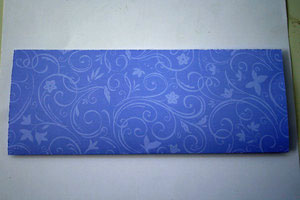
    Score from the short side of the patterned paper at 4 1/4". Crease along the fold line.

    NOTE:
    For this version of the card, the side of the patterned paper that is up will be the most visible in the finished project. Fold with this pattern to the outside.
  2. Step 2

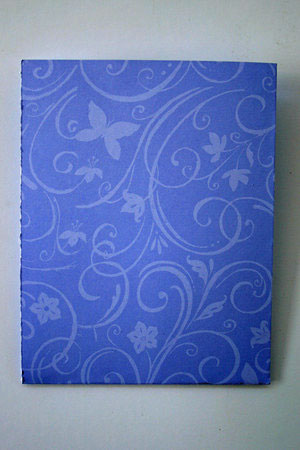
    Turn paper 90 degrees. Score down the center of the paper at 5 1/2". Fold and crease with a bone folder.
  3. Step 3

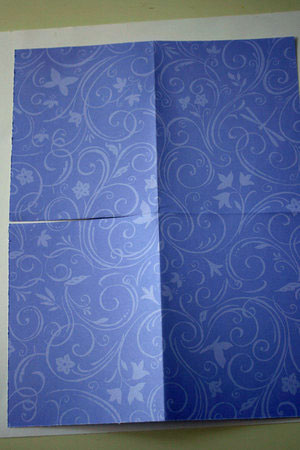
    Unfold the paper. Cut along the horizontal fold from the left edge of the paper to the vertical score line.

    NOTE:
    Again, the side of the patterned paper that is facing up in this step will be the most visible in the finished project.
  4. Step 4

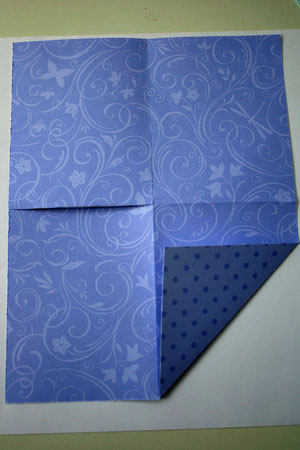
    Fold up the bottom right corner so that the bottom edge meets the edge of the center score.

    TIP:
    Make a pencil mark 4 1/4" from the bottom right corner; align the pencil mark with the bottom of the vertical score line, and score to connect the points.
  5. Step 5

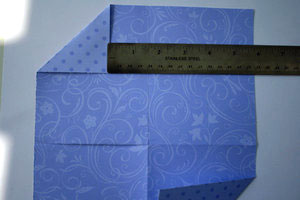
    Fold down the top left corner. Leave 1" - 1 1/2" room from the edge of the folded down corner to the vertical fold.

    TIP:
    Make a mark at 3" from the corner, along the top of the paper and down the side. Align the two marks on a scoring line and score to connect the points.
  6. Step 6

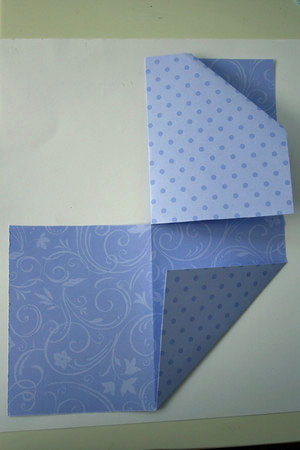
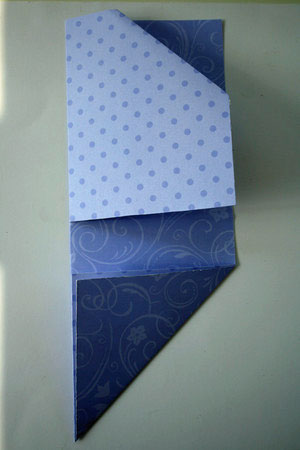
    Fold the top left panel over to the right hand side.
  7. Step 7

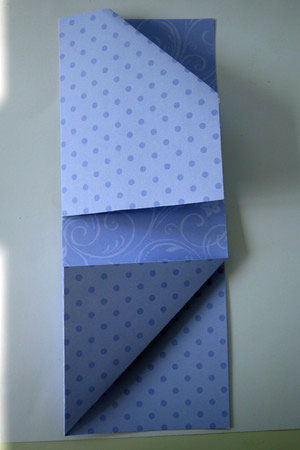
    Fold the bottom left panel behind the folded panel on the right.
  8. Step 8

    Fold the bottom corner up over the other folded up corner, aligning the folds.
  9. Step 9

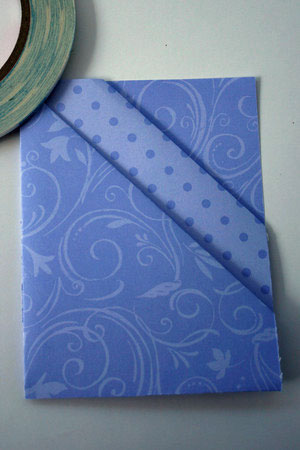
    Add adhesive on the sides of the bottom half and fold it up.
  10. Step 10

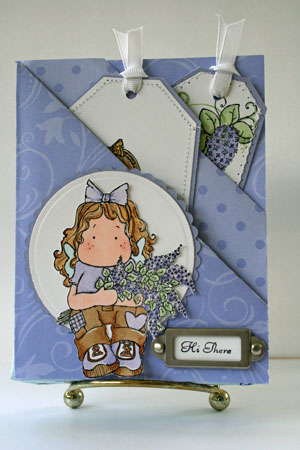
    Decorate the card front as desired, and create inserts for the pockets.

    The tags in the sample measure 2 1/2" x 5" and 1 3/4" x 5".
Video!

Variations

  1. After step six, instead of folding the right side under, fold both lower flaps up.
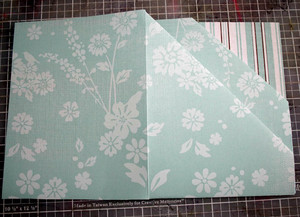
  2. Fold the left panel around to the card back. Use adhesive to attach loose ends. Now your card will be able to open.
Your Turn

You've seen the tutorial, now you try it! We've got a section of the gallery set aside for Diagonal Double Pocket Card. Try this technique, then upload your artwork to the gallery. Show us your creations!

***Please note - Internet Explorer/Edge is not a supported browser, and will not allow you to see the videos. Please use Chrome, Firefox or Safari to view our tutorial videos.

Questions and Comments

We'd love to get your feedback or questions. Leave your comment below.

FABULOUS Tutorial Claudia, LOVE the samples, Jennifer smile
Jennifer Meyer  |  Wed Jun 4, 2008 at 4:17 PM
Just tried the tutorial. Love it, love it, love it!! Thanks so much for posting it!
krista824  |  Wed Jun 4, 2008 at 4:23 PM
Thank you for sharing Claudia. I love the tutorial and love love love your card samples. Keep making those lovely cards. smile Hugs to you.
Lilian  |  Wed Jun 4, 2008 at 4:52 PM
AWESOME tutorial Claudia...and your finished project is just gorgeous! Thank YOU for a great tutorial!!
Jodi  |  Wed Jun 4, 2008 at 5:15 PM
What a cute card! Thanks for the tutorial, Claudia. It must be providence as I just today bought two packets of seeds to tuck into my niece's birthday card, then I came home and read your tutorial. One question - if one does the variation, in what various places should one put adhesive? Thanks!
Pam  |  Wed Jun 4, 2008 at 5:24 PM
Claudia this was a great tutorial, I loved your samples, they are so cute!!
Jody  |  Wed Jun 4, 2008 at 5:27 PM
Let us share and share alike. Who cares where or with whom it started....for goodness sakes...there's worse things going on in our world! Let's get our PLEASURES as we can and enjoy our shared talents...Thank you Claudia, YOUR card is precious!!!
Suzie  |  Wed Jun 4, 2008 at 5:41 PM
Wow! I never even thought about a double pocket card! I am so trying this out tonight!! Thanks for posting, great tutorial!!!!
Mindy  |  Wed Jun 4, 2008 at 5:45 PM
Claudia, you rock!! Awesome job on the tutorial!! Don't pay any attention to all that's happening, you're awesome!!
Kelly S  |  Wed Jun 4, 2008 at 6:38 PM
Great job! Love it, Claudia! The sample is beauitful!!
Consuelo  |  Wed Jun 4, 2008 at 6:46 PM
GREAT tutorial Claudia. I LOVE your creations. I think you are a fantastic artist. One reason I cancelled my subscription to TJ. I love to share and I think that is what stamping a card is all about. Sharing what you love with EVERYONE.. Keep up the great work.
Dawn  |  Wed Jun 4, 2008 at 6:49 PM
Awesome tutorial...some friends and I are just starting up a book club and a bookmark will make the perfect insert here!!! Thanks so much, Claudia!!

Let's remember an old saying...'If you can't say something nice....Splitcoast is NOT the place for you!!!
Joycelyn  |  Wed Jun 4, 2008 at 6:50 PM
Great Tutorial Claudia... always wanted to make one of these... Thank you for sharing.
Aimee30  |  Wed Jun 4, 2008 at 6:53 PM
I love this! I am only getting the poictures, not the directions. I'd really like to make this card and was wondering how I could get the written directions for it? Any help would be appreciated. Thanks you ..Betty
Betty Penta  |  Wed Jun 4, 2008 at 7:09 PM
Super cute! Thank you for taking the time to put this tutorial together. It is wonderful of you to share with us.
Martha  |  Wed Jun 4, 2008 at 7:38 PM
This looks like fun. Really like the looks of it.
Thanks for showing how to do it.
Nancy L
NanCbeader  |  Wed Jun 4, 2008 at 8:26 PM
Claudia, thank you for sharing. I'm a fan of your work! I hope to see you post again in the future.
Thao  |  Wed Jun 4, 2008 at 9:12 PM
Claudia great card. I loved the colors and the stamps. I am going to make it tomorrow and will try to teach it to my students who attend kids college next week. Always on the look out for well written material that I don't have to pay for.
Margaret Brunier  |  Wed Jun 4, 2008 at 9:32 PM
How very clever. I especially like the variation after step 6. I think this will be a very useful fun card. Thank you.
Elaine  |  Wed Jun 4, 2008 at 9:33 PM
Thanks for the tutorial Claudia. Your cards are gorgeous! I love the coloring. Just beautiful! The highlights in the girl's hair is an amazing detail. Great job.
Michelle P Fischer  |  Wed Jun 4, 2008 at 11:44 PM

Page 2 of 7 pages  <  1 2 3 4 >  Last »

You need to be logged in to comment

GET OUR NEWSLETTER


Splitcoaststampers's privacy policy