Diagonal Double Pocket Card

by Claudia Rosa

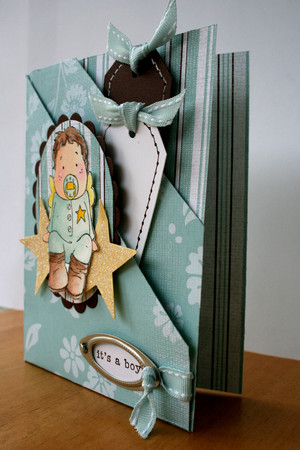
Create a double pocket card out of one sheet of patterned paper.

Supplies
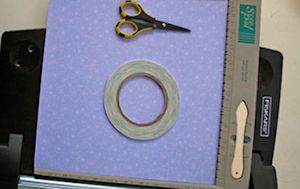
  • Patterned paper (8 1/2" x 11")
  • Scoring tool
  • Scissors
  • Adhesive
  • Ruler
  • Other supplies as needed to complete the card (embellishments, tags or gift cards for inserts, etc)

Step-by-Step

  1. Step 1

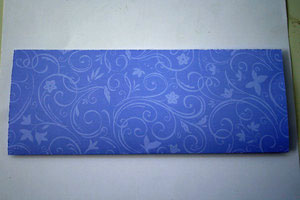
    Score from the short side of the patterned paper at 4 1/4". Crease along the fold line.

    NOTE:
    For this version of the card, the side of the patterned paper that is up will be the most visible in the finished project. Fold with this pattern to the outside.
  2. Step 2

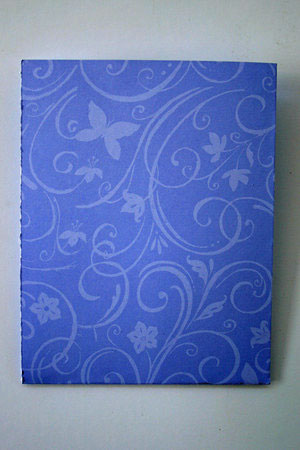
    Turn paper 90 degrees. Score down the center of the paper at 5 1/2". Fold and crease with a bone folder.
  3. Step 3

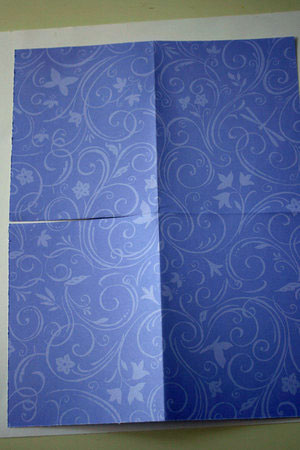
    Unfold the paper. Cut along the horizontal fold from the left edge of the paper to the vertical score line.

    NOTE:
    Again, the side of the patterned paper that is facing up in this step will be the most visible in the finished project.
  4. Step 4

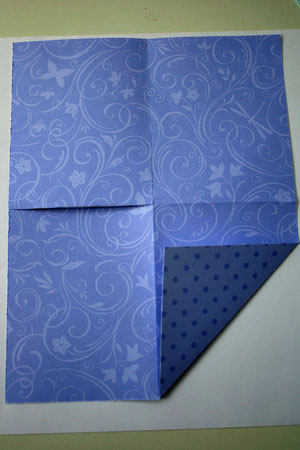
    Fold up the bottom right corner so that the bottom edge meets the edge of the center score.

    TIP:
    Make a pencil mark 4 1/4" from the bottom right corner; align the pencil mark with the bottom of the vertical score line, and score to connect the points.
  5. Step 5

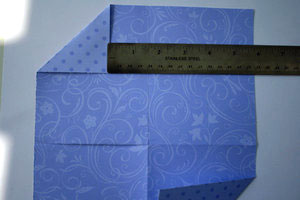
    Fold down the top left corner. Leave 1" - 1 1/2" room from the edge of the folded down corner to the vertical fold.

    TIP:
    Make a mark at 3" from the corner, along the top of the paper and down the side. Align the two marks on a scoring line and score to connect the points.
  6. Step 6

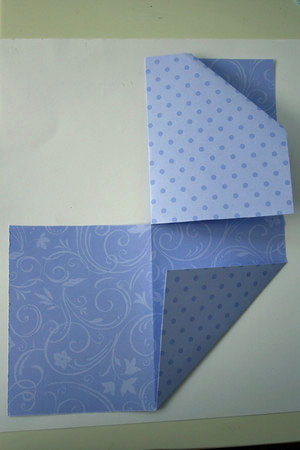
    Fold the top left panel over to the right hand side.
  7. Step 7

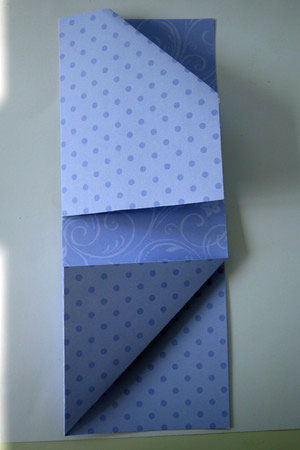
    Fold the bottom left panel behind the folded panel on the right.
  8. Step 8

    Fold the bottom corner up over the other folded up corner, aligning the folds.
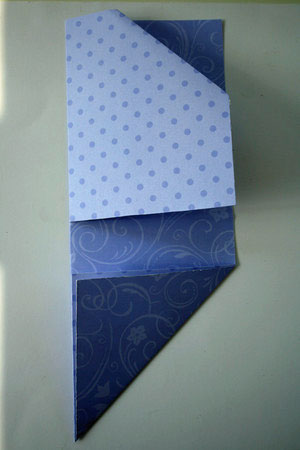
  9. Step 9

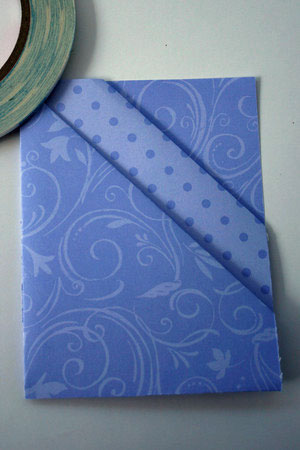
    Add adhesive on the sides of the bottom half and fold it up.
  10. Step 10

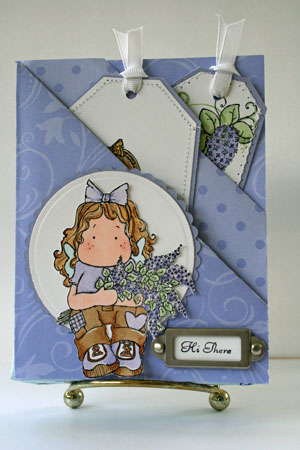
    Decorate the card front as desired, and create inserts for the pockets.

    The tags in the sample measure 2 1/2" x 5" and 1 3/4" x 5".
Video!

Variations

  1. After step six, instead of folding the right side under, fold both lower flaps up.
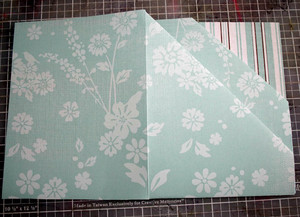
  2. Fold the left panel around to the card back. Use adhesive to attach loose ends. Now your card will be able to open.
Your Turn

You've seen the tutorial, now you try it! We've got a section of the gallery set aside for Diagonal Double Pocket Card. Try this technique, then upload your artwork to the gallery. Show us your creations!

***Please note - Internet Explorer/Edge is not a supported browser, and will not allow you to see the videos. Please use Chrome, Firefox or Safari to view our tutorial videos.

Questions and Comments

We'd love to get your feedback or questions. Leave your comment below.

i am a father of a 6 year old daughter and a school teacher. this is a great art work. can you send me more so i can teach at class
stephen velasco  |  Sat Aug 16, 2008 at 2:09 AM
wonderfull !
mjflorent  |  Mon Oct 13, 2008 at 6:42 AM
I've been searching for your tutorial which explains how to make a gift pocket that fits around a wine bottle and you put a treat in the pocket. I thought I saved it and now I want to make these and can't find it. Please help.

Thanks!
Jerrie Cicerale  |  Tue Dec 2, 2008 at 7:24 PM
bravo j'adore elle est magnifique je cherchais justement une carte originale
biz
ynomra  |  Wed Dec 3, 2008 at 12:17 PM
really good tutorial, shame how petty people have to be about sharing. what's in a word.
Keep up the good sharing of knowledge
Mandy  |  Mon Jan 12, 2009 at 12:57 PM
Merci beaucoup pour ces explications, j'adore cette carte !!!!!!! et les tiennes sont superbes !!!!!
bizz, sev
severine  |  Sat Jan 17, 2009 at 2:05 AM
I just found a place to buy Magnolia stamps
http://www.magnoliastamps.us/
and will be placing an order soon! I am quite excited, because my first order I placed in another country (than the USA) and it took a few weeks to reach me.
Cyndi  |  Sun Jun 7, 2009 at 7:16 PM
Thank you so much for sharing this with all of us. This is the first time I've ever viewed it and really like it! Would be perfect for wedding invites (thanks for the idea Linda)! Never heard of TJ before viewing this, but doubt that I will ever go to that website now.
craftymomto2  |  Sun Jan 31, 2010 at 12:38 PM
the stamps are Magnolia Stamps.....aren't they cute ? Just go to your search engine and type in www.magnoliastamps.com
There are a few places ( even overseas as well ) to purchase these ) to purchase these wonderful magnolia stamps. They are actually made in Sweden I think...not sure.
I just made several of these "cards" and they were easy, and fun to make. Hope everyone enjoys making them ! I made them for Easter cards!
Jacqueline  |  Fri Mar 26, 2010 at 4:51 AM
Oh this will come in so handy! thank you so much for sharing smile
Gail Bolander  |  Wed Apr 14, 2010 at 7:20 PM
looks great cant wait to try this out
craftypen  |  Wed May 26, 2010 at 3:34 AM
I have made three of these cards, and apparently I am doing something WRONG! When the card is folded,it the first full piece of card stock( right behind the first FOLDED peice,is SHORTER than the back peice of card stock...can you tell me what I am doing wrong here, or is this okay ? The cards shown on the tutorial don't show this problem !! HELP !
Jacqueline  |  Sat Jun 12, 2010 at 10:32 AM
I just came across this tutorial from another message board and want to say it is wonderful! I've never seen a 2 pocket card. It's been 2 years since all the drama, I hope this has not stopped you from sharing more ideas!
Penny  |  Sun Aug 22, 2010 at 10:12 AM
I finally figured out what I was doing ...with this tutorial,and the card turned out GREAT! Since then, I have made several of these cards ! For those of you who want to TRY to make one of these cards....it's easy and a lot of fun. Just make sure that you measure correctly and score / fold properly and you will do just fine ! Have fun !
Jacqueline  |  Fri Aug 27, 2010 at 10:39 AM
Thank you so much for the tutorial. This was my very first project using my new scor pal and I'm loving it. Thanks again.
Sheri  |  Fri Sep 17, 2010 at 11:12 PM
This is the first time I've ever viewed it and really like it! Would be perfect for wedding invites (thanks for the idea Linda)! Never heard of TJ before viewing this, but doubt that I will ever go to that website now.
scot  |  Fri Oct 1, 2010 at 3:30 AM
Thanks this tuto ! The card is so cute !
Thanks again !
yolande k  |  Fri Nov 12, 2010 at 3:52 AM
love the double pocket card! I tried


it it is easy and fun!
Philamona Alexander  |  Mon Sep 12, 2011 at 4:07 PM
Iwould love to have this tutoruial shown
again
carol  |  Mon Oct 10, 2011 at 1:12 PM
Excelente, me encanto hacerla y las instrucciones muy claras. mil gracias
Raizza  |  Mon Oct 15, 2012 at 4:08 PM

Page 6 of 7 pages « First  <  4 5 6 7 >

You need to be logged in to comment

GET OUR NEWSLETTER


Splitcoaststampers's privacy policy