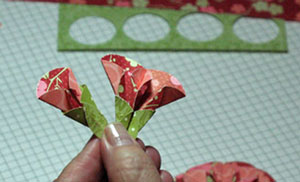
Dahlia Fold

by Donna Moore

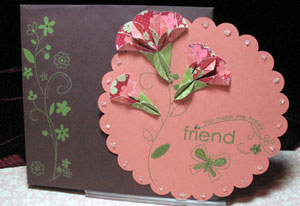
Add beautiful paper bouquets to your cards, scrapbooks, and other projects.

Supplies
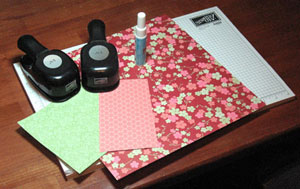
  • Circle punches

  • Double sided patterned paper

  • Cardstock

  • Adhesive


  • Note: To make folding more visible, a larger 3” circle was used for most of this demonstration.

Step-by-Step

  1. Step 1

    Punch one 1 1/4" cardstock circle and fold in fourths. Petals will be mounted on this base.

    For a full dahlia flower, punch eight circles from double-sided patterned paper for petals.
  2. Step 2

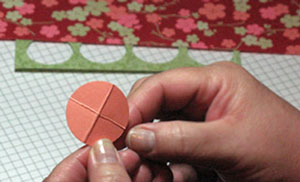
    Fold first patterned paper circle in half, trying to only crease the lower half to prevent folds in the upper part of the finished flower.

    Fold in half again and open.

    Decide which side should be the main background color (here, the red patterns is the main color). Flip over to show back side.
  3. Step 3

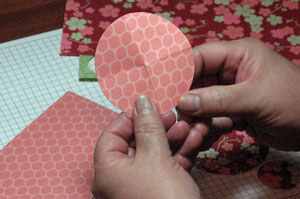
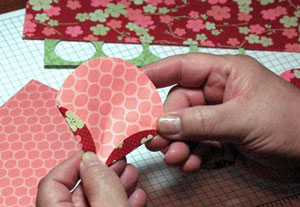
    In the lower two quadrants, fold a small petal shape upward using the fold marks as a guide.

    Turn over to the front side.
  4. Step 4

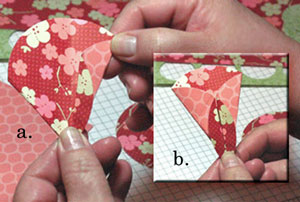
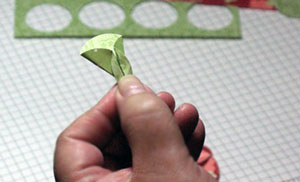
    Fold petal inward to the center like a paper airplane. (Picture A)

    Repeat for the other half. (Picture B)

    Repeat steps one through four to create seven more petals. This will make a full dahlia.
  5. Step 5

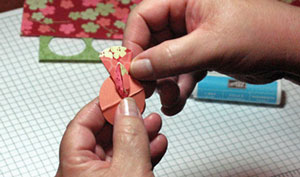
    Using the cardstock base from Step 1 as an evenly spaced mounting guide, adhere the first petal, aligning it at the center and at the fold line.
  6. Step 6

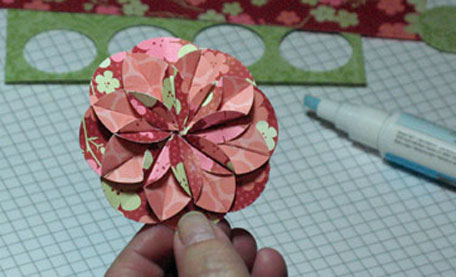
    Repeat process and adhere all 8 sections for a full dahlia.
  7. Step 7

    Finished project.

    Try creating flowers with one to eight petals.
Video!

Variations

  1. To create a flower bud, use slightly smaller single petals made from green paper for a stem base.

    For a frillier flower, use a scallop punch instead of plain circles.
Your Turn

You've seen the tutorial, now you try it! We've got a section of the gallery set aside for Dahlia Fold. Try this technique, then upload your artwork to the gallery. Show us your creations!

***Please note - Internet Explorer/Edge is not a supported browser, and will not allow you to see the videos. Please use Chrome, Firefox or Safari to view our tutorial videos.

Questions and Comments

We'd love to get your feedback or questions. Leave your comment below.

What a great tut....thanks so much for sharing it. As a newbie to all this I really appreciate it.
Joanne  |  Fri Jul 23, 2010 at 3:01 PM
Can't make out the size of the circle in
No 1. Would like to try smaller sizes for a card.
What sizes could I try?
Irene
Irene  |  Sun Feb 13, 2011 at 1:16 PM
Understand the most effective technique so that you make a website step-by-step beginning from how you can set it up on Photo shop, silce then it submitted also am with instructions on the easiest way to make skins and employ DotNetNuke all this via video lessons in my little Learn web desgin Site.
Basiastailt  |  Fri Oct 28, 2011 at 4:32 PM
I keep getting instructions but no tutorial!! what do I do???? thanks Joan
Joan Weber  |  Wed Jan 18, 2012 at 1:45 PM
Joan, you just commented on our photo tutorial. We do not have a video tutorial for this project yet. If that's what you are looking for.
Beate  |  Wed Jan 18, 2012 at 2:25 PM
A trick for step 3. Use a square to position the folds. no need to fold the circle (steps 1 and 2)

Does anyone know any other folds like this that work well double sided paper? I've done quite a bit of teabag folding, but those patterns do not show off double sided paper like this does.
lilstar  |  Wed Aug 29, 2012 at 4:03 PM
This is a very nice tutorial. I've made a few of these in the past, but the little extras of lining them up will make for a more 'balanced' flower. Thanks!
Kristy Tyra  |  Wed Sep 12, 2012 at 8:15 AM
You explained this well. I can't wait to try it.
pamper1  |  Fri Sep 14, 2012 at 11:48 AM
This looks like fun. As soon as I cam find some double sided paper, I am going to try this. Thanks for sharing this idea
Jackie Kittle  |  Tue Jan 7, 2014 at 9:53 PM
Guess I just don't have a knack for folding -- I need a video. Did I somehow miss the video?

The card is beautiful!!
Allyne  |  Sat Apr 4, 2015 at 3:23 PM
I've added a video, Allyne - thanks for your interest!
dina  |  Sat Aug 1, 2015 at 10:20 AM
Hello Donna, I've been spending 2 days in trying to make these lovely flowers. I have no trouble in making the single or triple flowers, however, when its time for me to make the 8 petal ones, they have a space in between all petals. Course I am trying to use the 1 1/2" punch (I do not have a 1 1/4 or 1 3/8 punch. Should that make a difference? If I try to make 9-10 petals than the circle is off kilter. Please help as I really love these! I have 6 thank you cards I'm making & want to use these on them. I fold the 9th circle as starting the flower, then I glue one petal on each of the scored lines, then one in between (which seems logical to get it even).
Claire Gagne  |  Sun Oct 28, 2018 at 12:18 PM
Hi Claire. The size of the circles shouldn't matter. To correct the space on the 8-petal flowers, I think you should be able to push them more to the center - if your folds are accurate, geometry says they should line up. 9-10 petals wouldn't work, again because of geometry.
dina  |  Mon Oct 29, 2018 at 6:05 PM

Page 5 of 5 pages « First  <  3 4 5

You need to be logged in to comment

GET OUR NEWSLETTER


Splitcoaststampers's privacy policy