Corner Rounder - Making Scalloped borders

by Beate Johns

Use your corner rounder to add scallops to your cardstock.

Supplies

  • Corner Rounder

  • Cardstock

  • Scissors

Step-by-Step

  1. Step 1

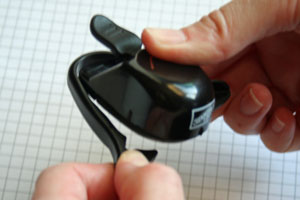
    Carefully pull the corner guide off the corner rounder.

  2. Step 2 Straight Border

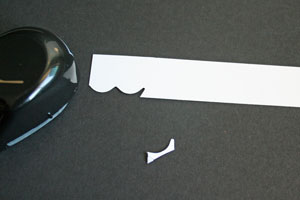
    Turn your corner rounder upside down so you can see the bottom of it. Line the edge of your cardstock up with the edge of the punch.

  3. Punch your cardstock to create your first scallop.

  4. Step 3

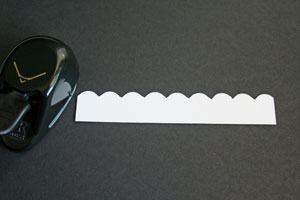
    Line the left end of the corner rounder up with the right end of your first scallop.

  5. Punch again to create your second scallop.

  6. Step 4

    Continue to line your corner rounder up with the last scallop and punch out more scallops until your entire edge of the cardstock is done.

  7. Step 5 - Scallops on Circles

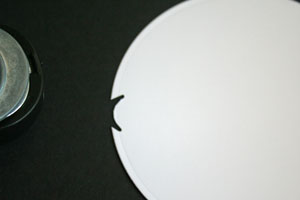
    Turn your corner rounder upside down. Line the cardstock up straight with the edge of your corner rounder bottom.

  8. Punch your first scallop.

  9. Step 6

    Line up the edge of the corner rounder with the end of your first scallop.

  10. Punch your second scallop.

  11. Step 7

    Continue to add scallops until you can't fit anymore on your circle.
    Sometimes it doesn't just add up right.

  12. Step 8

    Use scissors to cut of the leftover piece.
    If that creates a noticable gap, place some ribbon or hardware stragetically over it when finishing your project.

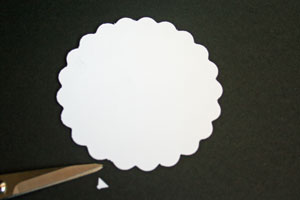
Questions and Comments

We'd love to get your feedback or questions. Leave your comment below.

Thank you so much for this demo! I've been dying to figure out how to cut scallops on a curved edge! That's fantastic! SU should do a special demo on fancy edge cutting for new demonstrators who just don't know yet!
Kathryn  |  Wed Apr 23, 2008 at 9:12 AM
Thank you for this tutorial.. I love the techniques that give us more options with the tools most of us have. I was just looking for scalloped scissors but will use this instead as I already have the corner rounder. This is a marvelous site for us as demonstrators just starting out. Thanks Tracy
Tracy  |  Wed Apr 23, 2008 at 12:20 PM
This is wonderful..I don't have the kind ofcornor rounder that comes. apart but do have 5that do,heart, flowers,squares,circles,and tiny ziz-zag punches that go in the cornors.Can't wait to try these!!Thanks so much! Ines (4cats Lady)
Ines..  |  Thu Apr 24, 2008 at 12:09 PM
Why can't I send a message?
Ines..  |  Thu Apr 24, 2008 at 12:12 PM
i didn't even know the corner guide came off! can't wait to try this one out...
bobbi  |  Thu Apr 24, 2008 at 7:02 PM
Thanks Beate, once again you've explained a mystery to me. I've been wondering how those large circle scallops have been made. I frequently use my corner rounder on straight edges, it just never occured to me that I could do it on a circle. I so much enjoy your tutorials. They are so easy to follow and the pictures are so good. Thanks so much.
Karla
Karla  |  Fri Apr 25, 2008 at 7:14 AM
Your creativity on this site never ceases to amaze me. Thanks for all the great learning aides you supply us with.
Tonda Baldwin  |  Sat Apr 26, 2008 at 6:02 AM
But can the corner rounder be put back together!? Hmm..but it looks fun.
Cyndi Evans  |  Mon Apr 28, 2008 at 4:59 PM
Hi,
Love d the class on the circle scallop. i never took the stamp apart. Stampmanic
Lyn  |  Tue Apr 29, 2008 at 2:57 AM
Cyndi,
Yes, the guide snaps on really easy again. Just pull the sides of the guide apart gently and slide the punch back in.
beate  |  Tue Apr 29, 2008 at 9:47 AM
thanks so much beate! i'm so stoked to see a tutorial for scalloping a circle. i'm sure i can recreate that with an oval too! thanks sooo much! i truly appreciate your tutorials.
abrazos,
bella
mirabella  |  Tue Apr 29, 2008 at 12:50 PM
I was stumped as to how to make the scalloped edge. Thank you so much for this amazing tip. I wasn't aware that the guide came off the corner rounder. I will be able to create some beautiful cards using this awesome technique. Thank You grin
Marina  |  Tue Apr 29, 2008 at 1:37 PM
Great info. thank you!
rosie k  |  Thu May 1, 2008 at 11:33 AM
Fantastic tutorial----anyone who makes & shares a tutorial deserves a metal. I've learned so much from everyones. Thank you Beate, for another great tutorial!!!!
Susan  |  Thu May 1, 2008 at 1:13 PM
thank you so much! i kept reading about this tech. but couldn't figure it out for the life of me. didn't know that the guide is removable:)
rokale  |  Fri May 2, 2008 at 2:25 PM
WOW! I'm so glad I saw this!! I never knew you could make a scalloped edge this way.
Now I have to try it!! Thanks!!!
Luciesfloozies  |  Sat May 3, 2008 at 7:34 AM
Very cool, Thanks so much Beate. I love finding new ways to use my old stuff. I am off to play.

Chris
Chris  |  Sat May 24, 2008 at 1:39 PM
Great idea! I've always wanted to make scalloped borders. Well, now I know how. I'll be a bit nervous taking the corner guide off, but I'll give it a try.
Becky  |  Tue Jun 3, 2008 at 12:10 PM
Thanks for the information, I've tried this a couple times but have trouble getting it lined up and suggestions?
peggy jones  |  Wed Jun 11, 2008 at 6:02 AM
Hi! I realy love all your projects. But I whanted to now if I whant to go faster what size of scallop punch should I by. The one you use more often. The size of the circle, square and oval, I'd like to know. Thank you very much!! Nancy
nancy folino  |  Thu Jun 12, 2008 at 5:21 AM

Page 1 of 4 pages  1 2 3 >  Last »

You need to be logged in to comment

GET OUR NEWSLETTER


Splitcoaststampers's privacy policy