Copic Ink Background

by Michelle Houghton

Use Copic Re-inker and Hand Sanitizer to create unique backgrounds.

Supplies

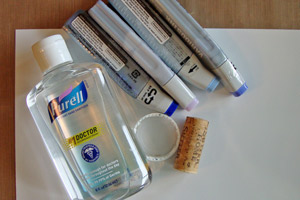
  • Glossy Cardstock, or Photo Paper

  • Copic Re-inker

  • Hand Sanitizer Gel, Purell used here

  • Found Objects

  • Craft Mat

Step-by-Step

  1. Step 1

    Use 2 or 3 different colors and drip ink from Copic re-inkers onto your paper.

    You can use monochromatic, analogous and even complimentary colors for this technique.

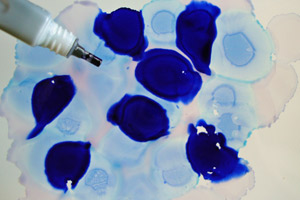
  2. On glossy papers the ink will bleed and blend. The colors will fade as the ink spreads out.

  3. Step 2

    Put a small pile of hand sanitizer on your craft mat. Dip a found object in the hand sanitizer.
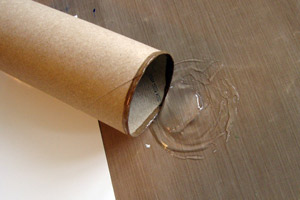
  4. Step 3

    Stamp your found objects into the Copic ink. The alcohol in the hand sanitizer pushes the ink and leaves the stamped area white. I used a toilet paper roll, cork and lid to create my finished look.

  5. Step 4

    Get creative and use your really cool new paper for an amazing project!

Video!

Variations

  1. Try different paper:
    You can use any paper for this technique with varying results, all of them beautiful. Try standard cardstock or even vellum for new looks.

Your Turn

You've seen the tutorial, now you try it! We've got a section of the gallery set aside for Copic Ink Background. Try this technique, then upload your artwork to the gallery. Show us your creations!

***Please note - Internet Explorer/Edge is not a supported browser, and will not allow you to see the videos. Please use Chrome, Firefox or Safari to view our tutorial videos.

Questions and Comments

We'd love to get your feedback or questions. Leave your comment below.

Thanks for all the comments ladies!!!

And thanks for taking the questions Beate, sorry ladies only alcohol inks on this one.
Michelle Houghton  |  Wed Jul 11, 2012 at 10:20 AM
I've used something similar to this technique, using rubbing alcohol and stampin' up reinkers. Using glossy paper, you get much the same effect as using Ranger inks, which are alcohol based. Great idea with the gel - can't wait to play with it, and some "found" objects! Thanks for the idea!
Joni  |  Wed Jul 11, 2012 at 12:11 PM
Yay it works with ranger alcohol inks too. Lots of fun. Thanks
Lisa  |  Wed Jul 11, 2012 at 7:57 PM
ohoo haven't done anything like this since play school! Thanks for the memory. I'll have a go!
Spyder  |  Thu Jul 12, 2012 at 2:49 AM
Awesome project gonna try it thanks for sharing!!!
Lena beck  |  Thu Jul 12, 2012 at 7:27 AM
Great tutorial! Would it work also with the Ranger alcohol inks? Because I don't have any Copic reinkers? Very inspiring, Miranda
Miranda  |  Thu Jul 12, 2012 at 9:19 AM
Wow, this really creates a fun and easy background!
Cynthia  |  Fri Jul 13, 2012 at 3:01 PM
Love the technique...just wish it would work with Stampin Up re-inkers as I have those on hand. No where near a craft store (i.e. Hobby Lobby, etc) to purchase alcohol based re-inkers...oh well, next time we're to Huntsville I will look for alcohol based re-inkers! I'll just use shaving cream and Stampin Up re-inkers!!!
Caroly Smith  |  Sat Jul 14, 2012 at 12:26 PM
Wonderful! Just what i was looking for as I don't normally make cards and I was looking for something simple but effective as a background. Thank you
tricia  |  Fri Jul 20, 2012 at 1:37 AM
It's amazing a few drops give such a pretty background. I asked myself how do you come up with these creative ideas. Such talent. Thank you!
Vicki  |  Sat Jul 28, 2012 at 5:23 PM
what a fun technique cannot wait to try this. Gr8 teacher. Thank you
lynn  |  Thu Aug 2, 2012 at 10:40 PM

Page 2 of 2 pages  <  1 2

You need to be logged in to comment

GET OUR NEWSLETTER


Splitcoaststampers's privacy policy