Chipboard Bookmark
by Beverly Gerard
Create a magnetic bookmark.
Supplies
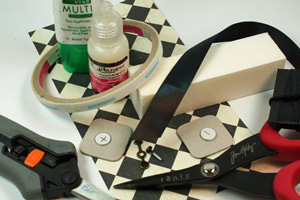
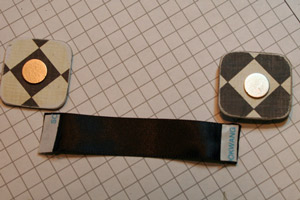
- Two identical chipboard shapes
- Small pair of magnets (Basic Grey magnetic snaps used here)
- Patterned paper (The Paper Studio used here)
- Liquid glue (Tombow Mono Multi glue & Glossy Accents used here)
- Sanding block
- Scissors
- Brayer or flat edge tool for scraping, such as a ruler
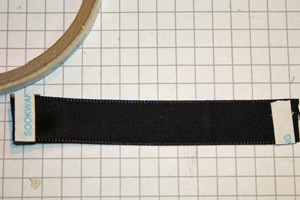
- Ribbon, cut to about 3 5/8" length
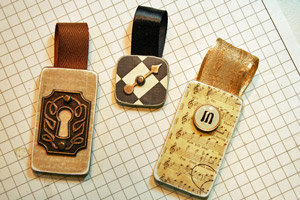
- Embellishment of choice
Step-by-Step
-
Step 1
Trace around chipboard onto the patterned paper to cut out 4 pieces of paper to fit the chipboard shape. (Allows for front & back of each chipboard.)
Use a thin layer of liquid glue to adhere cut paper to all 4 chipboard surfaces.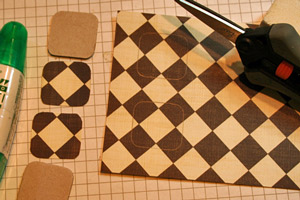
-
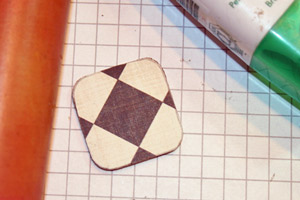
Step 2
Use a brayer to squeeze out any air bubbles between the chipboard and paper. Do this to all chipboard/paper surfaces.
-
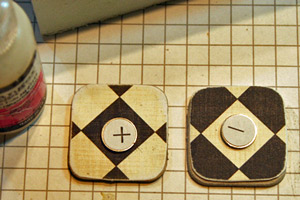
Step 3
Sand all chipboard edges with a sanding block. Next, adhere the magnets to the backs of the chipboard pieces, using a strong liquid adhesive, such as Glossy Accents or Crystal Effects.
-
Step 4
Add Scor-Tape™ to the raw cut ends of the ribbon. Fold the taped ends over on themselves to hide & secure raw edges.
-
Step 5
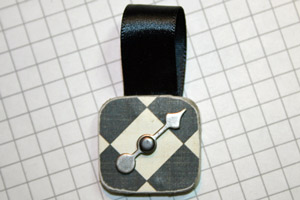
Once the raw ribbon ends are folded under and secured, repeat the process by adding Scor-Tape to the folded ends of the ribbon. Now secure the ribbon ends to the chipboard backs, above the magnets in the topmost portion of the chipboard backs.
-
Step 6
Use strong liquid adhesive to attach the embellishment to the front of the bookmark. Allow just a few minutes to dry.
-
Your bookmark is done.
Video!
Your Turn
You've seen the tutorial, now you try it! We've got a section of the gallery set aside for Chipboard Bookmark. Try this technique, then upload your artwork to the gallery. Show us your creations!
***Please note - Internet Explorer/Edge is not a supported browser, and will not allow you to see the videos. Please use Chrome, Firefox or Safari to view our tutorial videos.

Questions and Comments
We'd love to get your feedback or questions. Leave your comment below.
Hi Debbie!
These chipboard pieces all happen to be from retired SU chipboard collections. They were precut. The large ones are 2.25" X 1 1/8". The smaller one is 1 1/8" X 1". Literally any size you choose is the right size for your bookmarks.
Hi Trudie!
Welcome to N. Texas! Over the years I've watched stamp/scrapbook stores fade away here to the ones you've mentioned. :( There's a marvelous store in Waxahachie ... I know ... much farther than I'd like for sure. Possibly one in Irving, although I haven't been there. Thankful for online shopping!
Hi Bonnie!
I used Basic Grey Magnetic Snaps. They are widely available ... with many online stores carrying them. I just 'googled' Basic Grey Magnetic Snaps and found lots of stores from which to choose. I always keep some of these handy.
Hi Jan!
I've also made these from just a couple of layers of cardstock ... as shown in here and here as well. Hope this helps!
Smiles, Bev
Bonnie, if you have trouble finding a source, please send me a PM here at SCS.
Smiles, Bev
This is a wonderful idea! Thank you for making the video to go along with the written directions!
I am going to make 5 of these for Mother's Day! 1-My Mom, 1 for each Sister, 1 for my adult Step-Daughter, and 1 for my Daughter-in-Law! Thank you for the great idea!
His,
Traci S.
Thanks again!
His,
Traci S.
I hope you'll share the gifty bookmarks with us that you create!
~Bev
Page 2 of 3 pages < 1 2 3 >