Brick Wall

by Birgit Edblom

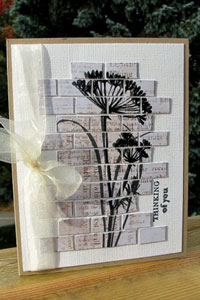
Create a unique look for your main image by cutting it apart and adhering it in brick form.

Supplies
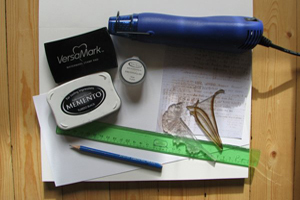
  • Cardstock
  • Black Ink Pad
  • Stamp
  • Patterned Paper
  • Versamark™
  • Black Embossing Powder
  • Heat Tool
  • Ruler
  • Pencil
  • Scissors
  • Adhesive

Step-by-Step

  1. Step 1

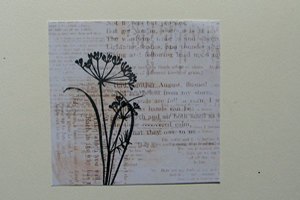
    Stamp image in black ink on patterned paper.
  2. Step 2

    Stamp again, slightly beside the first image in Versamark ink to add some depth.

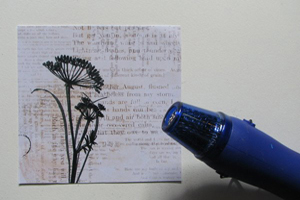
    Pour black embossing powder over the image and heat emboss. Allow to cool.

    Hint:
    If your paper is thin, you can glue it to a piece of cardstock for stability.
  3. Step 3

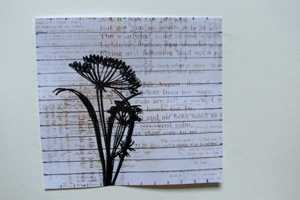
    Use a ruler and pencil to draw horizontal lines every 1/2".
  4. Step 4

    Draw vertical lines every 1" between the horizontal lines, offsetting them 1/2" every other line to create your bricks.
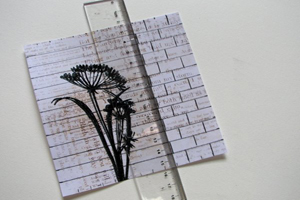
  5. When all the lines are drawn it looks like this.
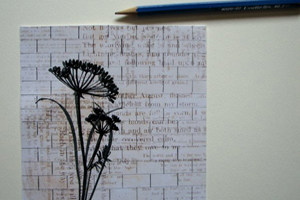
  6. Step 5

    Cut along your horizontal lines and place them in order.
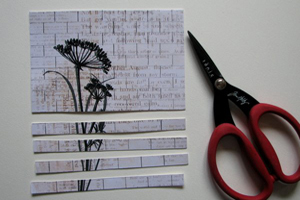
  7. Step 6

    Begin from the bottom and cut the first strip of paper along the vertical line.

    Adhere the bricks one by one, placing them on the cardstock with small spaces between to build a wall of bricks.
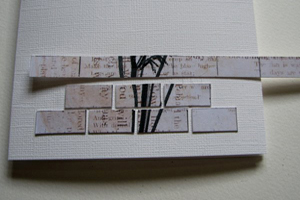
  8. Step 7

    Finish your card.

Video!

Your Turn

You've seen the tutorial, now you try it! We've got a section of the gallery set aside for Brick Wall. Try this technique, then upload your artwork to the gallery. Show us your creations!

***Please note - Internet Explorer/Edge is not a supported browser, and will not allow you to see the videos. Please use Chrome, Firefox or Safari to view our tutorial videos.
Questions and Comments

We'd love to get your feedback or questions. Leave your comment below.

What a great look,can't wait to give it a try. TFS
Ev
~~~~~~~~~~~~~
evelynn saddler  |  Thu Nov 12, 2009 at 7:13 AM
I love the tile or brick look. I also love it when you show an uncomplicated way of doing things such as cutting with the cutter instead of measuring, marking and cutting. Since I am not really good and not very imaginative when it comes to figuring out the easy way to do things, you reallly teach me a lot. Thank you so much for sharing your talent.
Marty  |  Thu Nov 12, 2009 at 8:07 AM
Thanks for the tutorial Birgit and the video Beate - both VERY clear - so I gave it a try. My card is posted here http://www.splitcoaststampers.com/gallery/photo/1538859?&cat=500&ppuser=147277.
Laurie  |  Thu Nov 12, 2009 at 1:35 PM
What a great idea
Gislinde Engelmann  |  Thu Nov 12, 2009 at 1:53 PM
Simple but beautiful card. Can't wait to try it
Mary  |  Thu Nov 12, 2009 at 3:20 PM
fantastic card idea keep them coming smile
nonrealblonde  |  Thu Nov 12, 2009 at 8:50 PM
Brigit! This is fantastic! I am so going to try this very soon!
Holly aka Toy  |  Thu Nov 12, 2009 at 9:06 PM
This is one of THE most beautiful techniques! I love it! Thank you so much for sharing your creativity and great tutorial! I can't wait to try it!
Vina  |  Fri Nov 13, 2009 at 12:00 AM
Coolt Biggan! B�de att hitta dig h�r och den ljuvliga tekniken.

Ha det b�st!

Kram //Erica
Erica Bj�rcman  |  Fri Nov 13, 2009 at 1:10 AM
Oh wow, an awesome tutorial!!

I tried my own card and I have to say this technique is so much fun.

Please continue, It's so much fun to find more and more great tutorials.

Greetins from Germany,

Tanja
Kleine85  |  Fri Nov 13, 2009 at 1:52 PM
This is such an exciting process! I can't wait to frame some of my families favorite pictures/photos (copies) in this technique and perhaps put an appropriate quote somewhere on the completed project. Thank so much for sharing this with us!
Traci S.  |  Fri Nov 13, 2009 at 2:24 PM
This is worgeous tutorial !!!
Thanks for sharing.
Hugs, Myrna
Myrna  |  Fri Nov 13, 2009 at 2:27 PM
This was very cute! I cant wait to try it out!
Emily  |  Fri Nov 13, 2009 at 7:04 PM
I have seen this done with sticker labels too. You get the white price tag/yard sale stickers and stamp on the sheet, and color as you want it. Then you peel the paper back and place the stickers on the card in rows.
Jen  |  Sat Nov 14, 2009 at 8:38 AM
I tried it, did not think I could get it right, and wow, it looks great. Thank you for the idea
Lee-Ann Geldenhuys  |  Sat Nov 14, 2009 at 12:38 PM
Great idea...great tutorial!
Susanne527  |  Sun Nov 15, 2009 at 8:28 AM
BRICK WALL CARD ~ Before cutting your 1/2" horizontal strips into the 1" vertical strips, place a strip of double-sided tape onto the back - saves the hassle of trying to apply adhesive to individual fiddly little rectangles!
Lynne Cullen  |  Sun Nov 15, 2009 at 10:17 PM
Can't wait to try this - great idea! Thanks for sharing.
Pat  |  Mon Nov 16, 2009 at 4:28 PM
Love this! What a great idea. Thanks for sharing.
Pat  |  Mon Nov 16, 2009 at 4:31 PM
this has me thinking- about doing it on a larger scale for my kitchen wall... hmmmmmm.......
great tutorial!
trishia  |  Tue Nov 17, 2009 at 4:35 PM

Page 3 of 5 pages  <  1 2 3 4 5 >

You need to be logged in to comment

GET OUR NEWSLETTER


Splitcoaststampers's privacy policy