Blackout Embossing

by Lydia Fiedler

Create bold and dramatic effect with 3D embossing folders and ink.
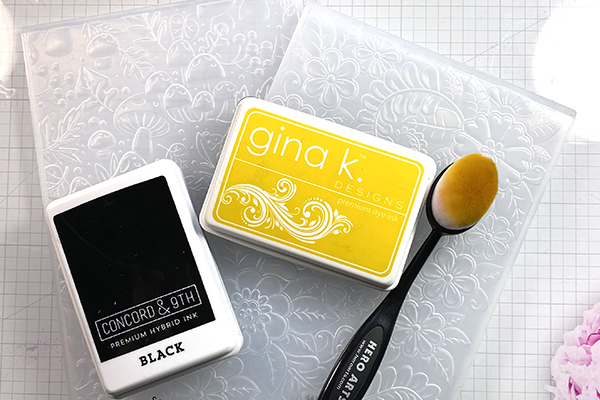
Supplies

    For a detailed supply list, please see the video description on YouTube


  • 3D Embossing Folders

  • Ink
  • (Foam ink pad preferred)
  • Blending Brushes

Step-by-Step

  1. Step 1

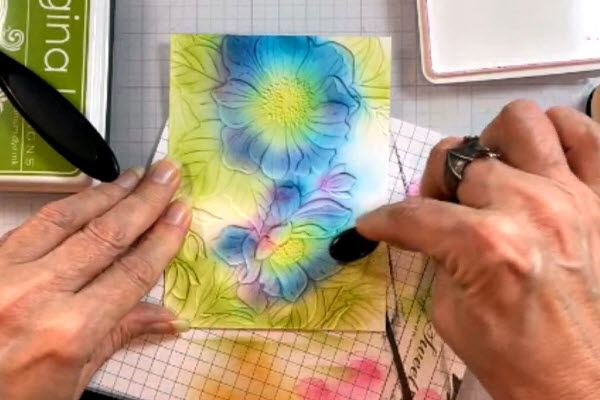
    Using a 3D embossing folder, emboss a white card front.

  2. Step 2

    Using ink and blending brushes, add color to the debossed side of the panel.

  3. Step 3

    Using a foam ink pad in a dark color or black, swipe the ink across the colored card panel, using very gentle pressure, until all of the flat areas are covered with ink.

  4. Step 4

    Finish the card.

  5. This technique is also very striking with no color added.

Video!

Your Turn

You've seen the tutorial, now you try it! We've got a section of the gallery set aside for Blackout Embossing. Try this technique, then upload your artwork to the gallery. Show us your creations!

***Please note - Internet Explorer/Edge is not a supported browser, and will not allow you to see the videos. Please use Chrome, Firefox or Safari to view our tutorial videos.

Questions and Comments

We'd love to get your feedback or questions. Leave your comment below.

Oh Lydia!! Ahhhh-mazing!! Love the technique and can't wait to give it a try!! TFS I think I'm going to get hooked!! Lol. Quick question- could a black pigment ink be used for the swiping if foam?
jmhoffmann  |  Wed Jan 31, 2024 at 4:40 AM
Oh wow Lydia! I love this technique and can’t wait to give it a try. Thank you for sharing your beautiful cards with us. I love your videos!
Gail Paradise  |  Wed Jan 31, 2024 at 5:57 AM
beautiful! Every time I go to buy that mushroom embossing folder, it is sold out….
howdyheidi  |  Wed Jan 31, 2024 at 6:18 AM
Wonderful technique! I've done similar backgrounds using Stazon directly on the embossing folder but, not being a fan of Stazon, I seldom use it. I'm glad to see this video and will be giving it a try.
Bravesfan Linda  |  Wed Jan 31, 2024 at 7:16 AM
Hi Lydia, Thanks for the video tutorial on this amazing technique! Your cards are spectacular!
bzzzeee  |  Wed Jan 31, 2024 at 7:27 AM
OMG, all I can say is, "WOW"! What a gorgeous outcome for such an easy, quick technique. All my embossing folders that I "collect" will finally get some use. I loved this so much I clicked on your YouTube link so I could give you a THUMBS UP!! Great job!
Desert Stamper  |  Wed Jan 31, 2024 at 10:04 AM
@jmhoffman I'm sure that would work great!!
lydia  |  Wed Jan 31, 2024 at 10:32 AM
@Linda I agree - I don't like the messiness of that technique always!
lydia  |  Wed Jan 31, 2024 at 10:33 AM
Thank you so much Desert Stamper!
lydia  |  Wed Jan 31, 2024 at 10:33 AM
I’m just sitting here with my mouth hanging open. The results are absolutely stunning and SO easy. What could be better? Thanks for this amazing idea!!
Carolyn Steele  |  Wed Jan 31, 2024 at 1:11 PM
what embossing folder (the one with the large flowers used in the sample above) are you using? Name of the folder and the company that sells it please? Your sample is so striking and I HAVE to buy that folder!
LinB  |  Wed Jan 31, 2024 at 6:07 PM
Love this technique. Great cards.
Ozcat  |  Tue Feb 6, 2024 at 7:50 PM
wow that is gorgeous! love how it pops!
Conniecrafter  |  Mon Feb 26, 2024 at 8:48 AM
I am impressed. I will dig for my 3-D folders. I tend to like those better than the regular ones.
Thank you for sharing.
dickiebutts  |  Tue Feb 27, 2024 at 5:53 AM
@linB all the supplies are in the description of the video on YouTube - just click "more" to see the full description.
lydia  |  Sun Mar 31, 2024 at 7:11 AM
Thank you for this beautiful tutorial Lydia! Just tried it for the first time and I'm hooked! Can't wait to show the ladies next time we meet.
AKSTAMPER  |  Sat Apr 20, 2024 at 11:00 PM

Page 1 of 1 pages

You need to be logged in to comment

GET OUR NEWSLETTER


Splitcoaststampers's privacy policy