Alcohol Ink
by Cindy Lyles
Take non-porous surfaces from "blah" to "wow".
Supplies
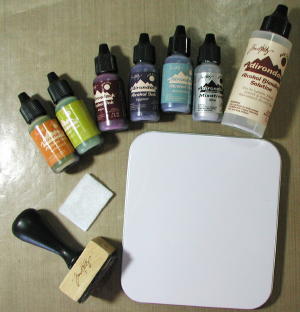
- Alcohol inks in assorted colors (Adirondack® colors used here: Butterscotch, Lettuce, Raisin, Eggplant, Stonewashed).
- Alcohol Blending Solution*
- Applicator and white felt rectangle (applicator is a hand stamp with hook side of Velcro® attached)
- Mixative (Adirondack silver used)*
- Craft mat
- Non-porous surface to alter, such as this white CD tin (Try glossy cardstock, dominos or CDs; anything non-porous)
*Adirondack Mixatives are formulated exclusively for use with alcohol inks. Rubbing alcohol / Krylon or other metallic inks can be substituted; however, results can vary.
Step-by-Step
-
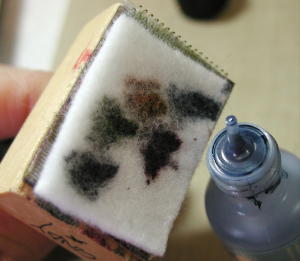
Step 1
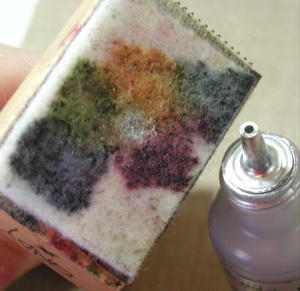
Begin by placing white felt rectangle onto applicator, place nib of alcohol ink into felt and squeeze bottle. Apply each color once and avoid overlapping colors on the felt. They can touch, just not overlap.
-
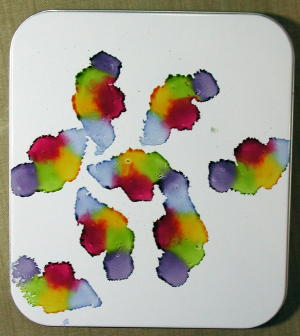
Step 2
Randomly stamp onto piece to avoid the appearance of a pattern. Alcohol inks dry instantly, so virtually zero dry time is required between steps.
-
Step 3
Continue to stamp randomly. Do not cover entire piece; make sure a small amount of white shows.
-
Step 4
Without changing the felt applicator, squeeze a small drop of mixative onto the felt rectangle. Mixatives are highly concentrated and a tiny drop goes a long way.
-
Step 5
Stamp randomly to apply the mixative.

-
Step 6
Squeeze a very small amount of Alcohol Blending Solution onto the same applicator. Too much solution will significantly lighten or even remove the color from the piece. One can always add more if needed. Experiment to find a look that's pleasing.
Tip: The blending solution is indeed "magic in a bottle" according to Tim Holtz. Use this product to clean work surfaces, remove adhesive from scissors, and remove any ink from hands or work surfaces. Try it on the Stamp-A-Ma-Jig™ clear placement piece after using waterproof or solvent ink.

-
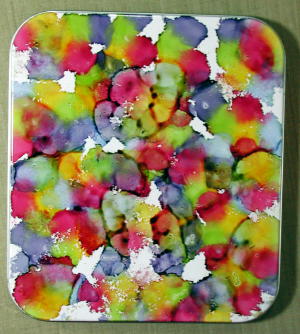
Step 7
Stamp randomly to blend the mixative with the alcohol inks. The Alcohol Blending Solution mixes with the alcohol inks to creating a veined effect and blend colors. Stamp randomly until the look desired is achieved.
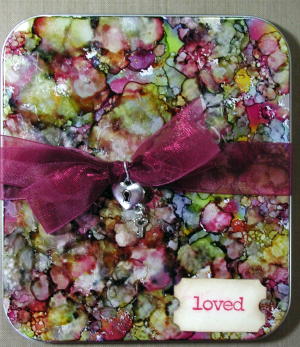
Apply rub-ons or other embellishments to finish.
Tip: If stamping on completed project, a good quality, waterproof ink works well. Ranger's Archival Ink is recommended. Solvent inks can react with the alcohol inks.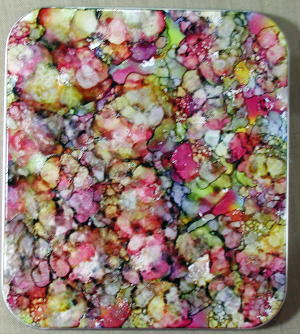
-
Step 8
Completed piece.
Variations
-
Dominos are non-porous too! The application for this techique is endless. Glossy paper, buttons, CDs, and so forth.
If finished product is to be worn or handled roughly, consider sealing it. DecoArt DuraClear Varnish™ is recommended, available in gloss or matte. It is a premium polyurethane finish that dries quickly (few hours) and with scant fumes. Envirotex™ is another excellent product; however one must work in a highly ventilated area and extensive dry time is required (up to 3 or 4 days, depending on weather conditions).
All products used in this tutorial are from Ranger Ink (http://www.rangerink.com available at your local craft/hobby store or through various e-tailers). For more in-depth information Tim Holtz's DVD The Journey Continues is top-notch and an excellent resource.
Questions? Please start a thread in the proper forum and PM a link to me. I am happy to share what I know about this fun technique.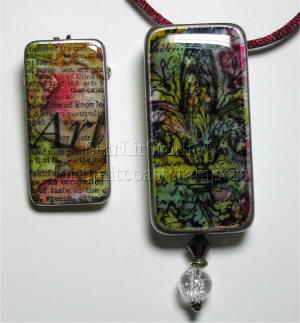
-
Your Turn
You've seen the tutorial, now you try it! We've got a section of the gallery set aside for Alcohol Ink. Try this technique, then upload your artwork to the gallery. Show us your creations!
***Please note - Internet Explorer/Edge is not a supported browser, and will not allow you to see the videos. Please use Chrome, Firefox or Safari to view our tutorial videos.

Questions and Comments
We'd love to get your feedback or questions. Leave your comment below.
Some photo papers will work fine, but depending on the emulsion that the manufacturer uses, the alcohol in the inks can actually dissolve it and turn your project into a gluey mess! If you've found a brand that works well, definitely use it, but otherwise it's probably best to stick with glossy card stock, which has an emulsion that is not reactive with alcohol inks. HTH!
I have not been able to successful seal my work on tin without ruining it (and crying) - the deco product did not seem to work - any suggestions out there?
Thanks!!!
What is white felt?
Dear Clara - The white felt is exactly that - white felt, pre-cut to the size of the ink applicator tool. The tool and application method were designed by Tim Holtz. One can purchase these pre-cut felt pieces (try googling Ranger felt ink replacements) in packages of 50. Please PM me if more info is needed & thank you, Cindy
thanks!!!!
The system will not allow me to publish links or I would list them here. I will send you a pm with the links, but for others that are looking for an answer, simply google 'alcohol inks glass ornaments' and you will find several tutorials and one youtube video from Ranger showcasing this technique using glass ornaments. Sincerely, Cindy
alchol inks. It sounds very interesting.
Thanks
Page 2 of 4 pages < 1 2 3 4 >