Acrylic Post-It™ Note Holder

by Beth Silaika

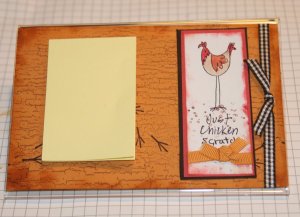
Turn an acrylic photo frame on its end to make a cute desk accessory!

Supplies
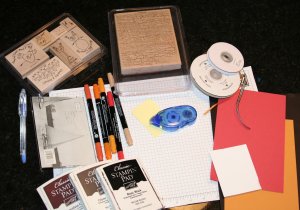
  • 4" x 6" Horizontal Bent Acrylic Photo Frame

  • RSVP™ Pen (can be purchased from most office supply companies)

  • Ink or Markers

  • Stamps

  • 4" x 6" cardstock for the background

  • Cardstock Scraps

  • Adhesive

  • Post-It™ Note Pad

Step-by-Step

  1. Step 1

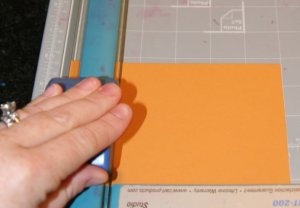
    If needed, trim 4" x 6" cardstock to fit inside the frame. This will be your background.
  2. Step 2

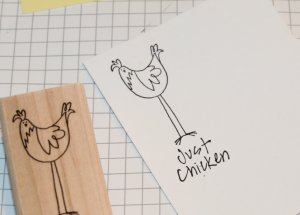
    Stamp main image on a cardstock scrap.
  3. Step 3

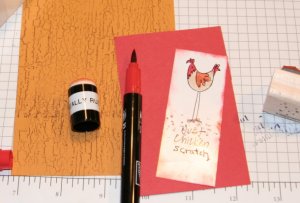
    Stamp background cardstock (here, Weathered Background on More Mustard). Color main image with markers.

    Layer main stamped image on a coordinating scrap of cardstock, and attach to background.

    Hint: Make sure to offset the main image so it is not covered by the Post-It Note Pad you will be placing on top of the acrylic frame.
  4. Step 4

    Add ribbon to background.

    Slide assembled background into the photo frame.

    Note: The photo frame is upside down. It will rest on a flat surface like a small desk.

  5. Step 5

    Remove paper backing from Post-It™ Note Pad. Use adhesive to secure note pad to the acrylic frame.

    Check here for a tutorial on altering an RSVP pen to match.
Your Turn

You've seen the tutorial, now you try it! We've got a section of the gallery set aside for Acrylic Post-It™ Note Holder. Try this technique, then upload your artwork to the gallery. Show us your creations!

***Please note - Internet Explorer/Edge is not a supported browser, and will not allow you to see the videos. Please use Chrome, Firefox or Safari to view our tutorial videos.

Questions and Comments

We'd love to get your feedback or questions. Leave your comment below.

I AM JUST GETTING STARTED AND I LOVE ALL THE HELP THIS SITE GIVES TO NEW STAMPERS. THANKS ALOT, JANET BURSON
JANET BURSON  |  Thu Feb 14, 2008 at 6:44 AM
I think this a great idea and can hardly wait to try it.
Ryn  |  Mon Feb 25, 2008 at 9:38 PM
Hi Beth,
Is the stamp set you used in your note holder from SU? I looked in the catalog and could not see it, or is it an older set? Thanks
Sandy  |  Sat Mar 8, 2008 at 12:01 PM
I love this idea, I can't wait to try it, but I've never heard of RSVP pens. I noticed some of the pens looked like they match the designs. Can someone please tell me more about the pens. Thanks! These will make nice gifts.
Debbie  |  Tue Apr 15, 2008 at 11:02 AM
I love this idea, and luckily I had the materials to make a post-it-note stand today. I tried to upload my picture to the post-it-note gallery, but can't figure out how. Can someone please help me.
Thanks, Debbie
Proudmom
Debbie  |  Tue Apr 15, 2008 at 2:42 PM
How much embellishment or how much layering can you put into the frame? Does it open up a bit? Thanks for the tutorial!
Rosetta  |  Sat Jun 7, 2008 at 11:13 AM
Is there a way to get the post-it to stick on there? I made one for a friend and the post-its fell off from their back piece before she even got to use them. Any suggestions for an easel-type support?

Thank you.
Eva Dingwall  |  Thu Jul 3, 2008 at 12:45 PM
I am so excited to see this and can't wait to give it a whirl...more will be revealed. Hope that the post its stay put as an earlier poster had concerns about them falling off of stand. I have the acrylic frames on hand...I'm off to see the wizard!!!
Shergayle  |  Wed Jul 23, 2008 at 8:46 PM
I've been thinking that I used a post-it cube that may have been too large. BUT, I also thought that using dimensionals and a dot of color or stamping and cutting out a part of the picture in my frame, placing that at the bottom of the post its would help hold it in place.

If anyone tries this, let me know if it works for you. I have one more to do myself. They are fun to make.

Eva
Eva Dingwall  |  Thu Jul 24, 2008 at 5:51 AM
I made these for my MOPS group, and everyone loved them! I took the paper backing off and adhered the post-its with red-liner tape. If you were really worried about them not falling off, maybe find ones that have the adhesive edge that holds all the papers together, then the top ones wouldn't be able to pull off of the one taped to the frame. Hope that helps! Thanks for the great tutorial, Beth!
mybelle101  |  Thu Jul 24, 2008 at 10:32 PM
If you use that sticky strip tape on the back of the post-it notes, they will not fall off. That stuff hold ANYTHING on. I put one on the top and bottom on the back of the notes and it stays put. smile
Sharon White  |  Wed Aug 13, 2008 at 6:44 AM
I think this is a great idea but I can't find the frames
paula divone  |  Mon Sep 1, 2008 at 4:00 PM
I love this idea!!! Especially for teacher gifts! I'm going to try this today!!!
audrey  |  Thu Nov 6, 2008 at 6:28 AM
Paula (and anyone else having trouble finding the frames): Try your local Dollar General, or Dollar Tree, or any similar "dollar"-themed store. They usually have these frames in stock for $1 each.
Whitney  |  Tue Dec 23, 2008 at 1:10 PM
This is great! I've seen where people put coordinating paper inside the pen. What size do you need to cut the paper to put it in the pen?
RosyS  |  Tue Jan 6, 2009 at 8:39 AM
Hi RosyS,

I added a link to our altering pen tutorial in the last step of this tutorial.
beate  |  Tue Jan 6, 2009 at 11:53 AM
Are these frames the ones with a easle on the bottom part to keep the frame standing up? How am i suppose to stand or put this memo holder after im through making it. If i lay it flat or try to, then the frame will sit lop-sided.
Maria  |  Wed Apr 15, 2009 at 10:01 AM
hi just found this site my name is jennie and im from KENT in ENGLAND
Jennie Addis  |  Wed Jul 1, 2009 at 12:12 PM
I did my fall demo using this project and all the girls loved it! I used lovely as a tree for the main image and used chocolate chip, sunny yellow and ruby red ink to create soft fall colours in the trees. I also used printed designer paper for the background and the pen as this saved time:-) Love the ideas! Merci!
Julie Robert  |  Sun Sep 20, 2009 at 7:42 AM
I just made one last night! Wow...how fun!
Maria, you use the 4x6 frames that hold a horizontal photo.

I just love this idea and see some great Christmas gifts being created! Thanks!
Sharain Mueller  |  Thu Aug 19, 2010 at 6:02 AM

Page 1 of 2 pages  1 2 >

You need to be logged in to comment

GET OUR NEWSLETTER


Splitcoaststampers's privacy policy