3D Paper Piecing

by Mariska van der Veer

Layer several stamped images to create a 3d look.

Supplies
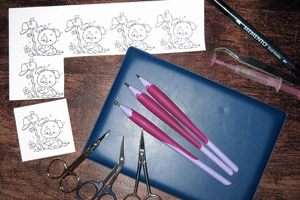
  • Five stamped impressions or printed digital images close to each other on the paper you usually color on, used here is one of the Naughty Puppies by Wee Stamps
  • One stamped impression or printed digital image cut into the shape you want to use as a base
  • Coloring Medium (markers, pencils, inks, etc.)
  • Precision scissors or a craft knife
  • Memento Dual Tip marker Tuxedo Black, or other black marker
  • Pergamano embossing tools and mat
  • Olba Glue kit with syringe, or other liquid glue
  • Pair of Tweezers

Step-by-Step

  1. Step 1

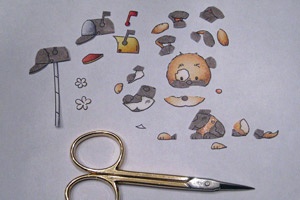
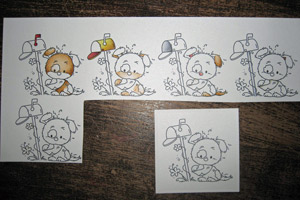
    Color every part of the image apart from each other.

    Hint:
    You can use several parts of one images but make sure that the different colored parts of the image don’t touch each other and have enough space between them to cut out later. In this picture for instance the body of the puppy is colored in one image and the back leg, that will go onto op the body as a layer, is colored in a second image.
  2. Step 2

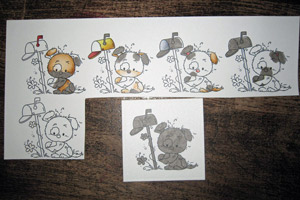
    Decide from every little piece that you have colored what adjoining piece is going to be the base for another piece.

    For instance, in the matter of the body the back leg, the feet, the envelope and the head are going to be a higher layer then the body, so those parts are going to serve as a base to adhere these parts to. Color those base parts with a shadow color, used here is a W5 Copic Marker. Also color the part of the base image that is going to be paper pieced on.
  3. Step 3

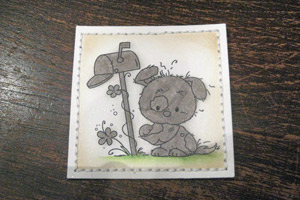
    Add shadow and background coloring to the base image when desired. Distressing or sewing on the base image should also be done at this point. You will not need the base part now until step 7.
  4. Step 4

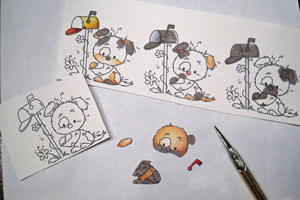
    Cut out all the pieces WITH the adjoining base parts that you have colored in a shadow color. You don’t need the base parts, just a good rim to add glue to will often do.
  5. Step 5

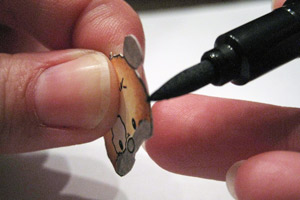
    Color the sides of the little pieces with the large tip of the Memento marker. Where there aren’t black lines (in this sample the back leg has party been cut without using black lines as a guide) don’t color the sides with the black marker.
  6. Step 6

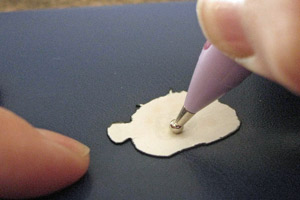
    Place the little pieces colored side facing down on the embossing mat, take an embossing tool that matches the size of the piece you are embossing, with the ball of that tool push down a little and go round in circles.

    The little pieces should be slightly rounded on the colored side when you are ready. Be sure to not add to much pressure and be careful with very small pieces as they may jump away.
  7. Step 7

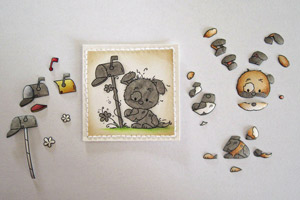
    Take a sheet of paper, place the base piece in the middle and all the little pieces in the order they are going to be placed on top of each other around it.
  8. Step 8

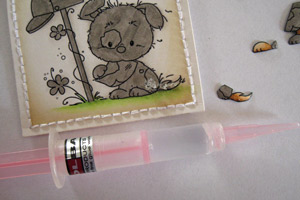
    Fill the syringe with glue and carefully decide which part of the image is going to be the most in the back of the image. Decide where the glue should go and carefully apply the glue.
  9. Step 9

    Using tweezers put the colored piece on top of the glue. Make sure the glue supports the piece of paper but don’t press down on it, this will push the glue to the sides and will flatten the image. The glue is very strong and once set will hold the pieces of paper perfectly in place.
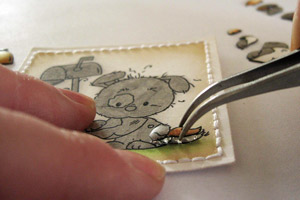
  10. Step 10

    Continue this process, each time carefully deciding which piece should be adding next and where the glue should go. If you by accident make a mistake the glue will stay flexible for a few minutes and the pieces can easily be removed.
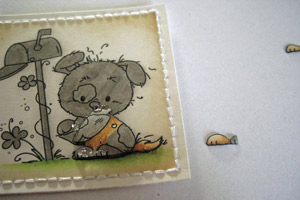
  11. Step 11

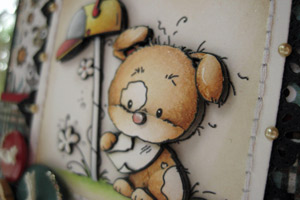
    The image is completely paper pieced. Looking from the side the image also looks good because of the shadow you have added to the base parts and the white sides of the pieces of paper that you have colored.
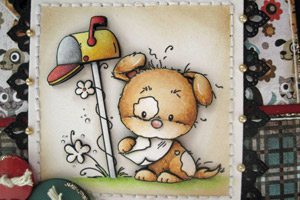
  12. Step 12

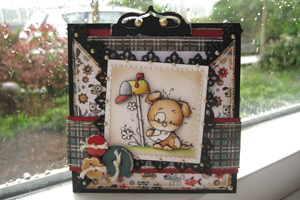
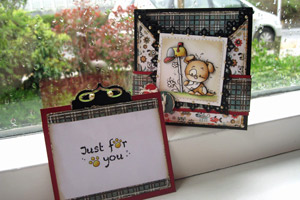
    Finish your project.

  13. Used here is the Criss-Cross Card Tutorial altered measurements.
Video!

Your Turn

You've seen the tutorial, now you try it! We've got a section of the gallery set aside for 3D Paper Piecing. Try this technique, then upload your artwork to the gallery. Show us your creations!

***Please note - Internet Explorer/Edge is not a supported browser, and will not allow you to see the videos. Please use Chrome, Firefox or Safari to view our tutorial videos.

Questions and Comments

We'd love to get your feedback or questions. Leave your comment below.

Mariska, what a wonderful and helpful tutorial. You have made the steps easy to follow and your finished image is adorable. Thank you so much for sharing.
Linda Eilers  |  Sat Jun 8, 2013 at 5:54 PM
Great tutorial, and such a beautiful card from such a simple design, thanks. I loved it!
Donna Whitten  |  Sun Jun 9, 2013 at 11:43 AM
Your work is absolutely stunning! I have been drooling over your beautiful completed projects in your gallery & on your blog.
Thank you so much for sharing this wonderful tutorial & for displaying a picture of all the little pieces in each project. I just ordered the special 3D glue & stamps from Whimsy so I can try this technique! Your blog pictures & video will be extremely helpful!
Hugs, Vina
Vina  |  Tue Jun 11, 2013 at 10:04 PM
Hey Mariska. I am curious about something. I have done two characters like this but have trouble when starting. How do you plan out your images and what layer is on the bottom and which pieces you want to build up with? I thought I would do a whole image in gray as the base. Then another layer that would have the pieces that are colored next with the remaining being
And then the next layer would be the pieces that are left which would be colored minus the pieces that will be built up on the next layer. It's a bit overwhelming and I have made some mistakes in my planning so I am hoping you can enlighten me some. I absolutely love this technique. It is my most favorite that I have learned so far so I would like to get it mastered before long so I can make lots of cards with 3D characters.
heather  |  Sat Jun 22, 2013 at 3:52 PM
Thanks so much for the great tutorial Mariska! I LOVE your work so decided to give this a try. Hopefully one day mine will look as good as yours!

http://www.splitcoaststampers.com/gallery/photo/2390826?&cat=500&ppuser=147277
Laurie Tirone  |  Sun Jun 30, 2013 at 7:43 AM
Thank you so much everybody for your lovely comments! Heather, I have to admit that I just color as I go and decide on the layers as I color. The first step to color the background completely grey is what I do as well, though I usually do that as my last step when I'm adding grey parts to the parts that I have already colored but I basically just start with coloring the skin parts and while I color deciding how many layers I want and how to color that on the different stamped impressions. At first I made a lot of mistakes as well but I've been doing it for so long now that I basically think in 3D now while I color. I do always show the little parts I've colored on my blog when I show a card I've created and I've been told often that people use those pictures for their first projects to get the feel of it. Good thing about this technique is that you can start very simple with just a few layers and build your way to more and more pieces as you feel more comfortable with it.

Hope that helps!

Hugs,
Mariska
Mariska van der Veer  |  Sun Jun 30, 2013 at 8:12 AM
I can't even say how great this video. Can you tell me what kind of glue to use. I missed it in the video.

Thanks so much. You're great
Anna Forsman  |  Tue Jul 2, 2013 at 4:19 PM
Thank you so much Anna! I use Olba Glue and their syringes. It's a glue produced in The Netherlands and it's available in the USA through Whimsy Stamps, the company that also sells the rubber stamps of the puppies that I work with in the video.

Hugs,
Mariska
Mariska van der Veer  |  Tue Jul 2, 2013 at 11:28 PM
This is truly a work of art. Such detail is amazing. I am so excited about trying this technique. Thank you, Thank you, Thank you smile
Kay Zink  |  Wed Jul 31, 2013 at 7:40 PM
Wow, is an understatement to your paper piercing. I love the cards you make. This looks hard to me, but I am willing to give it a try. I just hope I can be half as good one day as you are now. Thank you so very much for sharing. Your talent is so awesome.
Diana Beckham  |  Thu Aug 1, 2013 at 12:36 PM
Fabulous video, Mariska!
MelanieR  |  Thu Aug 8, 2013 at 7:12 PM
I love your tutorial and can't wait to try it.
Yvette Smith  |  Thu Aug 15, 2013 at 12:16 AM
I loved your video .This is beautiful. I have one from a craft fair n never got to try an make one.You gave great instructions.Yes I will do it now. Thank you very much.What is the name of the glue you used?
Elaine Keegan  |  Wed Oct 23, 2013 at 11:24 AM
This is Exquisite. You are very talented. Thanks for sharing. I hope to watch your video again and try it myself. It will be a while before mine looks as elegant as yours. Thank You
Kathryn Sloan  |  Thu Jan 30, 2014 at 5:36 AM
I love the way you did this instead of paper tole images they use to have. I did not understand the name of glue that you used. Do you mind sharing that with me. Thanks for helpful instructions. Brenda
Brenda Atchley  |  Mon Feb 10, 2014 at 12:58 PM
Hi Mariska, I love your tutorial. You did a great job. I love the whole card is there a tutorial for the card as well? I also love the color combinations you used. Would you mind sharing?
Thank you so much, Cammi
Cammi Jwanier  |  Thu Jun 26, 2014 at 11:37 PM
Absolutely stunning! Instructions and video were very clear. Thank-you for taking so much time in preparation of this excellent tutorial.
Debbie Hipps  |  Sat Sep 27, 2014 at 8:16 PM
Wow!! I just joined the Fan Club and watched this amazing video! So adorable and mt friends will be so impressed when I make cards with this technique. It was awesome how well prepared you are for the video. Thank you!
Karla Mahan  |  Thu Oct 16, 2014 at 2:49 PM
Mariska, I have been admiring your work for some time now. Beautiful. Could you tell me the weight of the card that you use for your moulding and how do you stop the edges from creasing? Regards Mezl
Merilyn Lydiard  |  Wed Mar 23, 2016 at 3:47 PM
That was so detailed and mind-blowing, all in one! You certainly have an enormous amount of patience and coloring skills!
Rosy Newlun  |  Fri Apr 20, 2018 at 8:05 PM

Page 2 of 3 pages  <  1 2 3 >

You need to be logged in to comment

GET OUR NEWSLETTER


Splitcoaststampers's privacy policy