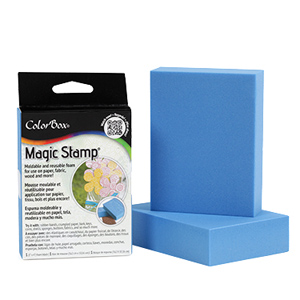
Magic Stamp by Clearsnap
Brought to you by Clearsnap
Make your own impressionable stamp over and over again from any textures with Clearsnap's moldable, reuseable Magic Stamp.
Highlights


- Reusable
- Available in a variety of different shapes and sizes
- Ideal for stamping on paper, wood, fabric and more
- Use with a variety of inks
- Made in the USA
Product Description
Manufacturer Description
At Clearsnap®, we love color! And finding new ways to help our customers add color to craft
projects is our passion. From our beginnings in a garage workshop more than 30 years ago,
we've grown into a leading US manufacturer in the paper crafts industry.
With the ColorBox® line of inkpads, Clearsnap introduced many features common on today's
inkpads, such as the raised inking surface which allows the use of any size inkpad with any size
stamp. Cat's Eye® inkpads brought high quality inks to the market at an affordable price. Petal
Point® and Paintbox® inkpads offer removable plates or petals in a multi-color palette. We also
offer fun tools and accessories to accompany our ink pads.
Clearsnap uses only the finest quality materials in our products. When we develop a new
inkpad, applicator or embellishment, we put it through its paces. We invite some of the best,
most experienced and demanding artists to test it for us. Products that survive and shine
through this process make it into our catalog and onto our web site.
Product Description
ColorBox® Magic Stamp® is a moldable, reusable foam block with the ability to form an
opposite impression of any pattern it is pressed into. Heat the surface of the block with a heat
tool for 10-15 seconds and press the heated side firmly onto a textured surface. The block will
not be hot to the touch after being heated, nor will it damage the item it is pulling the design
from, but it will leave a creative impression on the block’s surface!
The block can then be used to stamp fun backgrounds and one-of- a-kind images. Once you are
finished using the impression on your block, reheat the patterned surface with the heat tool and
the impression will disappear. Each foam block can be reused over and over again. Like magic!
ColorBox® Magic Stamp® is a moldable, reusable foam block that can be heated and pressed
into any texture or design to produce a reversed image for stamping. To reuse the block, reheat
the surface and mold a new image.
Allow Lydia to tell you more about Magic Stamps:
Reviews
-
So Many Possibilities!
By Dina KowalI really enjoyed working with the Magic Stamps® - I've thought a lot this year about pulling some of our classic techniques and products to the present! I actually started my first project by pressing my block into a piece of crumpled newsprint (I think it was actually filler from a Clearsnap® package!), and surprisingly, that background turned out to be my favorite - the texture in the stamp gave a beautiful marbled look. Other favorite textured surfaces were dies, stamps, embossing folders and lace. Impressing a script stamp into the block gave me a scripty print in the negative, which was a beautiful effect. I had a lot of fun using the blocks with my gel plate too - for some of the layers, I coated the plate with acrylic paint, and then picked up the paint with the block to stamp on the tags directly. I also brayered the block with acrylic paint and stamped it onto the block to build up textured layers for a single pull.
The blocks were easy to use (although I did overheat a small section of mine, despite the warning) and I loved the applications for mixed media as well. The sides of the block were fun to use for smaller areas and as borders on tags. The blocks worked well with dye inks, Oxide inks, and acrylic paints, and cleaned up easily - even heat-set acrylic paint rinsed off easily with warm water. The surface is great for monoprinting too, as well as reverse stamping. So many possibilities! -
Stamping in a Whole New Way!
By Ardyth Percy-RobbThe Magic Stamp® is stamping in a whole new way for me! I had a lot of fun experimenting with different textures and inks. Here's a few tips:
First, I tried a few things (a tea strainer, metal impression plate) where the texture was too fine - these didn't make enough of an impression in the Magic Stamp. TIP: Choose an item with a texture that is well-defined.
I got good results with the lid of my Mini Mister. I pounced it repeatedly and randomly on the warm surface of the Magic Stamp. TIP: When you use a small item to create texture, work quickly before the surface cools.
Next, I used a clean metal pot scrubber. I opened it up so that it would cover the whole Magic Stamp and pressed it in. TIP: Don't be afraid to put some weight on your item when pressing into the warm Magic Stamp - this will result in a deep, interesting texture for you to stamp!
Both Distress Oxides and Catherine Pooler inks worked well with the Magic Stamp. They have a thicker, 'creamier' texture than other die inks that seemed to stick to the Magic Stamp and give a good impression.
I love that the size of the Magic Stamp is perfect for creating a quick background. The backgrounds are so interesting that you don't need to do much else to your card - stamp into the centre of a standard A2 card front or panel, add a sentiment and some embellishment and you're done! -
Great Little Product… Joy to Use
By Mary PrasadWhen I saw a couple YouTube videos about the Magic Stamp®, I became really excited to try this product. I immediately started to think about ways I would like to use it. I even jotted down a few ideas on my computer note pad to try out. The single product packaging is perfect - I was happy to see it packaged in paper material that can be recycled.
The instructions are printed on the back of the package. They are very clear; in fact it is quite straightforward to use - just heat and press on something to create a custom stamp. I also like that it is easily reusable just by reheating.
The only (minor) downside was that I couldn’t tell if I had heated the Magic Stamp enough, although this will probably get better with practice. With my first few uses, I was afraid of overheating it. As far as size goes, I would prefer it to be a little bit bigger: 3 1/2 x 4 1/2 inches rather than 3x4 inches. A slightly larger size would work better for backgrounds on 4 1/4 x 5 1/2 inch cards. With this size I had to add more borders for this size card - not a big deal but it would be nice to have more options. They do make other sizes but I didn’t have the opportunity to try them.
I really liked that you could use the Magic Stamp with embossing folders to make a background stamp that could then be embossed for a cool stamped 3D effect. I was also able to use it with my brass stencils. Finally I tried it with die cuts with mat board. This requires steel ruled dies, such as Sizzix Bigz, XL, Movers & Shapers, etc. I used a couple Tim Holtz dies. I got a great impression. Since these dies are usually a bit thicker than thin dies (e.g. Thinlits, Framelits), you get a bolder subject. I decided to use a Gelly Roll pen to decorate the thicker lines.
All in all, I think this is a great little product that’s a joy to use. There is so much you can do with it! You are only limited by your creativity. -
A Little Magic in the Craft Room
By Jennifer TimkoIsn’t it fun when you discover a product that has been around for a bit but is new to you?! And fun was what happened when introduced to the Clearsnap® Magic Stamp®. This moldable foam allows tons of creativity in creating backgrounds. Sometime you like the idea of a background for a project but are not really committed to owning the design for lots of things. The Magic Stamp solves that. You can change the stamp to another texture with just a little bit of heat and imagination.
I created three different backgrounds and tried a number of different inks to see what worked best for me. My first card was created using a broken sidewalk that had really cool texture. I smooshed that Magic Stamp into it (after heating) and the way it stamped resembles an interesting watercolor design. I found that Tim Holtz Distress Oxide Ink worked the best for me on the stamp but I suspect other pigment inks would work really well too.
I got a little more ambitious with my next textures and used a wooden basket and a metal storage basket to create the next two designs. Again, I used Oxide Ink. For one, I let the design be more of the star with only a sentiment added. For the other, I used the whole stamp as a background for other images.
It was fun trying different textures to see what would happen when I stamped them. And great for one-time use patterns…a money saver in the stamp room. Make sure you use this on objects that have a deep enough pattern so the Magic Stamp can pick up the texture. Other than that, your the choices are endless. You too can add a little Magic (Stamp) to your craft room! -
Over and Over Again
By Lydia FiedlerI remember doing a lot of molding-type crafts when I was a kid - both with craft products and with food - candy molds, molds for clay, etc. In stamping, I have stamped into clay, and also done the amazing technique where you iron a stamp image's impression into velvet. But for various reasons, those weren't regular additions into my cardmaking for a few reasons - bulk, messiness, or just a general allergy to using an iron. However, I have now moved the Colorbox® Magic Stamp® into the place of honor in my studio - the Raskog cart next to my desk that holds a lot of the things I reach for regularly.
When I sat down to review this product, what immediately appealed to me is the fact that I already owned a MILLION things that would produce amazing stamp images with Magic Stamp - namely, my stamps, embossing folders and embellishments. So for most of my experiments, I didn't even leave my craft room. I used a detailed background stamp to produce a mirrored image - where the stamp image was a line art image and very delicate, once I heated and pressed the Magic Stamp into the design, inked it and stamped it - the image was exactly the opposite - a solid image with thin lines in the negative space. That makes the stamp go twice as far in the design department. The same is true for embossing folders - multiplied by two - because not only do you get different impressions from the raised and recessed sides of the folder, but also, you can also combine both of those by then embossing your stamped image.
Since the price point of the Magic Stamp is already great, the fact that it can stretch your other, more expensive supplies in a new way makes it a great investment. I also had a fun sequin assortment on my desk that had little shells and regular sequins in it, so I just heated up the Magic Stamp and smooshed it onto a pile of sequins. I stamped it in grey ink, and it looks like a black and white photograph of sequins, which is very cool. Outside the craft room, I found that using barbed wire made for a fun, western background for my horse card.
I also love that it can be used over and over again - which means if you make an impression that didn't turn out like you expected - you haven't wasted the product. How many supplies can you say that about?
Product Gallery
See a gallery of creations made by our review team using products and materials from Clearsnap.


Questions and Comments
What do you think? Leave your comments and questions.
Your tutorials are always so to-the-point, Lydia. Thank you for that. And, thanks for the reminder about this “stamp”, which I bought years and years ago at a show and have used exactly once (better than nonce).
One of my first stamping purchases was the magic blue stamp. A favorite was created by pressing into a bed of various sized buttons.
None of the reviews said anything about cleaning the block once you’ve stamped with it. Do you clean the block in the same way you clean a stamp? Does it stain like some photopolymer and rubber stamps do with certain inks? Are both sides of the sponge usable? Thanks!
Diana - GREAT questions! I was actually shocked at how well the Magic Stamp cleaned up with my chamois rag and water. No staining at all with pigment inks. Those are the only ones I tried, so I can’t speak to others. And, yes, both sides are useable. And, with a gentle re-heat it shapes back to original form for repeated use.
Great reviews, and what a fun product. I remember having one of these years ago, and it sounds like a fun item to have in our stash for lots of ideas that the reviewers mentioned. Thanks for sharing! Hugs!