Crafter’s Companion Gemini Foilpress
Brought to you by Crafter’s Companion
Highlights


- >Professional-looking foiling results
- >Crisp, clean images
- >Easy to use
- >Heats up quickly
- >Foil a variety of materials
- >Sized to work perfectly with Gemini Jr.
Product Description
Manufacturer Description
Crafter's Companion is a world-wide crafting company based in the North East of England. Whatever your hobby or interest, take a look around the Crafter's Companion site to find ideas and inspiration. The Crafter's Companion goal is to always support customers with a product range that includes not just crafting tools but stamps, dies, colouring mediums and a whole host of items to enhance the crafting journey!
Product Description
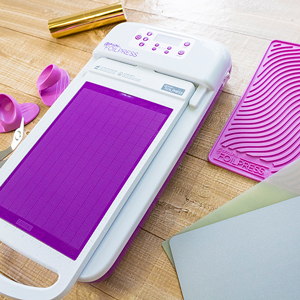
Introducing the latest addition to the Gemini family - the Gemini Foilpress. This innovative hot foiling machine takes paper and mixed media crafting to an exciting new level. The Gemini FOILPRESS delivers professional-looking foiling results using a hot press technique that ensures crisp, clean images every time. Perfect for stationery, invites, party decorations, home décor, gifts, and so much more. The Foilpress works perfectly with a multitude of materials. The size of the Foiling Platform is 7x5”
The FOILPRESS has been designed to work exclusively with the Gemini brand die-cutting and embossing machines and it comes with a Foiling Platform that has been perfectly sized to fit in the Gemini Junior. The FOILPRESS can also be used with the original Gemini machine, but users will need to buy a ‘Top Plate Extender’ to be able to do this. The FOILPRESS is not compatible with the Gemini GO.
The Gemini FOILPRESS is extremely simple to use, and each machine comes with a comprehensive instruction manual. It is the only foiling machine to have a temperature control feature. The temperature you select is determined by the material you wish to foil. In addition to this, the FOILPRESS has an LCD timer which counts down the time in both minutes and seconds. An indicator light on the display shows red or green to indicate when the FOILPRESS is ready to use. There is a ‘Material Matrix’ within the instruction manual which outlines the timings and temperatures for all applications. The FOILPRESS heats up quickly, meaning that you can start foiling almost immediately.
Learn more about Foilpress™ in these videos:
A complete library of Foilpress video tutorials may be found in HERE on the Crafter's Companion channel.
Reviews
-
Foiling All the Things
By Dina KowalI spent the weekend foiling all the things! I'm familiar with heat foiling, so it was fun to see what the Gemini Foilpress system can do. I found the chart in the instruction guide very helpful, with detailed listings and tweaks to time, temperature and shims for a variety of surfaces and thicknesses. I started off with a couple of techniques that don't require heat - the foiling plates can be used without foil to create an impression into cardstock or other surfaces. They can also be inked up for a letterpress effect. (Pro tip: Stazon Pigment ink is my favorite ink for letterpress - of all the inks I've tried, it works the best!).
Foiling with the plates is simple and the results are beautiful. The platform moves from the base to the Gemini Junior with ease and no shifting. Foiling with wafer cutting dies is also simple, using the same sandwich and settings. My fall tree card was done with a detailed cutting die, and the foiled outlines add a classy accent. Beyond the basics of foiling with the plates, I wanted to push into techniques and surfaces I hadn't tried before. My favorite results were foiling on acetate! The impression is crisp and clear. Next I used an embossing folder as a foiling plate, and that opens up so many more possbilities for backgrounds. (Note: it took me a few tries to get the proper thickness. I got best results with the open folder, foil, cardstock, a cardstock shim, and the metal shim. You'll also need to weigh down the folder to keep it flat as it heats.) I did a few experiments on fabric and some vinyl and faux leather samples - my best results were on denim and an upholstery fabric, and other results were mixed. How fun, though, to add special foiled touches to cotton fabrics, vinyl and ribbon!
Heat reactive foil can also be used with adhesives, so I tried my luck with sticky embossing powder. The platform is warm enough to melt the powder, so I stamped an image then added the powder and laid it on the platform to activate. Once the powder had cooled a little it was tacky and took the foil nicely. Any areas that didn't get good coverage could be reheated, and the foil reapplied by pressing it into the lines. Foil your stamps! Also, try foiling on double-sided tape for an eye-catching border. -
Versatile Machines that Delight
By Julee TilmanI had so much fun working with the Gemini Jr. and Gemini FoilPress. Right out of the box the Gemini Jr. was easy to use. I felt like angels were singing when I sent my first sandwich through without having to even push a button! Holding a button down the entire cutting time has been one of my biggest complaints with my machine from another manufacturer, so I’m sold!
The clean, precise cuts even with intricate dies and delicate materials make the Gemini Jr. an impressive machine. Add in the versatility of also being able to pair it with the Gemini FoilPress to hot foil with dies, and you’ve got a mighty combination.
The Gemini FoilPress took a bit more effort on the front end for me to figure out. The cutting sandwiches and materials matrix are a bit intimidating at first and I had less than perfect results. Once I figured out that I was using the wrong sandwich when I was starting out (there’s a difference between foil stamp dies and foil stamp & cut dies), things got much easier. And with the help of YouTube tutorials, and my trusty sand eraser I was foiling my way to my happy place in no time.
I made several cards with these two machines. I really do love the look of the FoilPress dies, but since I typically use my craft budget on stamps rather than dies, I wanted to see what I could do with my current stash of dies. By far my favorite technique was using thin dies to foil onto watercolor paper and then watercoloring or ink blending the image, basically allowing you to turn any detailed die you have into a stamp! I also loved the look of die cutting sentiments and then foiling over them with the machine.
Both the Gemini Jr. and Gemini FoilPress are versatile machines that will bring delight to any craft room. -
Can’t Stop Foiling
By Ilina CrouseThe Gemini Junior and the Gemini Foilpress are amazing tools that I think every crafter should have in their craft room/space. They take die-cutting and hot foiling to the next level! Both machines come with everything you need to start foiling and die cutting right out of the box.
The learning curve is almost non existent and the results are amazing! I love how using the metal shim with the Gemini Jr allows even the most intricate dies to be cut cleanly and love the ease of removing the little pieces between the intricate parts, they just stay on your plates!!!! And it's electric, so you are not cranking up anything.
The Foilpress is a machine when used with the Gemini Jr you can add gorgeous foil to your paper crafting projects and beyond, because there is foil for multi-surfaces, you can do leather, fabric etc. I love that the Foilpress has a timer (in the box there is a guide for the times depending on what material you are using and size of die) so you can just set the times, and it'll beep to let you know it's ready!!! For people like me who like to multitask this is an amazing feature!
Once you learn the basic techniques for foiling (using foiling stamps, foiling stamp and cut dies or just standard dies), and this is very quick, you can move to more experimenting. I love experimenting and got carried away. You can layer foil on top of each other, to get layered look. You can mask and get only portion of your project foiled, you can do selective foiling, where you secure your foiling die with piece of washi on the top to make it open as a flap and put foil only on the part you want to be foiled and so on. Also, the foils come in metallic looks, matte and sparkle, so you can pretty much achieve any look you are going for.
The machines are compatible with any standard dies and any foiling dies that are out on the market which is a big plus.
Once you start you can't stop foiling!!! -
I am a Foiling Die Ninja
By Lydia FiedlerI was fortunate enough to demonstrate the Foil Press and Gemini Junior at Simon Says Create this year, so that's how I learned to use the amazing Foil Press. With a real pro to teach me - Nicole Petersen of Picket Fence Studios - I was a foiling die ninja in no time. If you are new to the foil press, here are my tips. Heat the machine with the plate on it for much longer than you think you need. I like the high setting for four minutes with the die on after the machine has warmed up. Then, put your foil, pretty side down (I foiled some of Nicole's plates doing this wrong, so trust me), and the foil sort of clings to the die so that you can see where the design will be. The grid on the foil press helps you make sure your design is in the right place on your card front and level on your project. The silicone grips are awesome - grab the foil press and run it through your Gemini Junior and you have an amazing combo of letterpress and foil. I found a few tips you might like. I LOVE foiling dies with watercolor paper. I think the soft cotton gives a little boost to the letterpress effect. So on my Thank You card, I used Fabriano Hot Press watercolor paper. If you ever find that outside the design, there are flecks of foil, I use a stencil brush to whisk those away. Clean and perfect. The places where the heat activated foil is bonded won't be affected. In case you haven't used foiling dies, and you have foiled with toner activated foils, just note that this is a different type of foil - it's heat activated, not toner activated. So where you use a laminator or other heated machine to use toner-activated foils, these foils are heat activated, and the heat is coming from the metal dies - giving you both a 3D letterpress + foil look. The foils are not interchangeable.
I do need a minute to talk about the Gemini Junior apart from the Foil Press. This machine is life. I love that you don't have to hold a button down to feed your die cutting sandwich or Foil Press through. It's surprising what a small detail like that can do for your convenience and enjoyment while die cutting or foiling.
The Crafter's Companion foils are gorgeous. My go-to is their gold, but I had so much fun with Disco Ball and the Aurora Foils. Their Foil Press dies are amazing - but you can use any foiling die with their system with beautiful results. I find the Foil Press easy and a space saver in my tiny craft room. -
I am a BIG FAN
By JillDHI had the pleasure to work with both the Crafter’s Companion Gemini Jr and the Crafter’s Companion Foil Press Machine. I found both machines easy to operate and figure out.
Beginning with the Gemini Jr die cutting machine: This machine is extremely easy to use and I plan to use it for all my die cutting needs henceforth. You simply make a die cutting sandwich and run your thin dies through. For this, my sandwich is the following: Clear cutting platform, plastic shim, magnetic shim, die (cut side UP), cardstock, metal shim (optional), and clear cutting platform. The hardest thing for me was to remember to die cut upward away from the magnet. However, if you do cut into the magnet, even a few times, it’s all good! You can still use the magnet. I literally had perfect die cut results EVERY time and the ease of the machine is incredible. A manual die cut machine was always a challenge for me in terms of leverage and space for the handle to swing around freely. With the Gemini Jr. I don’t need leverage or extra space. I am a BIG FAN!
Next Up: Trying out the Foil Press Machine. I have never used a machine like this before, so I did rely on the included manual to help walk me through it. And the manual has all the information you need. Truthfully, I played with the controls of heating and time, but in the end, I had the best results when I just turned on the machine and didn’t mess with the heating temperature. The manual tells you how long you need to heat different elements for. Different elements meaning: Small dies, large foil plates, etc. In the end, I just stuck with 30 seconds for everything and had good results each time. The entire plate is hot when heated, so you don’t have to sweat being in the middle or the side. The Foil Press machine does have more of a learning curve than the Gemini Jr., but once you get the hang of it, you want to try foiling all the different dies you own! (Consider yourself warned. Wink!) I may or may not have been up until the wee hours of the morning with some crafty friends trying ALL THE THINGS! What fun we had!
For my cards, I used both the foil stamp ‘n’ cut dies, the foil stamp dies and other normal die cutting dies. I enjoyed the results of them all for different reasons. The foil stamp ‘n’ cut dies are fun because the whole of what you sent through is foiled, as well as cut (example on my frame card). When it come out the Gemini Jr. you have that ahhhhh moment! The foil stamp dies are awesome—especially the polka dot one I used to create several backgrounds (example on the polka dot Hello card). I have to say, the polka dot plate was my most successful of all the foiling. You can then save the negative foil and run it back through with card stock to basically get the reverse background. It’s quite cool and a great way to make your supplies go further! I then tried lots and lots of different dies I had on hand and ones that friends let us borrow. They all look so fun and shiny in person, but I think that shine is definitely not captured in my photos to the extent it is to see them in person. My basic Foil Press sandwich to run through the Gemini Jr. is the following: Foil Press hot plate, die, foil (shiny side down), cardstock and green plate. This worked the best for me. Sometimes I would add the metal shim on top off all that to get some added push, but I don’t recommend it, as it may give you a little too much push potentially.
The Foil Press platform has a grid on it, so it’s easy to line up dies on your projects and keep them straight, if you then tuck the cardstock into the corner as an alignment tool for yourself too.
Overall, I have to say that I really enjoyed getting to try out the Foil Press system. I think it would be a great deal of fun to try more of the Crafter’s Companion dies and any other company’s compatible dies. I do like that you can use the dies you already own too. I may have a few myself! The Gemini Jr. is definitely my new die cutting machine and I look forward to its ease of use for many projects ahead!
Product Gallery
See a gallery of creations made by our review team using products and materials from Crafter’s Companion.
.png)


Questions and Comments
What do you think? Leave your comments and questions.
Dina I would love to know more about using embossing folders in the foil press. Did you heat them for the same amount of time as the metal plates? Were they affected by the heat? You said you weighed them down was that because they were hanging over, or because they curl? I’m not sure if they are all the same plastic, did some take the heat better than others?
So im guessing, if you dont have a Gemini jr, one would not have much luck with this?
Jean, good question. The Foil Press provides the heat, and the Gemini provides the pressure/press. I’m not sure if the Foil Press is compatible with other die-cut machines. I’ll see what I can find out.
Did you ever find out if the Foil Press is compatible with other die-cut machines?
I’m interested in having the foil press but have a big shot. Thanks!
I have deleted my previous reply. I can’t recommend with certainty any alternate ways to use the Foil Press. I’ve only used it with the Gemini Jr, and had great results. I’m sorry I’m not more help!