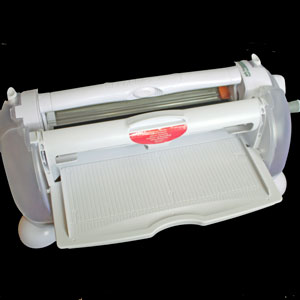
Creatopia™
Brought to you by Xyron, Inc.
Dry emboss, die cut shapes, cut strips, apply adhesive and laminate - all with one machine.
Highlights


- >Apply even, edge to edge adhesive to items up to 12" wide and 1/2" thick.
- >Permanent, repositionable, and fabric adhesive as well as two-sided lamination cartridges available.
- >Cutz™ Starter Kit turns your Creatopia into a paper cutter in just a few steps.
- >Cutz™ blades come in straight, wavy, postage, deckle, scoring and perforated blades.
- >Border Patternz™ Starter Kit lets you dry emboss with your Creatopia.
- >Border Patternz™ come in flower, hearts, dots, scallop and star patterns.
Product Description
Manufacturer's Description
The creative machine for applying even edge-to-edge adhesive to items up to 12" wide and 1/2" thick. It also laminates, embosses paper and other thin items, cuts straight and fancy lines on paper up to 12" wide and die presses shapes on paper up to 6 1/2" wide. It's the perfect all-in-one machine for all your craft, home and school projects. Store coupons will be accepted on all components of the Creatopia.
Product Description
Learn more about the Xyron Creatopia in this quick video:
Creatopia Refillz
Creatopia Cutz component:
Creatopia Border Patternz
Reviews
-
Scrapper’s Dream Machine
By Rose Ann ReynoldsReviewing the Creatopia was most exciting as there were so many fun components to try out! I was surprised at all of the different types of Refillz adhesive cartridges, Cutz Cartridges, and Border embossing Patternz there are to choose from. I also understand there are full 12" embossing Patternz, as well as a die cutting and embossing component called Shapez that attaches to the Creatopia and will accept papers up to 6.5" wide.
The Creatopia accepts papers up to 12" wide and 1/2" thick, so this is an indication that you need a larger space to place it. The components also take quite a bit of storage space, so you'll want to keep that in mind as well. The Creatopia is large, but it is light-weight and easy to move around. The crank handle and tray fold up for ease of storing and handling. When I changed my Refillz cartridges and various components, I found it quite easy to do. If you find you're having any difficulties, watching the videos and referring to the enclosed user guides will be very helpful!
Refillz
I am familiar with how this adhesive works as I own Models 150 and 510. The bonus with the Creatopia is having 12", edge-to-edge coverage. There are re-positionable, permanent, fabric, and two-sided laminating Refillz available. It has never been easier to cover chipboard to create my own books. No more messy glues (woo hoo)! I used the fabric adhesive to cover my chipboard journal with denim, and worked like a dream! I tried the laminating Refillz to cover some pretty scrapbook paper for a custom place mat, and there are so many other ideas I have in mind for this cartridge (covering maps, recipe cards, documents, certificates, etc.).
Border Patternz
I am not much of a scrapper, but I can just visualize the beautiful pages created with these fabulous embossing Border Patternz. Since I am mostly a cardmaker, I tried the star borders for a space-themed card, and it worked out nicely!. Changing out the Border Patternz takes a little getting used to as you need to be sure everything is lined up correctly. Once you try it a couple of times, it's easy to get the hang of.
Cutz
The feature I thought was most unique with the Cutz was the fact that you are able to install several different cartridges at the same time to make many cuts, all with one pass through the Creatopia. I love the different options of cuts, and there is even a scoring cartridge! To help keep the paper straight while cutting smaller pieces of card stock, I used two guide wheels. I positioned one on the right side by the crank handle, and the other right beside the Cutz cartridge. -
Definitely Versatile
By Beate JohnsWhen I received the items for this review my jaw dropped to the floor. It's a lot of product and the Creatopia machine is BIG! The kids loved it because the boxes it came in were filled with styrofoam peanuts. A mother's nightmare and a kids delight!
The machine, the Cutz and Border Patternz starter kit and extra blades and refills are bulky and you will need to find a special spot in your home to store them in and the machine is oh-so-cool.
Creatopia comes with a permanent adhesive cartridge. Like the smaller Xyron, the principal of the machine is the same. Slide your cardstock in, crank the handle and adhesive will be added to the part facing down. I like using the adhesive when adding chipboard letters or small embellishments and cutouts to my projects or for several techniques . The great thing about this new Xyron is that you can send items up to 1/2" thick through. Perfect for chipboard and coasters. I also love that you can add adhesive to items up to 12". It really inspires me to get back into scrapbooking.
Next, I wanted to try the laminating cartridge. Changing cartridges is pretty easy and takes maybe 30 seconds. I laminated a notebook cover. That will be great to keep the wear and tear of the notebook. My head is spinning from the possibilities for this cartridge. Luggage tags, name tags, report covers, kids artwork . . . The fabric adhesive cartridge is the most fun! I bought some cute patterned fabric as well as a bit of sturdy canvas like muslin. The patterned fabric turns into cute backgrounds and the muslin is wonderful to stamp on. Using the Creatopia to add adhesive backing is so easy and fun. You don't need to get your iron out and it's mess-free.
Changing the machine from adhesive to cutting isn't hard either. I like the different decorative blades Xyron offers, but I doubt I will use it for scoring or regular cutting. It takes too long to reposition the scoring blade for every score line and cranking the paper through. Now, if you don't have another scoring and cutting tool, this might great product to start out with and have it all-in-one. If you already have a 12" size cutter and scoring tool, then I don't think Creatopia will replace it. This add-on is great though, for adding several cuts and score lines at once. Mass producing cards that need several cuts/score lines will be easier with this.
Changing to the Border Patternz is easy as well. You can use it, as intended, to dry emboss a strip on the edge of your cardstock. Border Patternz makes it easy to add dry embossed patterns just to the edge of your cardstock. I was excited that I had the chance to play with the Creatopia and am looking forward to using it more. -
Creatopia - Cranking out Creativity
By Mary BrownNow…I’m sure if you are like me you own at least one Xyron machine. I started with the 500, never did figure out how to change the adhesive cartridge, went to the 510 and have mostly been a happy little stampcamper since then. The only problem was I couldn’t do large pieces. I knew that Xyron had larger ones, but my little 510 did the trick most of the time. GLAD I WAITED! The new Creatopia is one machine packed with many creative options.
Adhesives
First let’s talk adhesive. When I think Xyron, I think adhesive. The machine really is easy to assemble when you first get it. You have the base unit and then there are two different parts that slide into the machine and lock into place. One is the roller unit (Refillz Component) in the back and the other the adhesive/laminating Refillz cartridge in the front. Xyron has made it SOOO easy to get the adhesive cartridge in and the end fed through the roller unit. It’s as easy as 1, 2, 3 (which corresponds to the settings on the roller unit!).
I was beside myself with joy to see the fabric adhesive cartridge. Yes, you read that righ. FABRIC ADHESIVE REFILLZ CARTRIDGE! OMG, if you like to do ANYTHING with adding fabric you MUST have this (you know…Santa will be coming soon. Hint, hint!). You know what I LOVE about the Fabric adhesive? NO IRONING AND NO MESS! I decided I wanted to try this with my Build-a-Bear dies. I ran felt and fabric through my Xryon to get the adhesive on the back (I did this all at once laying the felt and fabric side-by-side). No problems! Took the piece and die cut my shapes out. Peeled off the backing (yep, that’s all there is to it) and laid the pieces on my fabric. Just be careful that you have your pieces where you want them…THIS STUFF STICKS! I have to tell you. I am SOOOOO excited about this product! It is absolutely WONDERFUL! If you have a fabric stash and want to an easy way to use it, this is for you!
Cutting, Scoring, and Perforating
The Creatopia is more than just for adding adhesives to your projects, but to help you create projects. One of the other units is for cutting, scoring and creating decorative cuts in your paper. Xyron has developed a wide variety of decorative blades that come two coordinating blades to a pack. The main unit comes with a cutting blade and a paper stabilizing cartridge. The product comes with great instructions on how to use it. You easily reconfigure your machine by removing the adhesive cartridge and the roller unit and replacing it with the cutting unit. Once that is in, just snap the cutting cartridges in place, add the stabilizing bar on top of your paper and run through the machine.
I decided to set mine up to do bookmark cards with the bookmark being perforated so it could be removed from the card. I set the perforating blade, scoring blade and cutting blade (I was using 12 x 12 paper) in the unit. Since you have a ruler right there, it makes it easy to get the cartridge position EXACTLY where you want it! I put the piece of paper down, bar on top and ran through the machine. It perforated, scored and cut all at the same time! Now, just how cool is that?
When setting up your machine you will want to use TWO of the guide cartridges. If not, you might have problems with it going crooked. As your paper is going through the machine, you have to be careful to keep it right along the edge of the feeding tray to keep it straight. It seems that the guide cartridges are the key to keeping your paper going through straight and not veering off. When I did my bookmark card I had used three cartridges just for the cutting/scoring/perforating but still the guide cartridges made a difference when I added those in.
Dry Embossing
Now we are not finished yet with what this new machine can do. You can also DRY EMBOSS edges. I’m not talking just the edge of a card, I’m talking the full length of a paper, even 12" x12"! How fun is tha?! Again there is a unit that snaps into place in the base unit. You lay your cardstock down with the bar on top and roll through the embossing rollers. There is a roller on top and bottom to give you a good embossed edge. This is designed to do the edge of the paper and it gives a nice border to your paper. Xyron recommends using at least a 65 lb. paper to get the best image and it does work best with the thick paper.
Xyron…they aren’t just about adhesive any more! Take a look at all the options available with the machine - cutting, embossing and adhering! WOW! -
One Machine to do it ALL!
By Angel WildeI was first introduced to Xyron adhesive several years ago when a friend showed me her little orange "X" (personal sticker maker). I was amazed and impressed with this innovative product. With the addition of the Xyron Creatopia to my craft room, I continue to be amazed and impressed today.
The Creatopia is large but very lightweight. It is not difficult to use. Changing from one component to another takes just seconds. The machine uses no batteries or electricity. The handle turns easily, no muscle required and it makes virtually no sound.
The first thing I tried was the adhesive cartridge. It really was easy to load and with just a quick turn of the handle I had an evenly applied layer of tacky permanent adhesive. My favorite type of projects are gifts and alterables so I absolutely love that I can use the machine for up to 1/2" thick projects AND 12" wide! The repostionable and fabric cartridges will also come in handy! The laminating cartridge was just as simple to use. And after running my project through I easily cut it by pressing and sliding the cut button. With 40 feet of laminate this will last me through several crafting seasons.
The Border Patternz were a lot of fun to work with. The top and bottom cartridges needed to be lined up and inserted correctly and the company made it simple by using symbols on the cartridges. All you do is line those up. I used the stars and scalloped border and got some fun embossed borders. My favorite part is I can now have an embossed border that is the entire length of my paper or scrapbook page, not just 5 1/2" long!
Because I am always on the lookout for a better paper cutter, it was the cutting aspect of the Creatopia system that intrigued me the most. Besides the straight blade there are several decorative blades to choose from as well as a perforating and a scoring cartridge for the Cutz component. I was able to cut through decorative paper, cardstock and even chipboard with ease. And being able to use more than one blade at a time on a project opens up so many possibilities that my head swims thinking about it!
I am eagerly looking forward to trying out the rest of the Creatopia accessories. I love the concept of having one machine that can do it all! Kudos, Xyron! -
Creative Options Using the Creatopia
By Ashley NewellFeatures
The Creatopia offers a wide variety of features for paper crafters. Adhering cardstock, chipboard, and even fabric could not get any better. The fabric adhesive works great because it adheres to paper crafting projects well. There is also an opportunity to smooth out the fabric to prevent any wrinkles from appearing in projects. To make sure you get complete adhesive coverage, rub the fabric onto the adhesive backing.
Cutting is another great feature. You can do straight or decorative cuts and have the option to score. Although the Creatopia allows you to use up to a 12" x 12" page, smaller pieces of cardstock seem to not stay in its proper place at the end of the cut, which causes imprecise cuts. Embossing on the Creatopia is another neat feature; however, you can only emboss the borders of the paper. Embossing an entire piece of cardstock is not an option using this feature. Additionally, the embossed image is not raised as high on all borders as compared to other embossing templates on the market.
Quality/Ease of Use
The Creatopia is made out of an acrylic or plastic material and can easily crack if not handled with care. The machine has many components that require you to change out to use the various features. Changing some of the components may require a bit of strength. However, the cranking mechanism is very easy. Xyron's videos help new users learn how to use the Creatopia with ease.
Overall
The best feature of Creatopia is the fabric adhesive because crafters can use a non-liquid adhesive and still receive permanent placement on their projects. It is a very large and bulky machine. It requires a large space in your work area. Ample storage is also needed to store all of the components and accessories needed to use the machine to its fullest potential. -
Fantastic Multi-purpose Machine!
By Jeni AllenI was very excited to open my Xyron Creatopia boxes! I have had another Xyron machine in the past and was really happy to see that Xyron has made significant improvements with this new Creatopia. I love that there are cartridges that do more than just adding adhesive or laminate. With the ability to cut and emboss in addition to adding adhesive, this Creatopia is a fantastic new tool!
I am accustomed to the Permanent and Repositionable Adhesives from Xyron, and these products continue to be wonderful with the Creatopia. They are perfect for adding adhesive from edge to edge of your paper. I really enjoyed the ability to add a lot of adhesive with a little effort. These adhesives are great, no paper lifting up on the edges or corners; great for products that require a good amount of adhesive. I really enjoy using the Xyron permant adhesive to cover items like notebooks. It boosts the quality of your altered item, by ensuring that your paper isn't going anywhere!
I have used the 2 sided laminate from Xyron previously and was curious to see if this laminate was the same. I have found that this form of laminating isn't my favorite. I think this laminate is good for some things, but it doesn't take care of all my laminating needs. I had a hard time with my laminate coming out smooth over my projects. I have found that keeping the product on the roller straight is very important. In my opinion, this laminate is best over a single sheet of paper. The addition of layers to the paper you are laminating keeps the product from sealing.
I am so excited that Xyron has added fabric adhesive to their line of adhesives for the Creatopia. I had such a great time with the fabric adhesive! The adhesive goes onto fabric just like to goes onto paper...simply delicious. The adhesive is very strong and keeps the fabric on your projects very well. I've really enjoyed the new texture that fabric has been adding to my paper projects. There are a multitude of fantastic fabric choices out there that really compliment any card, notebook, scrapbook page; the possibilities are endless. The Xyron Creatopia fabric adhesive is a no-mess way to branch out and bring the wonderful world of fabric into your papercrafting world! I'm so excited for what this product will add to my creative process.
The Cutz blades allow you to cut paper with a variety of different blades. You can scallop, perforate and score, just to name a few of the different Cutz blades. I love the detail that using a decorative blade to cut my paper added to my projects. I'm not a huge fan of decorative scissors because I can't cut straight with them to save my life. The Creatopia Cutz blades allow me to bring that decorative edge to my projects with much less effort than scissors. Using a decorative blade to simply cut your paper for a card brings in a great detail along the edges of you card. I also found the Cutz blades great for adding detail to the aspects of my card - patterned papers, main focal images, or embellishments. The Cutz blades cut very easily when the blades are properly installed in the machine. I love the ease of getting the perfect cut. Using a blade guide on either side of the desired Cutz blade ensures a prefect cut each time. Getting a scalloped, wavy, or deckle edge on your card has never been easier.
The Border Patternz: fun, fun, fun. I had a really great time with the Border Patternez. I love that this specific function of the Creatopia allows you to emboss borders anywhere on your projects. The Patternz embossing cartridges can slide anywhere, allowing you to emboss a border anywhere on your paper. You have up to 12", so these border Patternz are great for cardmaking, scrapbooking, or anything else. I found the Border Patternz very simple to use, and found that they add a fun detail to my projects. I also really appreciate that this is something that my daughter can do with me with great ease. Once the different Patternz are installed properly, you've got endless possibilities.
I am happy to have this Xyron Creatopia to add to my creative tools. I think it is a great multi-purpose tool that will make bring items out of my mind and into a real product with greater ease. Xyron did a great job with the creation of the Creatopia!
Product Gallery
See a gallery of creations made by our review team using products and materials from Xyron, Inc..


Questions and Comments
What do you think? Leave your comments and questions.
How heavy is the machine and what does it cost. How much are the refills and where do you buy the product and the refills?
Mary Ann, check the right hand side of this product review for prices and where to buy the machine.
It is a bit on the heavy side. I guess around 12 lbs.
Hugs and smiles
You got me curious, Mary Ann…so I weighed it on my electronic postal scale with the permanent adhesive component installed. It was just over 8 lbs.
Thanks Rose Ann….boy was I guessing wrong!
oh wow…this sounds so cool…! wonder how much my MIL is sending for my bday=)
LOL
WOW - this looks amazing. The way everyone is squealing over the fabric cartridge makes me think maybe I can still work with fabric without sewing!! This is so cool. Can’t wait to see what everyone did.
can you use other brands of embossing plates?
Cathy, sorry, you can only emboss with their embossing wheels. You can’t use plates from other die cut machines.
Is this like other Xyron machines in that you use up the full width of the adhesive even if you only run small pieces through it?
dry embossing:
When xyron comes out with the shapez component for this tool, you WILL be able to emboss with other manufacturer embossing folders and use third party die cuts. I really love my Xyron creatopia. I have used it to adhere 12 X 12 paper to chipboard to make my own chipboard letters.
When, oh, when is the Shapez component coming? I bought this machine for two reasons: 1) Because I love having fun, new gadgets and this fits this need! and 2) to be able to use any manufacture die cuts and embossing folders! I have patiently waited (not actually patient but I’ve been waiting) and I am about to burst with anticipation for the Shapez arrival!
I have a Creatopia but cannot get the adhesive refill to work - any help would be appreciated.
Thanks so much for all the information, reviews and videos. I have a smaller xyron but the fabric adhesive cartridge is just what i am looking for!
Are their different models of the Creatopia, some seem to have pink, green and blue patches on them, was wondering about that!
I do love the ease of using the machine… however I’ve been a little disappointed with the lamination part of it. Think I need to use it more to get the “gist” of it.
It’s great to be able to “xyron” so much paper at once.
Have just taken delivery of my Creatopia and all I can say is “WOW”!! I love how it can do so much. I’ve just ordered the Shapez component to go with it, as I was thinking of upgrading my old red sizzix to a cuttlebug or Big Shot, but now I can just do it all with this machine, and the platform is bigger than other die cutting machines, so no more worries about wether cutting dies will work. Can’t wait to get some more of the embossing rollers too…..and some more blades…. I truly am like a kid with a new toy!
I have most of the other Xyron machines, starting with the 150 X for tiny things, then the sticker maker, then the 510, then the 9” Creative Station and now the Creatopia. I Also have the Design Runner. I love Xyron stuff, they are the most used of all the machines in my craft room!
Do you know if you can use the fabric adhesive on paper? Will there be any difficulties? ie. the adhesive is stronger so more challenging to place once touched to paper. Joann.com stopped selling the regular permanent adhesive and they had the best price because of sales. So I wonder if they stopped because you can use fabric adhesive or…?
Hello, I have just got the Xyron Cretopia with the Shapez. I’m just using one Shapez die to practice on, but it’s not cutting all the way through. Help, Have I got the plates in the right order?? I was sent 1 x Black rubber mat, 1 thick white glass sheet, 1 x thin clear glass sheet and 2 x pink glass sheets, then I have the ‘Die’ and paper or card??? Thank you for any help…..
I am interested in the Creatopia machine. Does it have suction cups to hold it in place as you turn the crank or what keeps it steady? Also, I am interested in die-cutting fabric and wondered if the Creatopia will do this?
Thanks. Interesting threads, though I have not done stamping for a long time. I am a photographer, quilter, etc. and can see many uses for this machine.
Wow, some of these questions have never been answered in years!
Karen, if you look at the Shapez User Guide the sandwich(order or configuation of layers) is:
(From top to bottom)
pink platez, paper, die, pink platez, clear platez, rubber platez, white platez
However, you need to layer according to the thickness of your die and the differing thicknesses depending on what die you are using.
On the last page of the guide it lists different “sandwich” layers coinciding with 3 types of thicknesses of die (Thin, Medium, Thick). In each thickness category it lists the types of dies that fall into that category. ie: Thin Die- Spelbinders Shapeabilities, Spellbinders Frameabilities, ProvocCraft cuttl kids, Quickutz Cookie Cutter, Quickutz Singlekutz, etc
Medium Die/Embossing Folders- ProvoCraft cuttlebug, Sizzix Clearlits, Sizzix Sizzlits, Sizzix Embosslits, etc
Thick Die- Sizzix Bigz, AccuQuilt Go, Sizzix Original, etc
You would have to follow the picture that shows the different “sandwiches” that coincide with that thickness of die.
So I’m not sure what kind of die you are trying to use but it makes a difference how you layer. Sometimes, though, you may need to use an additional piece of paper as a shim so maybe you just need to try that.
By the way, in case anyone is interested I did buy the fabric adhesive refill instead of the permanent adhesive refill and it worked fine with paper. No difference. So if you find it cheaper, get it.
gramajuju-The Creatopia does not have suction cups but the feet are wide and since there is a place to hold your hand it is quite steady. I do believe it does cut fabric, though I have not tried it. But they sell the fabric adhesive refill for it AND one of the dies they list that can be used in this machine is the AccuQuilt Go so I assume so. The only thing I worried about is durability since it is plastic so I bought a Sizzix Big Shot Pro. But that being said, I have often brought it to crops and it held up and have also enjoyed the benefit of adhering large items or many small items for ease and time saving while producing projects of all kinds. Lifesaver!
Lorraine Darragh, I have had problems occasionally with Xyron adhesive refills in differing sizes (not the x though (that’s the 1.5 inch sticker maker that’s shaped like an X), and sometimes there’s not a lot you can do when one part of the sheet breaks in the middle of the roll but if you are just trying to put it in, just make sure you are lining up and feeding the part of the refill that comes out as a sheet(like a tongue) on the end into the rollers first before placing the cartridge all the way in the machine.
Gee, hope this was helpful to anyone. Let me know if you need to know more explaining and I can try.