There are two quotes I really like for the changing seasons:
"Winter is an etching,
spring a watercolor,
summer an oil painting
and autumn a mosaic of them all."
--Stanley Horowitz
"Nature gives to every time and season
some beauties of its own."
--Charles Dickens
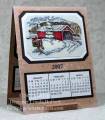
A nifty little four-sided calendar came to us in a Christmas card last year. When I really examined it closely, I realized it was simply a half sheet of cardstock folded in half and supported with a cardstock insert base. So, I decided to make a new one for 2007. It was so much fun and not that difficult to make, so I just had to share it here. You only have to come up with four images and put three calendar months on each "page," and what a perfect project to finally use my Changing Seasons stamp set!
For the calendars I used Red Castle's Freeware Calendar program: http://www.red-castle.com/software/fw/printcal.htm Here are the options I used: Month size - Width 1.187, Height 1.312, Year on Page, Border - Box (Thin), no print year (I used a custom rub-on for the year - see below). I printed the calendar onto white cardstock and then cut each row of months apart.
After I watercolored each of the images and did the cracked glass technique, I trimmed them to 3 1/4 x 2 1/4 and layered onto white and black cardstock, using the tag corner punch on each layer. The calendar sections are 3 1/2 x 1 1/4, layered onto black cardstock .
The base piece for this calendar is a half sheet of cardstock measuring 4 1/4 x 11, scored at 5 1/2 inches. I cut a two inch slit in the middle at each end, 3/8 inch from the bottom, and then used different background stamps and wheels on each of the four pages to coordinate with the seasonal image, masking off the other side with sticky notes for protection. Just remember that Winter and Spring are on one side, and Summer and Autumn are on the other. :o)
The year "2007" on each page was done using a custom rub-on transfer, created by printing the year onto acetate on my inkjet printer in mirror image (make sure it's on the slick side), allowed to dry for 15 minutes and then flipped over and transferred onto the paper by rubbing the back with a popsicle stick. Then I adhered the images and calendars.
For the bottom insert, cut a piece of matching cardstock 4 1/4 x 3 and then cut a notch out of each corner that measures 1 1/4 x 3/8. The resulting central tabs are slightly shorter than two inches wide, which fit nicely into those slits you created (see photo). That's it! See individual uploads for the other seasons.
Date: Tuesday, November 14, 2006 GMT Views: 2685
Favorited:145
Registered: January 18, 2005 Location: Yup, that's me and WILLIE NELSON!!! (insert heart here!) :) Posts: 11437
Wed, Nov 15, 2006 @ 7:43 AM
Honestly Linda...I hope I can stamp like you when I grow up...and color and....WOW!! These are all phenomenal!!!!!! Your coloring is just out of this world...wow!!!!!
------------------------------ My Blog! - Embellished
Registered: October 3, 2004 Location: Texas!!! Posts: 29108
Wed, Nov 15, 2006 @ 11:46 AM
What a wonderful gift idea!!!!! Thanks for the directions. I make a calendar for my mom every year and she would love this. Gotta see if I can hunt down those images too. They are perfect. TFS!