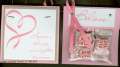
I uploaded these earlier in a scanned format and they really didn't show the details, so I'm trying again in hopes that you can better see the shrink plastic charm hanging in the "buckle window" as well as the depth on the acetate window. It is so hard to get a good visual to post. I'll figure it out someday
Date: Monday, September 20, 2004 GMT Views: 5681
Favorited:81
Registered: April 5, 2003 Location: Whidbey Island, WA Posts: 22041
Tue, Sep 21, 2004 @ 9:49 AM
Standing "O"!!!!!!!! Just gorgeous, Ellen! :up:
------------------------------ Julie Ebersole (JulieHRR once upon a time . . . )julieebersole.com"So shines a good deed in a weary world." -Willy Wonka
Registered: January 13, 2004 Location: Issaquah, WA Posts: 2137
Tue, Sep 21, 2004 @ 10:09 AM
This is a buckle card - if you do a search here on SCS you will find several pages with directions. In my mind I really simplified these. Basically take a 5 1/2"x 11"piece of cardstock. Make your first fold at 4 1/4" and your second at 8 1/2"- the smaller "flap" should equal the remaing 2 1/2". Fold this little flap over the front of your card and make a little indent in your card where you want the top cut to be. Figure out the size of the object you want to showcase in this "window" and then cut your opening slightly larger than the image you want to showcase. You will only cut on three sides - when looking at your work it is the top, right and bottom - I use an Xacto knife and a clear sewing ruler that has guidelines on it. This made it really easy for me to cut out the holes. After your slot is cut you can then insert the flap into this to keep the card closed. I mount my image after closing the card up so that it is in the correct place. On this card I choose to hang the shrink plastic charm in front of the little "door cutout". Hope this helps!
Registered: April 8, 2004 Location: Austin, TX Posts: 4857
Tue, Sep 21, 2004 @ 1:45 PM
what is the pink ink you used on the shrink plastic? All I can guess is colorbox or craft, but I've heard these smear on polyshrink??
------------------------------ Melanie
Illustrator and Designer for Gina K Designs/StampTV
Author of "Fabulous Stamped frames" and A Year of Flowers", published by Annie's
Please visit my blog "Hands, Head, and Heart" at: http://melaniemuenchinger.blogspot.com/
Check out my Youtube channel for stamping and cardmaking videos: https://www.youtube.com/user/MelanieMuenchinger/videos
Registered: January 13, 2004 Location: Issaquah, WA Posts: 2137
Tue, Sep 21, 2004 @ 2:19 PM
melmel, I only had a Pretty in Pink Craft Ink Refill - so I used a cosmetic sponge and just dabbed it on to the stamp, stamped my image and then shortly thereafter I heat set it - it worked fine. I have also made charms with Classic Ink - this bleeds out slightly - so if that "look" will work for you it is kind of fun and then we have red Staz-on. Oddly enough the Petal Points just didn't seem to work - oh well - this worked just great.