Registered: March 18, 2004 Location: New Hampshire Posts: 7021
Wed, May 31, 2006 @ 1:58 PM
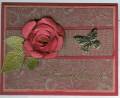
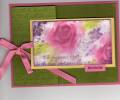
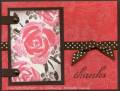
Here are the directions for the rose: I used four layers for each rose. I stamped two large and two of the medium and cut them out. I cut one of the medium images smaller than the other, cutting it so that part of it was free from the rest. (It looks sort of like a pinwheel.)That makes it look more realistic when you shape them. On this rose, I rubbed the edges with the Burgundy ink pad. before I assembled it. I hold each layer of the rose image in my left hand and, with my right thumb and forefinger, I bend and push the edges up against my left thumb, then I assemble the four layers of the rose (use any adhesive you like,but I find that mini glue dots work well), and glue some small beads in the center using CE. It's really quite a quick process...the rose is done in minutes. If you have any questions, PM me. Have fun!
The leaves are Lovely Leaves stamped with Versa
Mark and embossed.
------------------------------ "Life is much too important to be taken seriously." Oscar Wilde Proud to be a member of Mo's Digital Pencil Challenge DT! My BlogMy Gallery