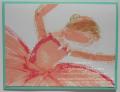
After a few practices with my idea to use the Work of Art set to "paint" a ballerina, I did this free-style. That is, I only used my clear-mount stamps to position where I stamped. I started with the bodice (the squarish block image), then the skirt, then the arms, neck and head. I am really happy with the result!
Date: Monday, July 28, 2014 GMT Views: 4719
Favorited:48
Is there any chance you would do a Video tutorial on this? It is sooo very beautiful--and I just keep looking at it. Here - on Pinterest--.. Its so beautiful.
Registered: July 4, 2008 Location: Snohomish, WA Posts: 92
Mon, Feb 22, 2016 @ 9:48 AM
whitetigers: I just commented on your wonderful case of my ballerina. Thanks again for the compliment! As I said in my other comment, duplicating the head was so tricky it has been the main stumbling block to my being able to do a good tutorial - when I have time I continue to analyze how I managed it and here are a few tips for the head and arms: The arms and most of the head/hair was marker-to-stamp inking just a part of the stamp and also turning it different ways and overstamping. I used the sort of oval shaped stamp - see my "Tulip Trio" which used only that stamp for the flower bud. Using the darker part of the tulip as a reference for orientation, I inked the left side of the stamp first with Crisp Cantalope to stamp an arm section, then with Baked Brown Sugar inked the same side but less of it, mostly the "rough" part that stamps the dotted lines and overstamped the arm section (but not trying to match up the images exactly). I did the same for the other arm section but rotated the stamp. The chest I think is the same stamp but just a part inside the dotted/rough area, and stamped off. The neck is the other side of that stamp that you see in the right side (lighter) of the tulip. The head is the whole stamp, first stamped with the left side of tulip orientation DOWN, then again rotating the stamp so that side is UP and angled so the overlapping ends on the left side sort of would be the point of a slight "V" shape - then I did one last stamp off to fill in the crown but I have not yet figured out the exact orientation of the stamp. Then, the hair was just alot of overstamping with that rough edge of the stamp inked with a marker and turning the stamp different directions. I hope that helps you (and everyone else who wants to try this) out a little bit! I will keep working on a tutorial as time allows...my apologies I have not been able to finish it yet.
------------------------------ Suzanne Johnson Stampin' Up! Demonstrator [email protected]